TrackIt@NUS - Developer Guide
TrackIt@NUS - Developer Guide

By: Team W13-4 Since: Aug 2020 License: MIT
Table of Contents
- Introduction
- Setting up
-
Design
- 3.1. Architecture
- 3.2. UI Component
- 3.2.1. Upcoming Tab
- 3.2.2. Module Tab
- 3.3. Logic Component
- 3.4. Model Component
- 3.5. Storage Component
- 3.6. Common Classes
- 3.7. Code Design Considerations
- 3.8. Feature Design Considerations
-
Implementation
- 4.1. Module Manager
- 4.1.1 Current Implementation
- 4.2. Lesson Manager
- 4.2.1 Rationale
- 4.2.2 Current Implementation
- 4.3. Task Manager
- 4.3.1 Rationale
- 4.3.2 Current Implementation
- 4.3.3 Design Considerations
- 4.4. Contact Manager
- 4.4.1 Rationale
- 4.4.2 Current Implementation
- 4.4.3 Design Considerations
- 4.5. Logging
- 4.5.1 Logging Levels
- 4.6. Configuration
- 4.1. Module Manager
- Documentation
- Testing
-
Dev Ops
Appendix A: Product Scope
Appendix B: User Stories
Appendix C: Use Cases
Appendix D: Non-Functional Requirements
Appendix E: Glossary
Appendix F: Instructions for Manual Testing
Appendix G: Effort
——————————————————————————————————————–
1. Introduction
(Contributed by Simon)
TrackIt@NUS is a desktop application for managing modules, lessons, tasks, and contacts, tailored to the needs of NUS students. It focuses on the Command Line Interface (CLI) while providing users with a simple and clean Graphical User Interface (GUI). The main iteraction with TrackIt@NUS will be done via commands.
TrackIt@NUS is an all-in-one solution for busy NUS students. The information that can be managed by TrackIt@NUS includes:
- Modules
- Lessons (for each module)
- Tasks
- Contacts
By combining these 4 core functions into a single app, we are able to deliver a unique user experience tailored to university students. In addition to the standard CRUD operations, students using TrackIt@NUS will be able to:
- View all upcoming tasks
- View all module-specific tasks
- View all upcoming lessons
- View all module-specific lessons
- View all contacts
- View all module-specific contacts (i.e. Professors, TAs, friends in the same module)
Any help on the development of TrackIt@NUS would be greatly appreciated, and there are several ways to do so:
- Contribute to the codebase of TrackIt@NUS by expanding the current set of features
- Write new test cases to improve coverage
- Propose and implement improvements for our existing features
The purpose of this Developer Guide is to help you understand the design and implementation of TrackIt@NUS so that you can get started on your contributions to the app.
2. Setting up, getting started
(Contributed by Simon)
Refer to the guide here.
3. Design
In this section, you will learn about the general design and structure TrackIt@NUS. Subsequently, this section will also describe and explain how each component in TrackIt@NUS works individually. TrackIt@NUS is coded using the Object Oriented Programming paradigm and it follows the Facade Pattern and Command Pattern in software design.
3.1 Architecture
(Contributed by Long)

The Architecture Diagram given above explains the high-level design of the App. Given below is a quick overview of each component.
.puml files used to create diagrams in this document can be found in the diagrams folder. Refer to the PlantUML Tutorial at se
-edu/guides to learn how to create and edit diagrams.
Main has two classes called Main and MainApp. It is responsible for,
- At app launch: Initializes the components in the correct sequence, and connects them up with each other.
- At shut down: Shuts down the components and invokes cleanup methods where necessary.
Commons represents a collection of classes used by multiple other components.
The rest of the App consists of four components.
-
UI: The UI of the App. -
Logic: The command executor & the logic interface providing APIs for the UI to retrieve necessary data. -
Model: Holds the data of the App in memory. -
Storage: Reads data from, and writes data to, the hard disk.
Each of the four components,
- defines its API in an
interfacewith the same name as the Component. - exposes its functionality using a concrete
{COMPONENT_NAME}Managerclass (which implements the corresponding APIinterfacementioned in the previous point.
For example, the Logic component (see the class diagram given below) defines its API in the Logic.java interface and exposes its functionality using the LogicManager.java class which implements the Logic interface.

How the architecture components interact with each other
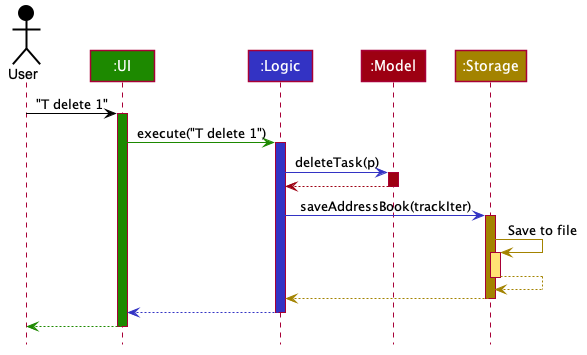
The Sequence Diagram below shows how the components interact with each other for the scenario where the user issues
the command T delete 1.
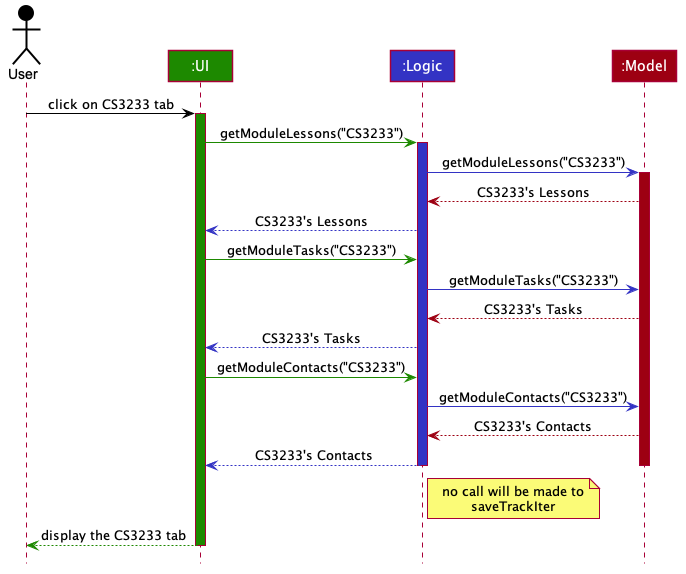
Another Sequence Diagram below shows how the components interact with each other for the scenario where the user clicks on a module tab.
The sections below give more details of each component.
3.2 UI Component
(Contributed by Wei Hong)
The Class Diagram below shows how the UI components and sections interact with one another.
 Figure - Structure of the
 Ui component
The UI consists of a MainWindow that is made up of parts such as SidePanel, StatusBarFooter, CommandBox
as shown in the Class Diagram above. All these, including the MainWindow, inherit from the abstract UiPart class. The UI also consist of 4 main
components:
- The
UpcomingTab - The various
ModuleTab - The
ContactTab - The
HelpTab
Each of these components may also consist of smaller parts known as cards. A card is a UI component that contains information that is shown to the user. e.g. A TaskCard will contain information about a particular task. More details can be found in the respective sub-sections.
The UI component uses JavaFx UI framework. The layout of these UI parts are defined in matching .fxml files that are in the src/main/resources/view folder. For example, the layout of the MainWindow is specified in MainWindow.fxml.
Each of these tabs consists of one or more List Panels and its respective Card. In each List Panel, the Graphics component of each of the List Cells is defined by the respective Card.
The UI component:
- Executes user commands using the
Logiccomponent. - Listens for changes to
Modeldata so that the UI can be updathed wit the modified data.
3.2.1. Upcoming Tab
(Contributed by Tiffany)
The Class Diagram below shows how the components in the Upcoming Tab interact with each other.
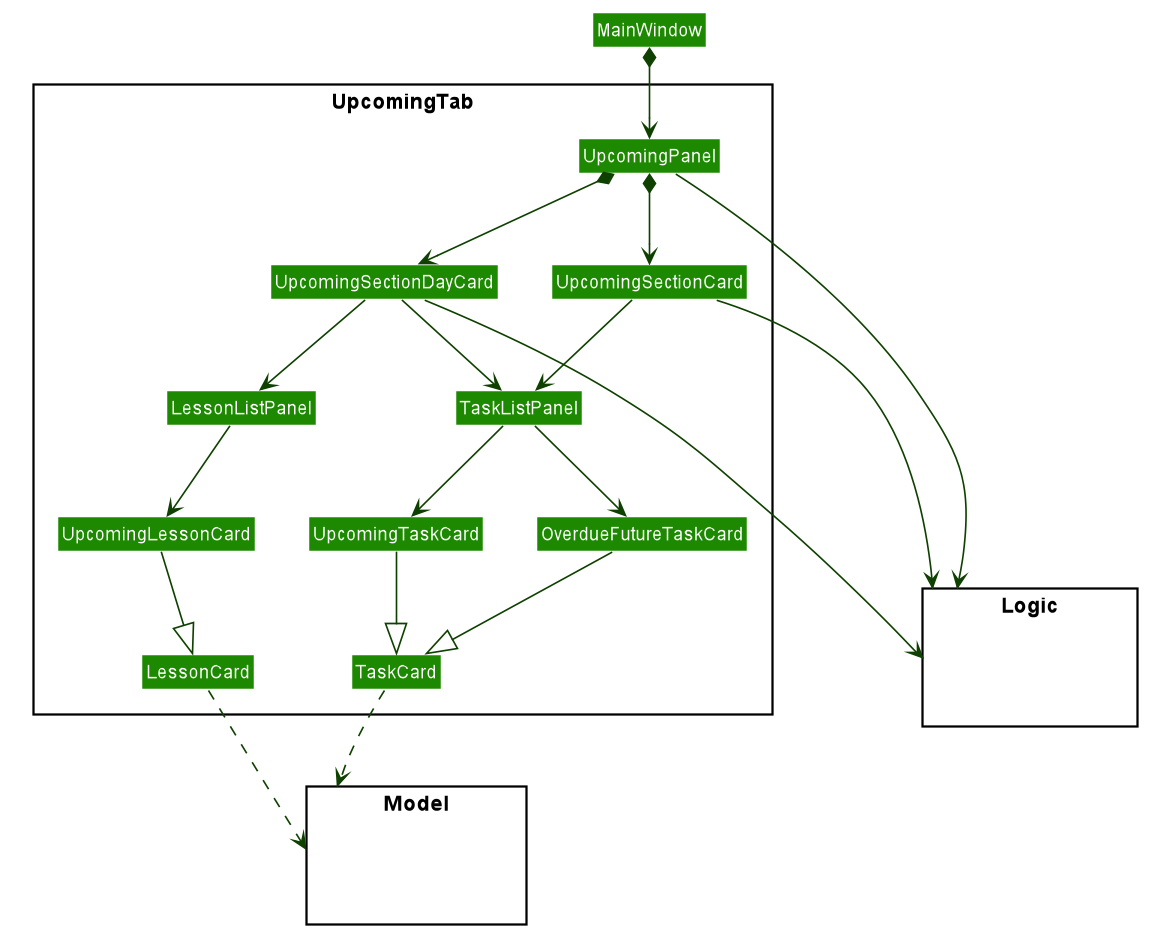
![]() All the
All the ListPanels and Cards inherit from the abstract UiPart class.
Responsibilities
The Upcoming Tab consists of a list of an UpcomingSectionCard for the Overdue section, 7 UpcomingSectionDayCards to represent each day of the next week, and finally another UpcomingSectionCard for the Future section. Each UpcomingSectionCard comprises of a TaskPanel and each UpcomingSectionDayCard comprises of a TaskPanel and a LessonPanel.
The Sequence Diagram below shows how the calendar feature in the Upcoming tab is populated.
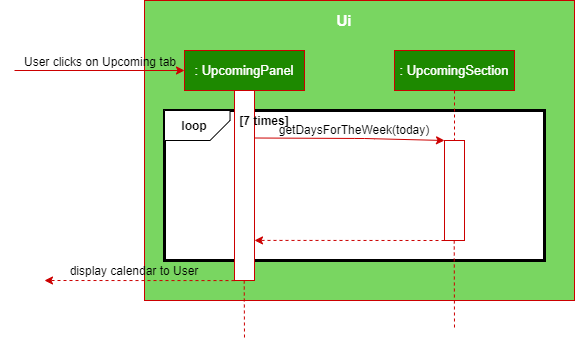
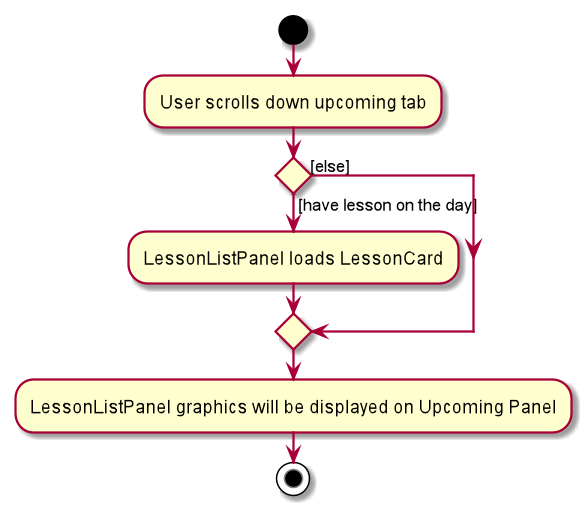
Flow of adding lessons
When a user scrolls down the Upcoming Tab and reaches a date, the UpcomingLessonCard that happens for the day
will be loaded into the LessonListPanel within the UpcomingSectionDayCard. The Activity Diagram below shows
how the UpcomingLessonCards are added in to result in the display in the UpcomingPanel.
3.2.2. Module Tab
(Contributed by Wei Hong)
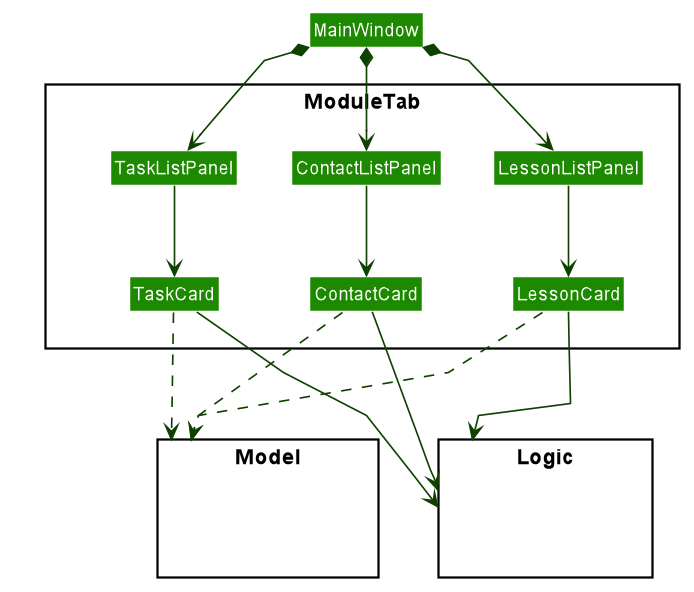
The Class Diagram below shows how Module Tab components interact with each other.
This module tab consist of three panels (LessonListPanel, TaskListPanel, ContactListPanel) and their
corresponding cards (LessonCard, TaskCard, ContactCard). In all of the panels, the graphics of each of the
ListCell is defined by the respective Cards.
The ContactTab and HelpTab both follow a similar structure as the above class diagram, except that they each
consist of 1 single panel instead of 3.
3.3. Logic Component
(Contributed by Long)

API :
Logic.java
-
Logicuses theTrackIterParserclass to parse the user command. - This results in a
Commandobject which is executed by theLogicManager. - The command execution can affect the
Model(e.g. adding a person). - The result of the command execution is encapsulated as a
CommandResultobject which is passed back to theUi. - In addition, the
CommandResultobject can also instruct theUito perform certain actions
Given below is the Sequence Diagram for interactions within the Logic component for the execute("delete 1") API call.
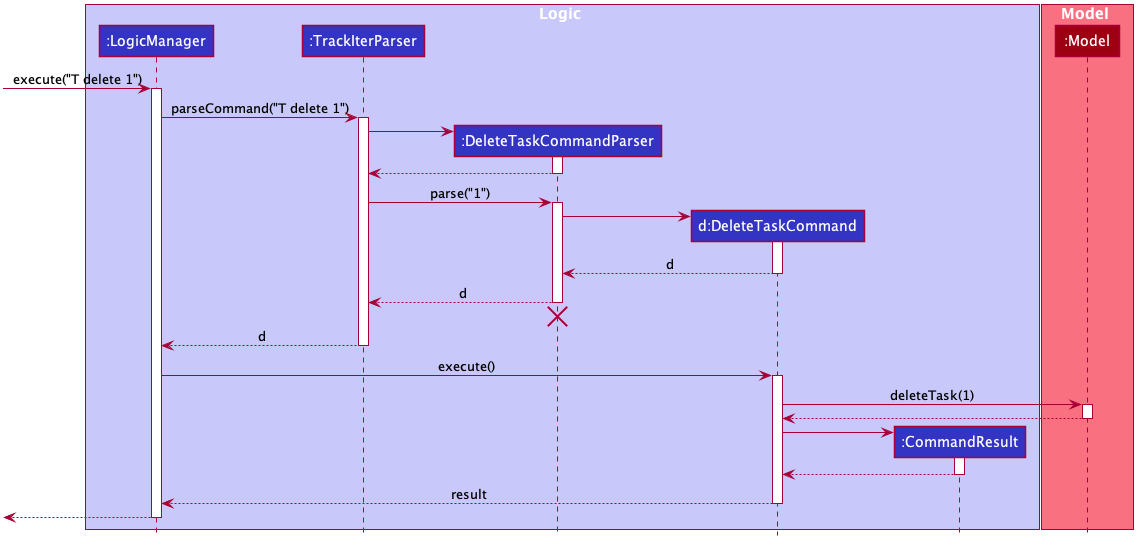
DeleteTaskCommandParser
should end at the destroy marker (X) but due to a limitation in PlantUML, the lifeline continues to the end of the diagram
3.4. Model Component
(Contributed by Long)

API : Model.java
The Model,
- stores a
UserPrefobject that represents the user’s preferences. - stores the TrackIt@NUS data.
- exposes 4 unmodifiable
ObservableList<>objects:-
filteredModuleList, which contains all theModulesin the TrackIt@NUS -
filteredLessonList, which contains all theLessonsin the TrackIt@NUS -
filteredTaskList, which contains all theTasksin the TrackIt@NUS -
filteredContactList, which contains all theContactsin the TrackIt@NUS
-
- These lists can be ‘observed’ e.g. the UI can be bound to this list so that the UI automatically updates when the data in the list change
- Does not depend on any of the other three components.
3.5. Storage Component
(Contributed by Long)

API : Storage.java
The Storage component,
- can save
UserPrefobjects in json format and read it back. - can save the app’s data in json format and read it back.
3.6. Common Classes
(Contributed by Long)
The commons package contains classes used by multiple other components in the trackitnus.commons package.
3.7 Code Design Considerations
(Contributed by Long)
All commands in TrackIt@NUS follow a similar execution flow.
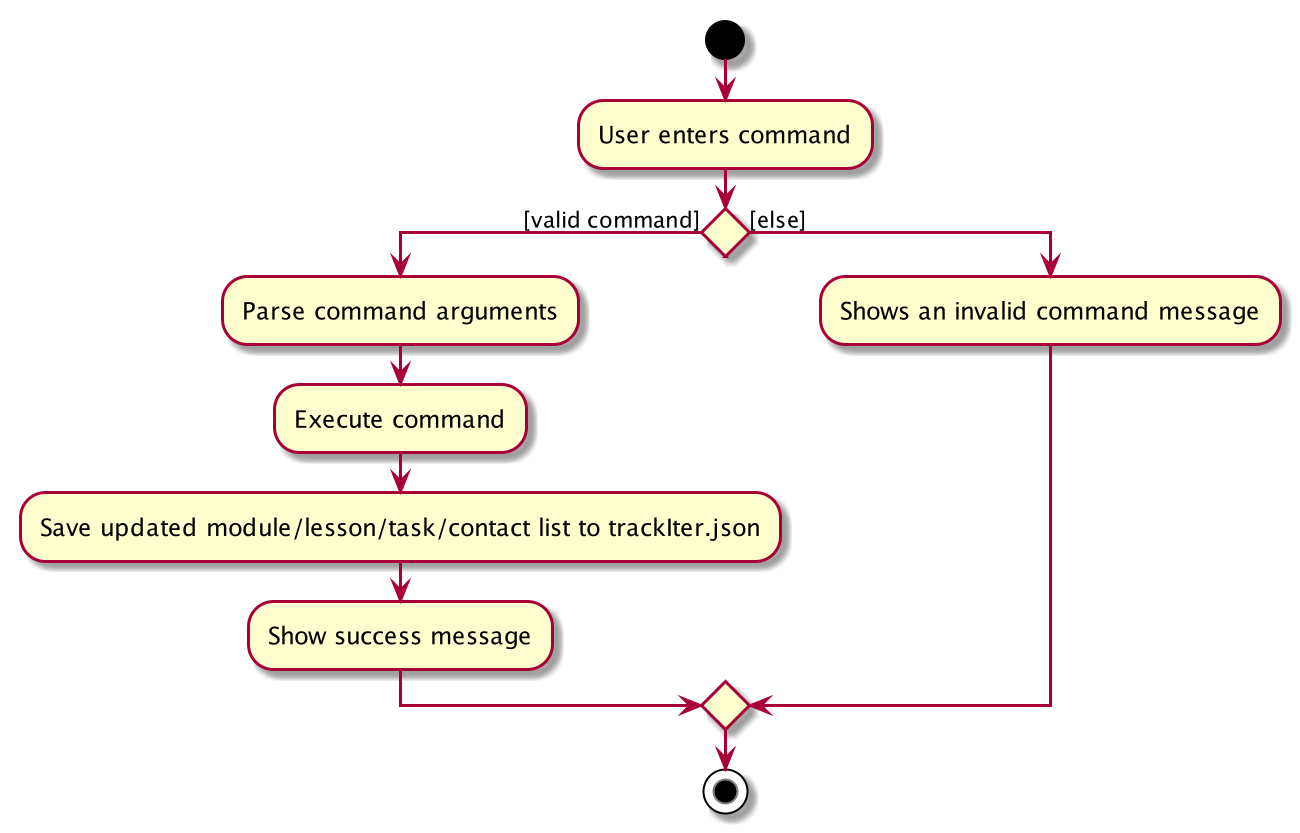
We have done this to improve maintainability. Making our code more uniform will:
- Make testing easier
- Allow us to track down bugs faster
- Allow us to better use the Single Level of Abstraction (SLAP) principle in our code
In addition, this will make our code base much more organised, and hence make it easier for new developers to quickly learn and contribute.
Another design challenge was how to manage our predicates. TrackIt@NUS makes use of many different predicates to allow users to view specific tasks, lessons, and contacts. For exmaple, users can view module-specific tasks , contacts, and lessons. They can also view overdue tasks and future tasks (tasks where the deadline is more than a week away). To manage all these predicates, we had 2 options:
| Pros | Cons | |
|---|---|---|
| Option 1 (current choice): Extract each the predicates into their own unique class | Increases code maintainability and testability. Now as a developer you exactly where to find each predicate. Makes use of the DRY principle and improves abstraction because you no longer need to interact with the actual lambda or test function, simply call the predicate. | Makes code more verbose as each predicate can simply be declared using a single lambda. |
| Option2: Declare each predicate using a single lambda in the ModelManager class. No predicate will have a class. | Makes code shorter and simpler to read. No need to create a class when you can simply declare a predicate with a lambda. | Need to duplicate such code when using ModelStubs for testing. This will violate the DRY principle. |
All classes of Logic & Model at the same level will have similar structures
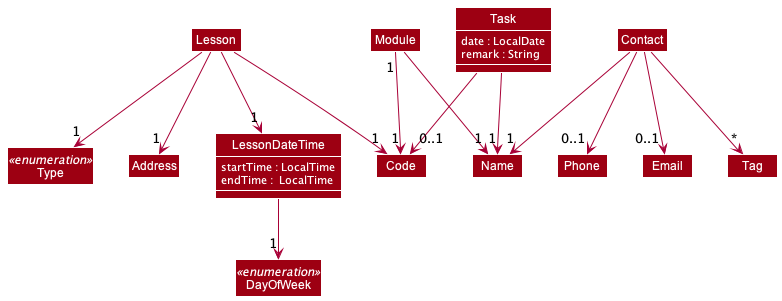
The above diagram illustrates the structure of 4 classes: Module, Lesson, Contact and Task.
To elaborate on this design consideration, we will first take an example on some lowest-level classes They include Email, Address, Code, Name ….
All of these classes share a similar structure as 2 classes Address and Code as below:

Furthermore, all Add/Edit/Delete commands will share very similar structure, below is the example of AddCommand, EditCommand & DeleteCommand,

The same principle applies to all CommandParser classes.
This will bring several benefits:
- If a bug is found, we can quickly check same-level classes(that have the similar structure) for the existence of the bug since it’s quite likely to contain the same bug
- If any fix/improvement is applied to a class, we can quickly apply the same fix/improvement to other same-level classes
- Improve maintainability of the project. Since the back-end was developed in parallel, each developer was assigned to code at least one “part” of the back-end (for example, one can be assigned to write all Module-related classes, subclasses, commands and command-parsers). Yet, due to the similarity in structure of classes of the same level, it’s very easy for a developer to maintain others’ codes.
A possible drawback of this uniform design is that it may not be the most appropriate design for each class, but for this project we believe this drawback doesn’t apply.
Abstract all low-level logic to Model & Maintain a straight logic flow
To illustrate this design, please look at the following diagrams for 3 different possible implementation of getModuleContacts():
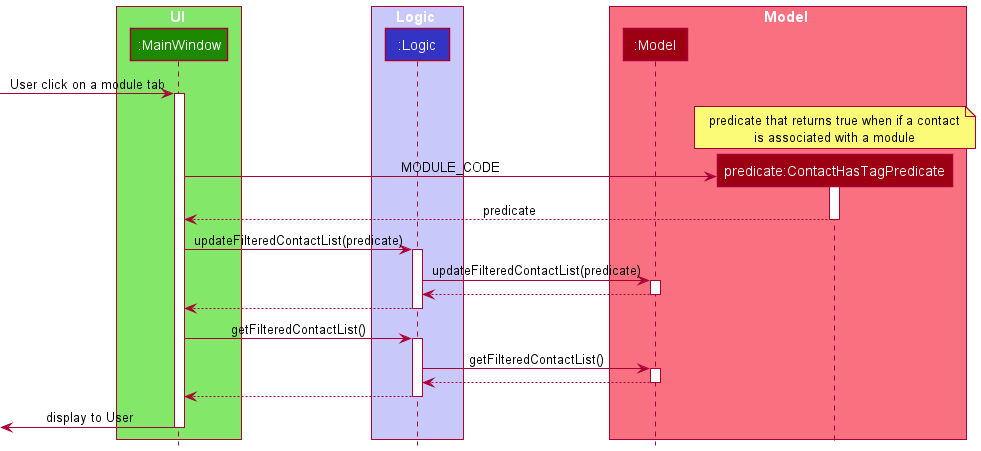
The above diagram illustrate the possible design if the UI handles the low-level logic
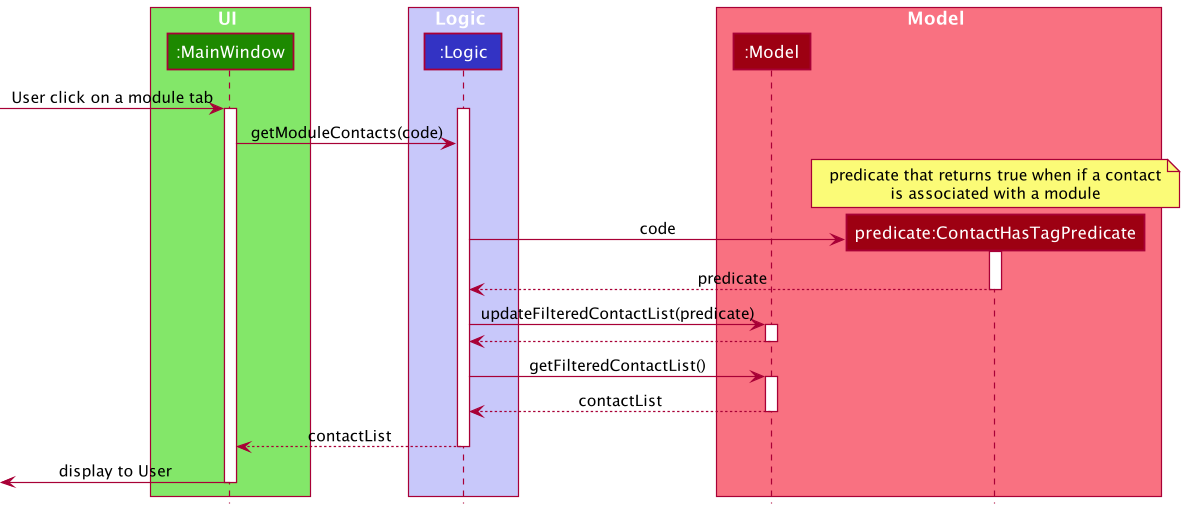
The above diagram illustrate the possible design if the Logic handles the low-level logic
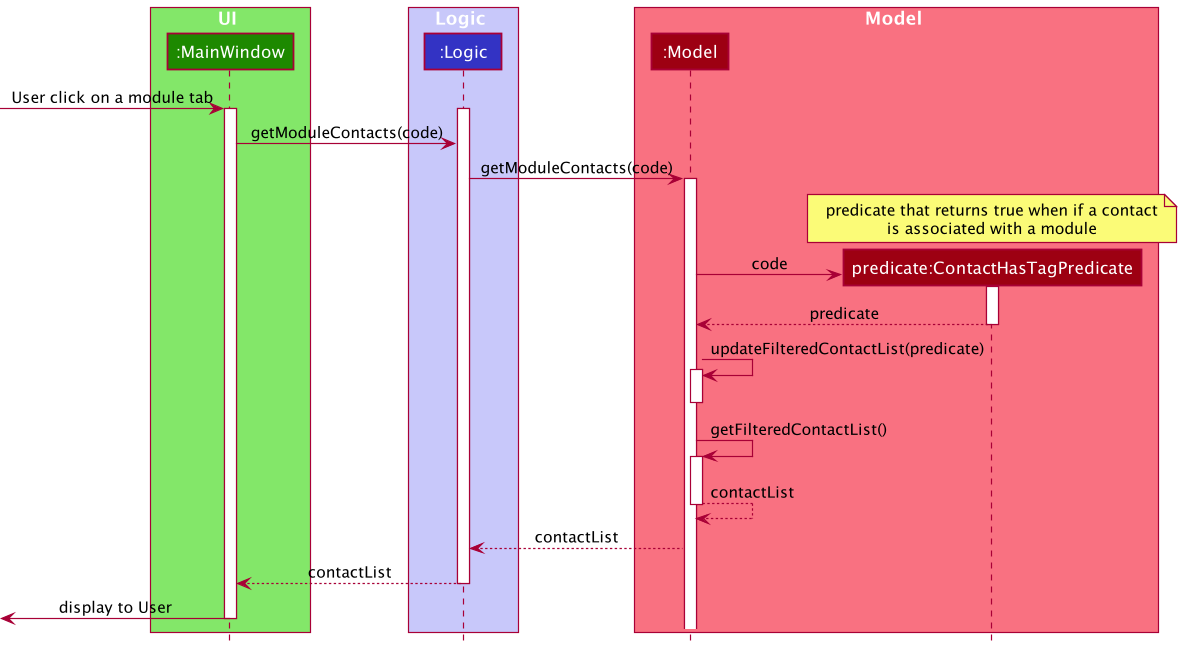
The above diagram illustrate the current design of the back-end
It is easy to see that the current design eliminates all cross-level calls. All methods calls are only in the form a class to itself or to the level right below it. This helps maintain an uniformed straight logic flow for all functions, which greatly improves maintainability and extensibility. Also, this design better follows the ModelViewController pattern (MVC) since the UI should only be in charged of displaying to users, the Logic should only receive events and control the Model and the Model should be the place where all business logic takes place.
In this app, we have tried our very best to ensure almost all (if not all) logic calls follows this principle.
Other code design rules applied
- A function/method should only do what it’s expected to do (which should be inferable from its name), and in no ways should it surprise the caller.
- Most code snippets that can be reused between classes will be abstracted out to the common Utility classes.
- And design rules from the module’s website
3.8. Feature Design Considerations
(Contributed by Long)
The entire app follows a simple principle: the app should behave in the way most normal users expect it to behave.
Its behaviors should help users complete their intended tasks quickly and conveniently, but avoid getting in their way by forcing users to follow some strange constraints.
The following section states some important feature design considerations the team has made during the development of the app
When the module code is edited, all associated lessons/tasks/contact tags are edited as well
| Pros | Cons | |
|---|---|---|
| Option 1 (current choice): Edit all related all associated lessons/tasks/contact tags | More intuitive to users, because it’s natural to expect that when a module code is edited, its associated lessons/tasks are modified to still belong to the newly edited module and doesn’t become “orphan” entities. For contacts, we believe that most normal users also expect the app to change the tag associated with the old code to the new code. | It increases coupling of the codebase, make it more prone to bugs |
| Option2: Just edit the module code and leave other stuff untouched | Simplify the app’s logic, decrease coupling and “possibly”, give users more control over the app | “Surprise” most users with its “unexpected” behavior, and create some weird logic in the app (for example, where can a lesson/task be displayed if it doesn’t belong to an existing module) |
After having considered all the pros & cons, we have decided to implement this feature so that the user can have the best possible User Experience!
When a module is deleted, all associated lessons/tasks are deleted but contacts are left untouched
This behavior of the app has been considered (and debated) thoroughly. The following are our rationale:
- We believe it’s rare that users need to delete a module (even if they entered the code or name wrongly, they can still edit those fields). So, if they have decided to delete a module, it is likely they have finished(or dropped) that module , so the app’s expected behavior is to delete all the module’s associated tasks/lessons.
- Deleting a contact usually means the user no longer want to connect with that contact, which is rarely the case because it’s almost always better to have more contacts so that one can seek help when necessary (or “just in case”). Hence, we decided to give users full control over their contacts (even the to-be-deleted module’s related tag will not be deleted, so that users can keep track of a contact’s related modules).
Similar to the previous module edit, one clear drawback of implementing this behavior is it will complicate the app’s logic and make the app more bug-prone.
After having considered all the pros & cons, we have decided to implement this feature so that the user can have the best possible User Experience!
Allow users to use mouse to click on tabs
This feature is one of the most debated features in our team.
We are well aware of the module’s constraints that the app must be optimized for CLI.
Yet, 5 todo-apps have been studied by our team (macOS’s reminders, Microsoft To Do, Todoist, OmniFocus) and we found all of these apps only have one way to change tabs, and it is by clicking on them. Although forcing users to use CLI to change tab can be easily implemented, it will make the app unintuitive to most users (except CLI gurus), and hence cannot attract new users to change to our new app from their old apps(of which they are so used to clicking on tabs).
Also, even for CLI gurus, typing something like switch CS2030 to switch to a new tab while it can be done with just a single click is not something we think they will do.
One last reason is that we think it’s very convenient for users to use mouse to click on various different tabs in during a short period to just get a sense of upcoming tasks & lessons and related contacts to help them. This “fast jump between tabs” cannot be done by CLI.
Edit/Delete contacts/lessons/tasks by Index
| Pros | Cons | |
|---|---|---|
| Option 1 (current choice): Use Index to edit/delete | Very “intuitive” for users, they can use the index being displayed to edit/delete the entity they need to | Cannot delete contacts from the upcoming tab. There is no concrete Id for tasks/lessons/contacts, theirs Ids (in this case: index) depends on their position in the current tab |
| Option2: Assign each contact/lesson/task a concrete Id | Each entity is associated with only one Id, can edit/delete anywhere in the app | Force users to remember long sequences of Ids and hence create a mental burden everytime they want to edit/delete an entity |
We have chosen the 1st option to make users feel comfortable using our app
Unified command syntax
We have put in a lot of effort to make the command syntax unified, means that all commands have very similar syntax. They can be observed from the following tables:
| Command | Format |
|---|---|
| add module | M add m/CODE n/NAME |
| add lesson | L add m/CODE t/TYPE d/DATE a/ADDRESS |
| add task | T add n/NAME d/DATE [m/CODE] [r/REMARK] |
| add contact | C add n/NAME p/PHONE_NUMBER e/EMAIL [t/TAG]... |
| Command | Format |
|---|---|
| edit module | M edit CODE [m/NEW_CODE] [n/NAME] |
| edit lesson | L edit INDEX [m/CODE] [t/TYPE] [d/DATE] [a/ADDRESS] |
| edit task | T edit INDEX [n/NAME] [d/DATE] [m/CODE] [r/REMARK] |
| edit contact | C edit INDEX [n/NAME] [p/PHONE_NUMBER] [e/EMAIL] [t/TAG]... |
| Command | Format |
|---|---|
| delete module | M delete CODE |
| delete lesson | L delete INDEX |
| delete task | T delete INDEX |
| delete contact | C delete INDEX |
| Command | Format |
|---|---|
| help | help |
| exit | exit |
This will relieve our users from the mental burden of having to remember different syntax for different commands. Although there are only 14 commands to get used to, having to remember all 14 of them will be a huge barrier for our new potential users and also, it will put an unnecessary mental burden on the users of our app.
Other small feature considerations
| Rationale | |
|---|---|
| No limit on length of phone number | We have looked at Android’s and iOS’s contact app and no app imposes limits on the length of phone number |
| Only basic validation of email address | We believe that the app should only prevent user from accidentally entering phone number/name inside the email field (to provide additional convenience). It’s challenging to valid the validity of email (need to check if the domain exists…) yet it’s unnecessary since it’s the user’s own benefits to input valid emails |
| Minimal restriction on lessons’ time | We believe that the app should provide users full control over their schedule (for example overlapping lesson time) to cater to a wide range of different users’ needs. Moreover, it’s the user’s own benefits to input maintain a correct lesson schedule |
| Edit/Delete modules by code | Editing/Deleting modules is an action that users will rarely do (maybe a few times every semester). We believe the UI shouldn’t be cluttered by some info that users will only need once every semester, so we have decided to omit the Index for modules to make the UI cleaner |
4. Implementation
This section describes some noteworthy details on how certain features are implemented.
4.1 Module Manager
(Contributed by Simon)
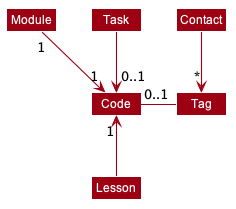
TrackIt@NUS allows users to keep track of all modules that he/she is taking. Module (or more exactly module’s code) is the link between Lesson, Task and Contact. The following diagram illustrates their relationship:
![]() The module code needs to begin with 2-3 capital letters, then exactly 4 digits, then follows by
an optional capital letter. The module name must not be empty and doesn’t contain character “/”
The module code needs to begin with 2-3 capital letters, then exactly 4 digits, then follows by
an optional capital letter. The module name must not be empty and doesn’t contain character “/”
![]() modules are allowed to have the same name, as long as they have different codes
modules are allowed to have the same name, as long as they have different codes
![]() Since there is no index being shown for a module, the module can be edited/deleted only by its code.
For example:
Since there is no index being shown for a module, the module can be edited/deleted only by its code.
For example:
-
M edit CS2030 m/CS2040 n/Edited nameto change the code of CS2030 to CS2040, and change its name to “Edited name” -
M delete CS2030to delete the CS2030 module
4.1.1 Current Implementation
(Contributed by Simon)
In this section, we will outline the key operations of the Module Manager, namely:
AddModuleCommandDeleteModuleCommandEditModuleCommand
Before we begin, it is important for us to define 1 key term: association:
![]() A lesson/task is associated with a module if its code field is equal to the
module’s code.
A lesson/task is associated with a module if its code field is equal to the
module’s code.
![]() A contact is associated with a module if it contains that module’s code as 1 of its tags
A contact is associated with a module if it contains that module’s code as 1 of its tags
The add, delete, and edit commands are all implemented in similar ways. When they are executed they will:
- call on the relevant Model methods
- update the
UniqueModuleListdepending on the command - Save the updated module list to
data/trackIter.json - return the relevant CommandResult message
In this section, we will use the following Activity Diagram to outline the parse & execution of a AddModuleCommand
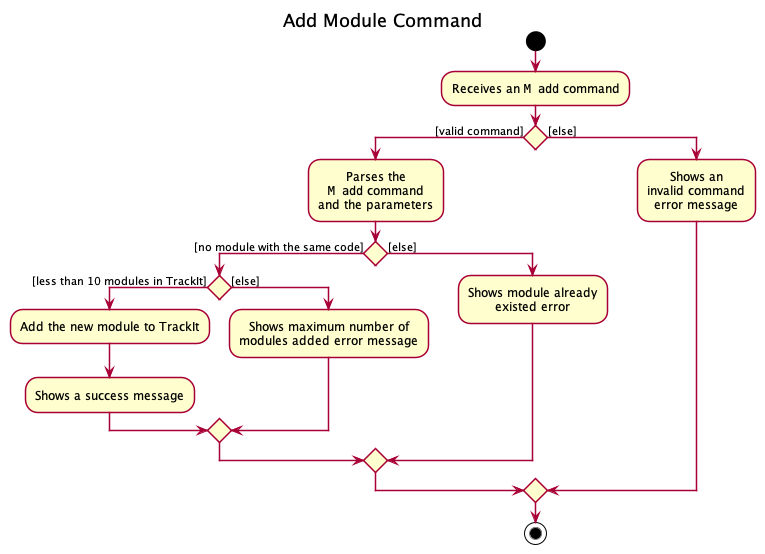
When the user enters the M add m/CODE n/NAME command to add a new module, the user input command undergoes the same command parsing as described in
Section 3.3 Logic Component. If the parse process is successful, a AddModuleCommand will be returned an its execute method will be called.
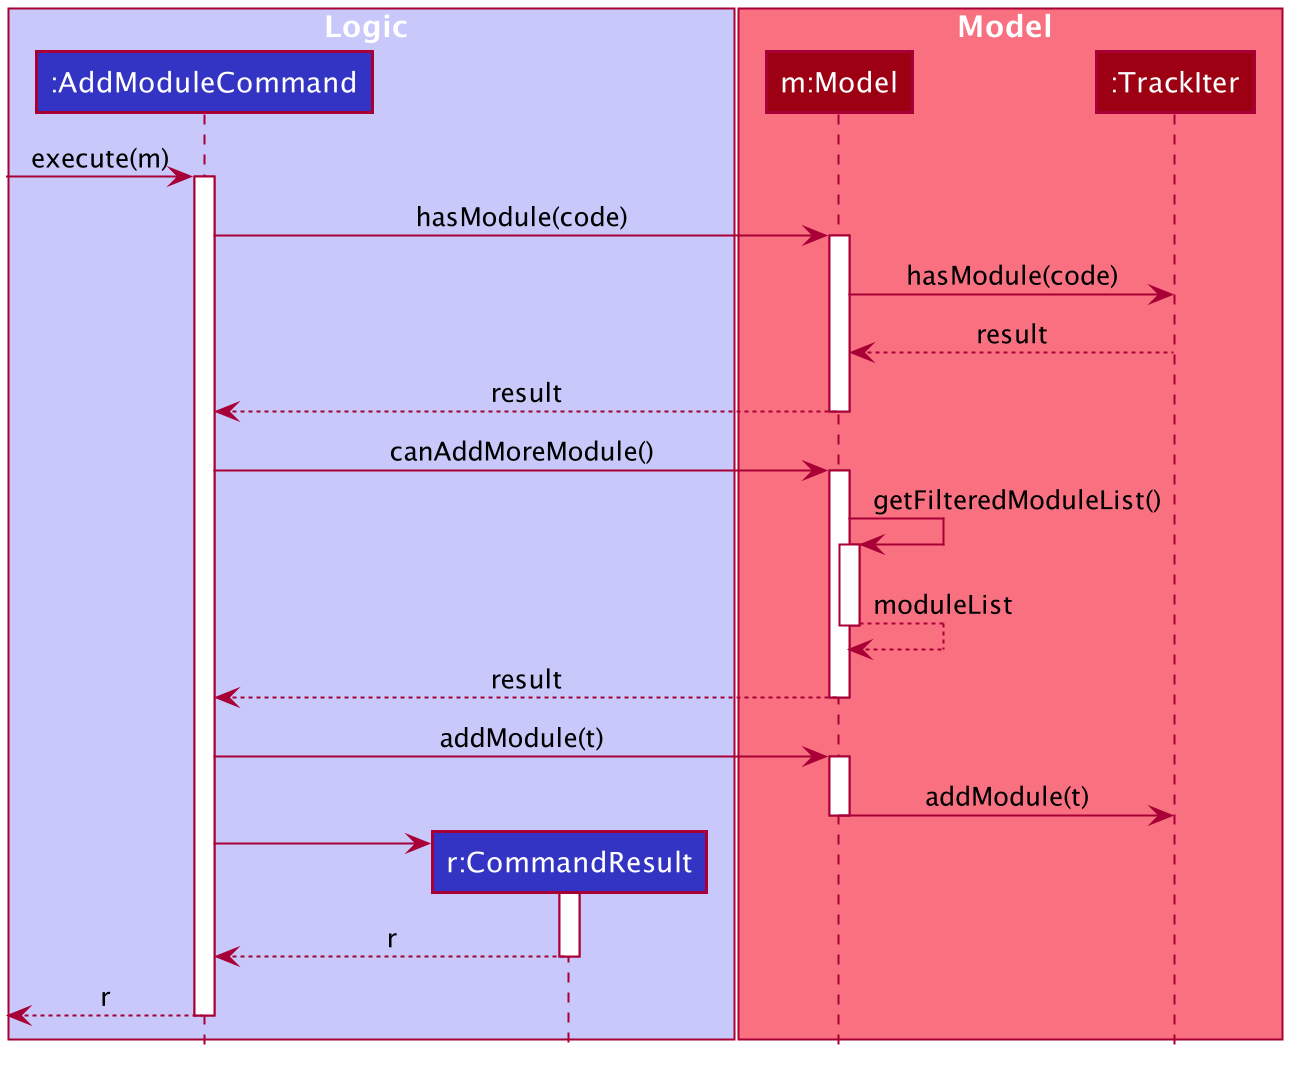
The following steps will describe the execution of the AddModuleCommand in detail, assuming no errors are encountered.
- The
Model’shasModule(code)is called. If it returnstrue, aCommandExceptionwill be thrown. - The
Model’scanAddMoreModule()is called. If it returnstrue, aCommandExceptionwill be thrown. - The
Model’saddModule()is called to add the module from TrackIt - The
Uicomponent will detect this change and update the GUI. - Assuming the above steps are all successful, the
AddModuleCommandwill then create aCommandResultobject and return the result.
The following Sequence Diagram will illustrate the above steps in greater detail :
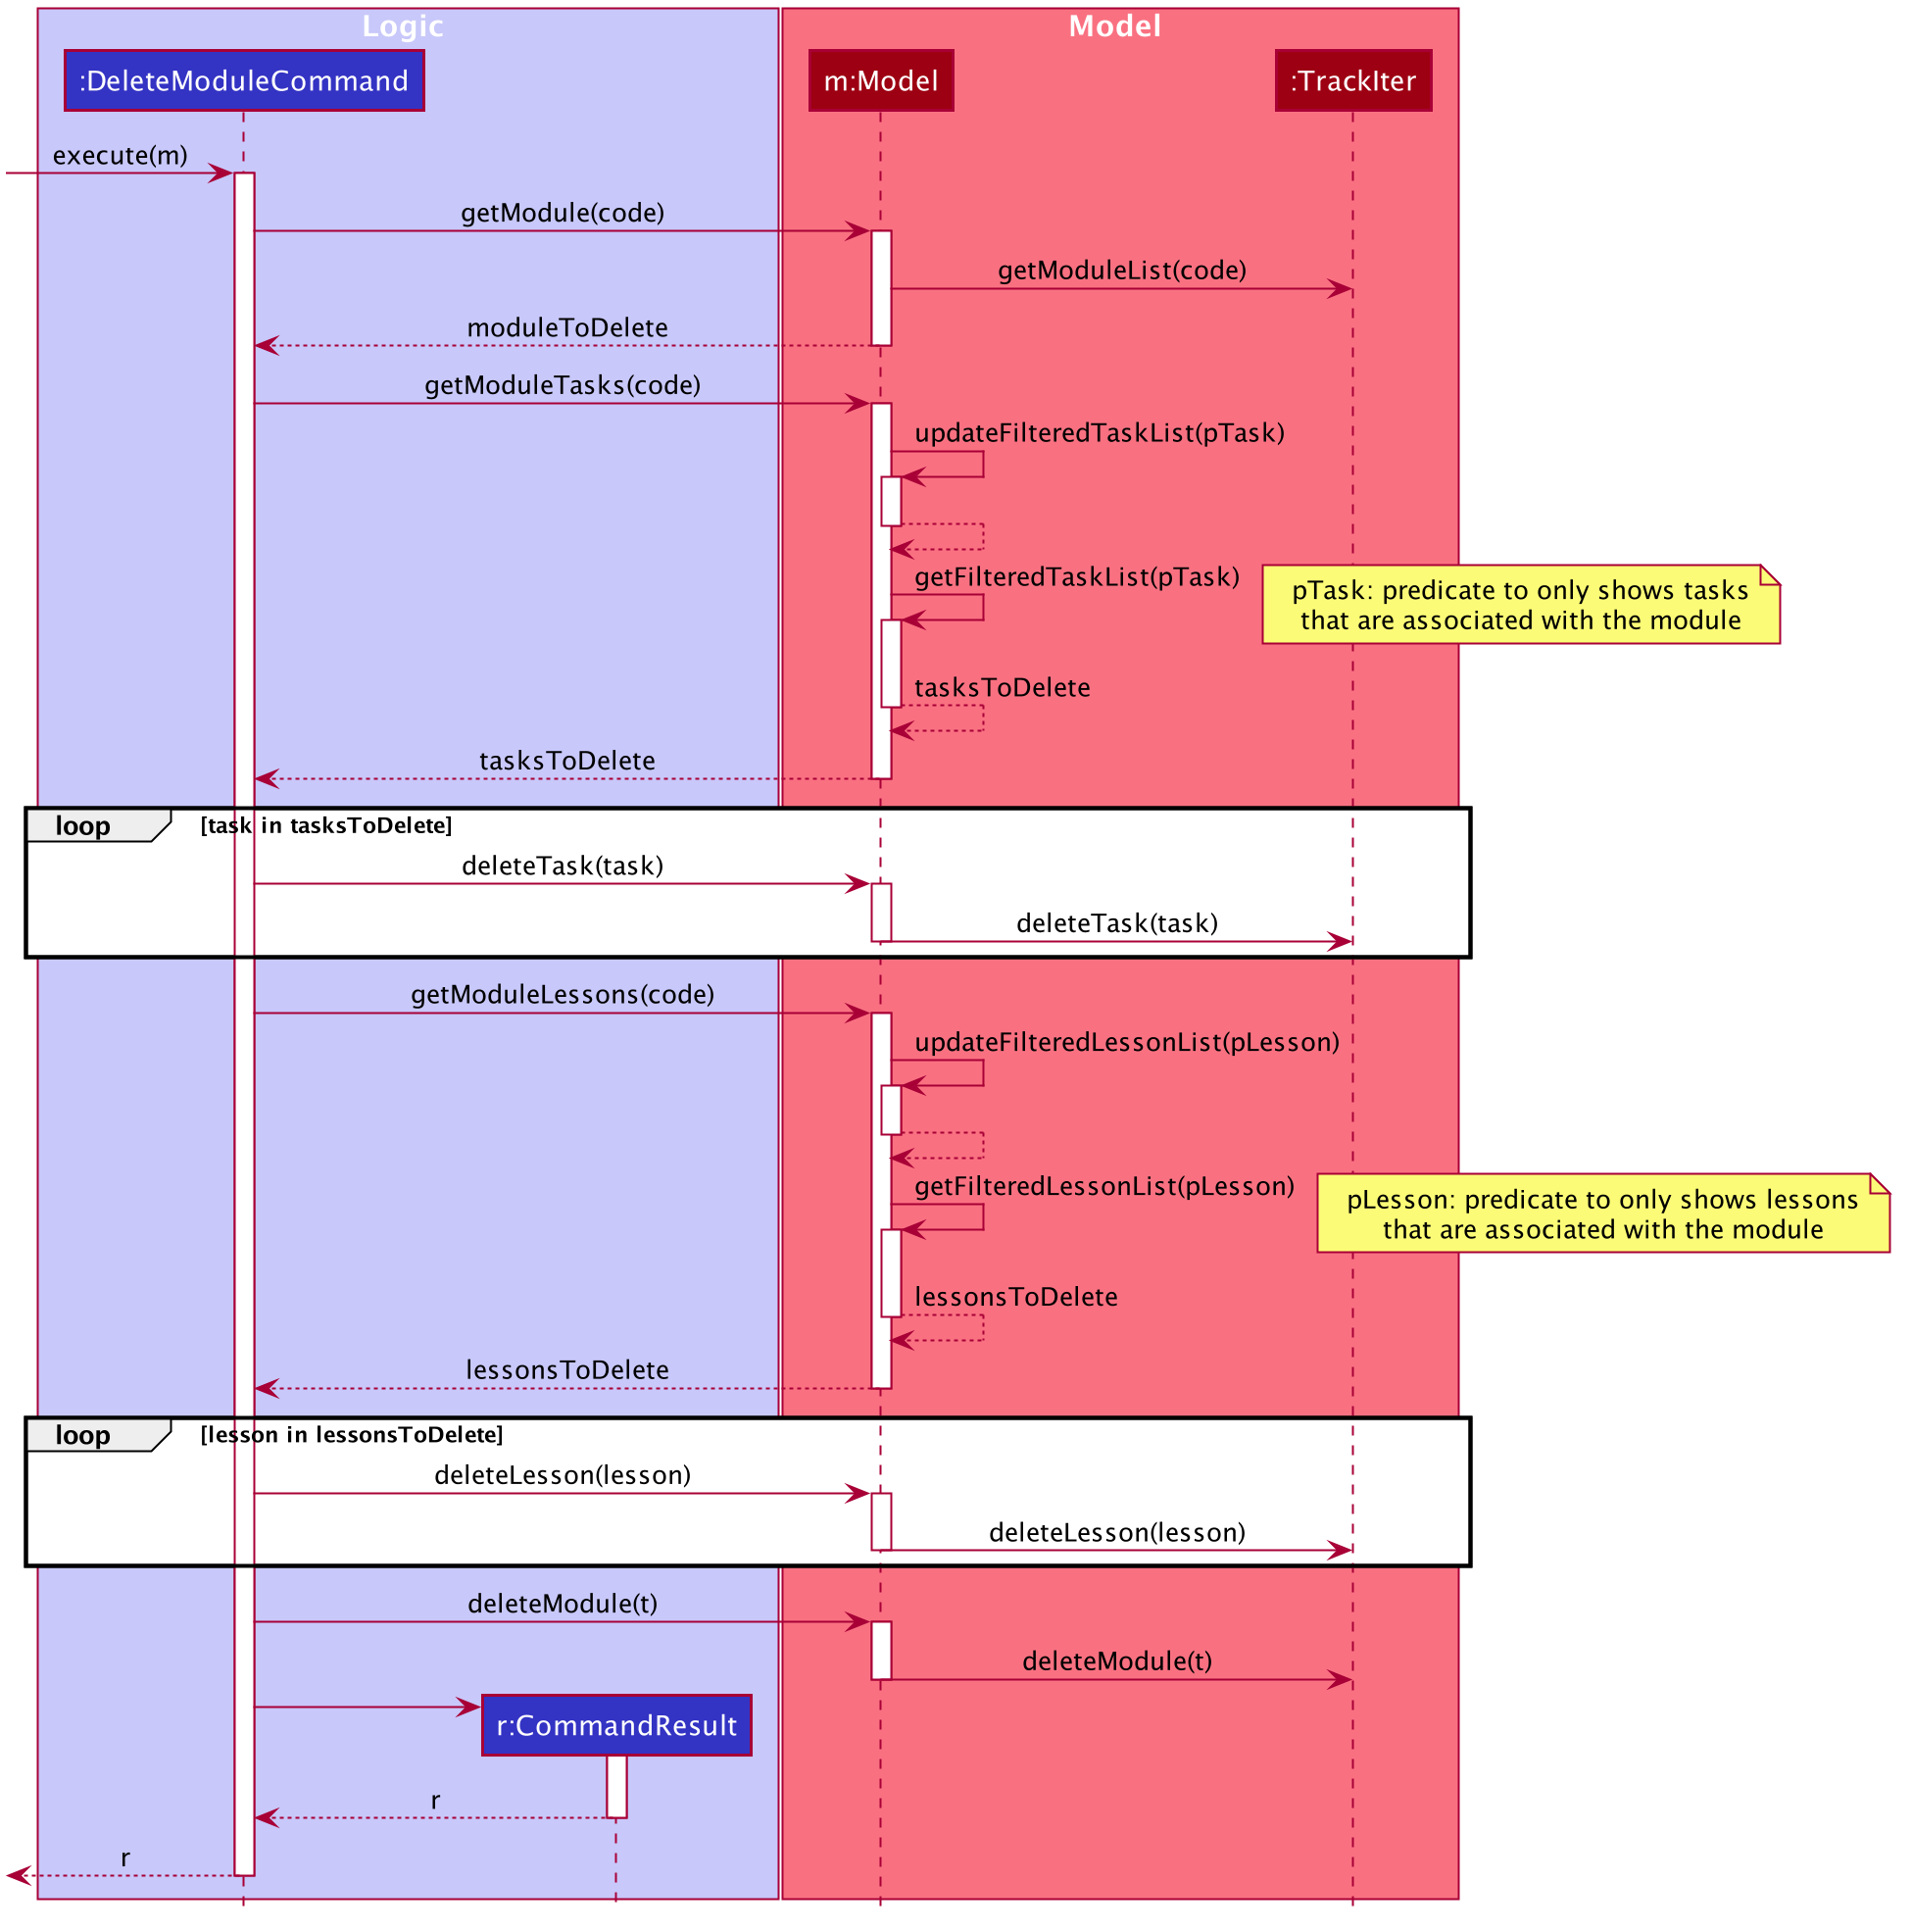
In this section, we will use the following Activity Diagram to outline the parse & execution of a DeleteModuleCommand
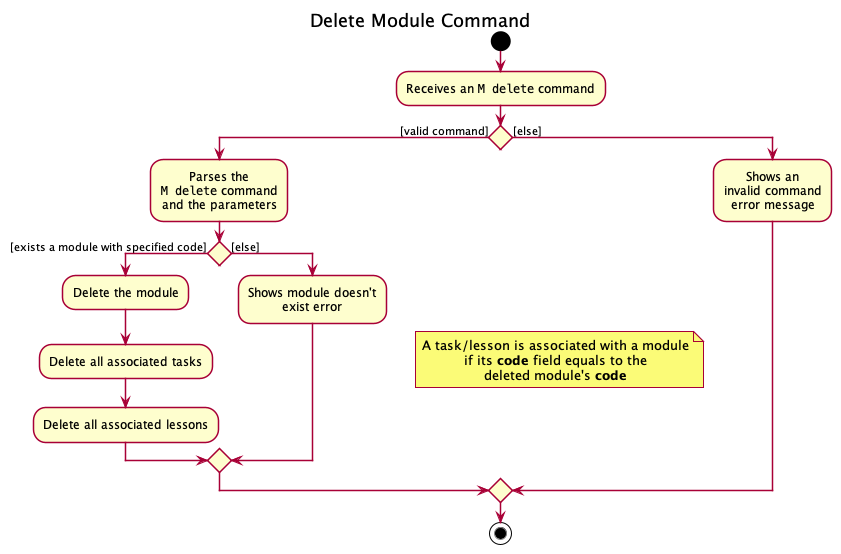
When the user enters the M delete CODE command to delete a module, the user input command undergoes the same command parsing as described in
Section 3.3 Logic Component. If the parse process is successful, a DeleteModuleCommand will be returned an its execute method will be called.
The following steps will describe the execution of the DeleteModuleCommand in detail, assuming no errors are encountered.
- The
Model’sgetModule(code)is called and it will return an Optionalto delete. If the returned optional is empty, a `CommandException` will be thrown. - The
Model’sgetModuleTasks()is called to get the list of tasks that are associated with the module. - For each task received from the above step, the
Model’sdeleteTask()will be called to delete the task from TrackIt - The
Model’sgetModuleLessons()is called to get the list of lessons that are associated with the module. - For each lesson received from the above step, the
Model’sdeleteLesson()will be called to delete the lesson from TrackIt - The
Model’sdeleteModule()is called to delete the module from TrackIt - The
Uicomponent will detect this change and update the GUI. - Assuming the above steps are all successful, the
DeleteModuleCommandwill then create aCommandResultobject and return the result.
The following Sequence Diagram will illustrate the above steps in greater detail :
In this section, we will use the following Activity Diagram to outline the parse & execution of a EditModuleCommand
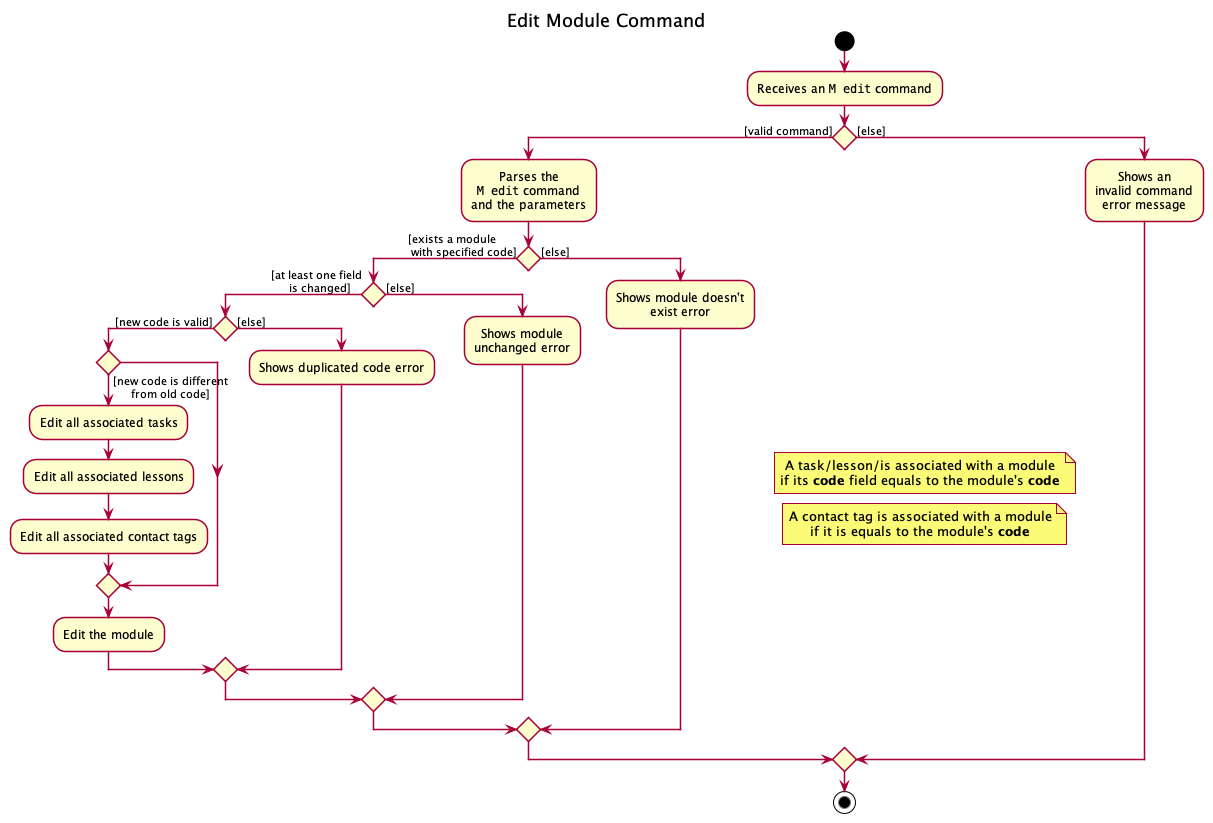
When the user enters the M edit CODE command to edit a module, the user input command undergoes the same command parsing as described in
Section 3.3 Logic Component. If the parse process is successful, a EditModuleCommand will be returned an its execute method will be called.
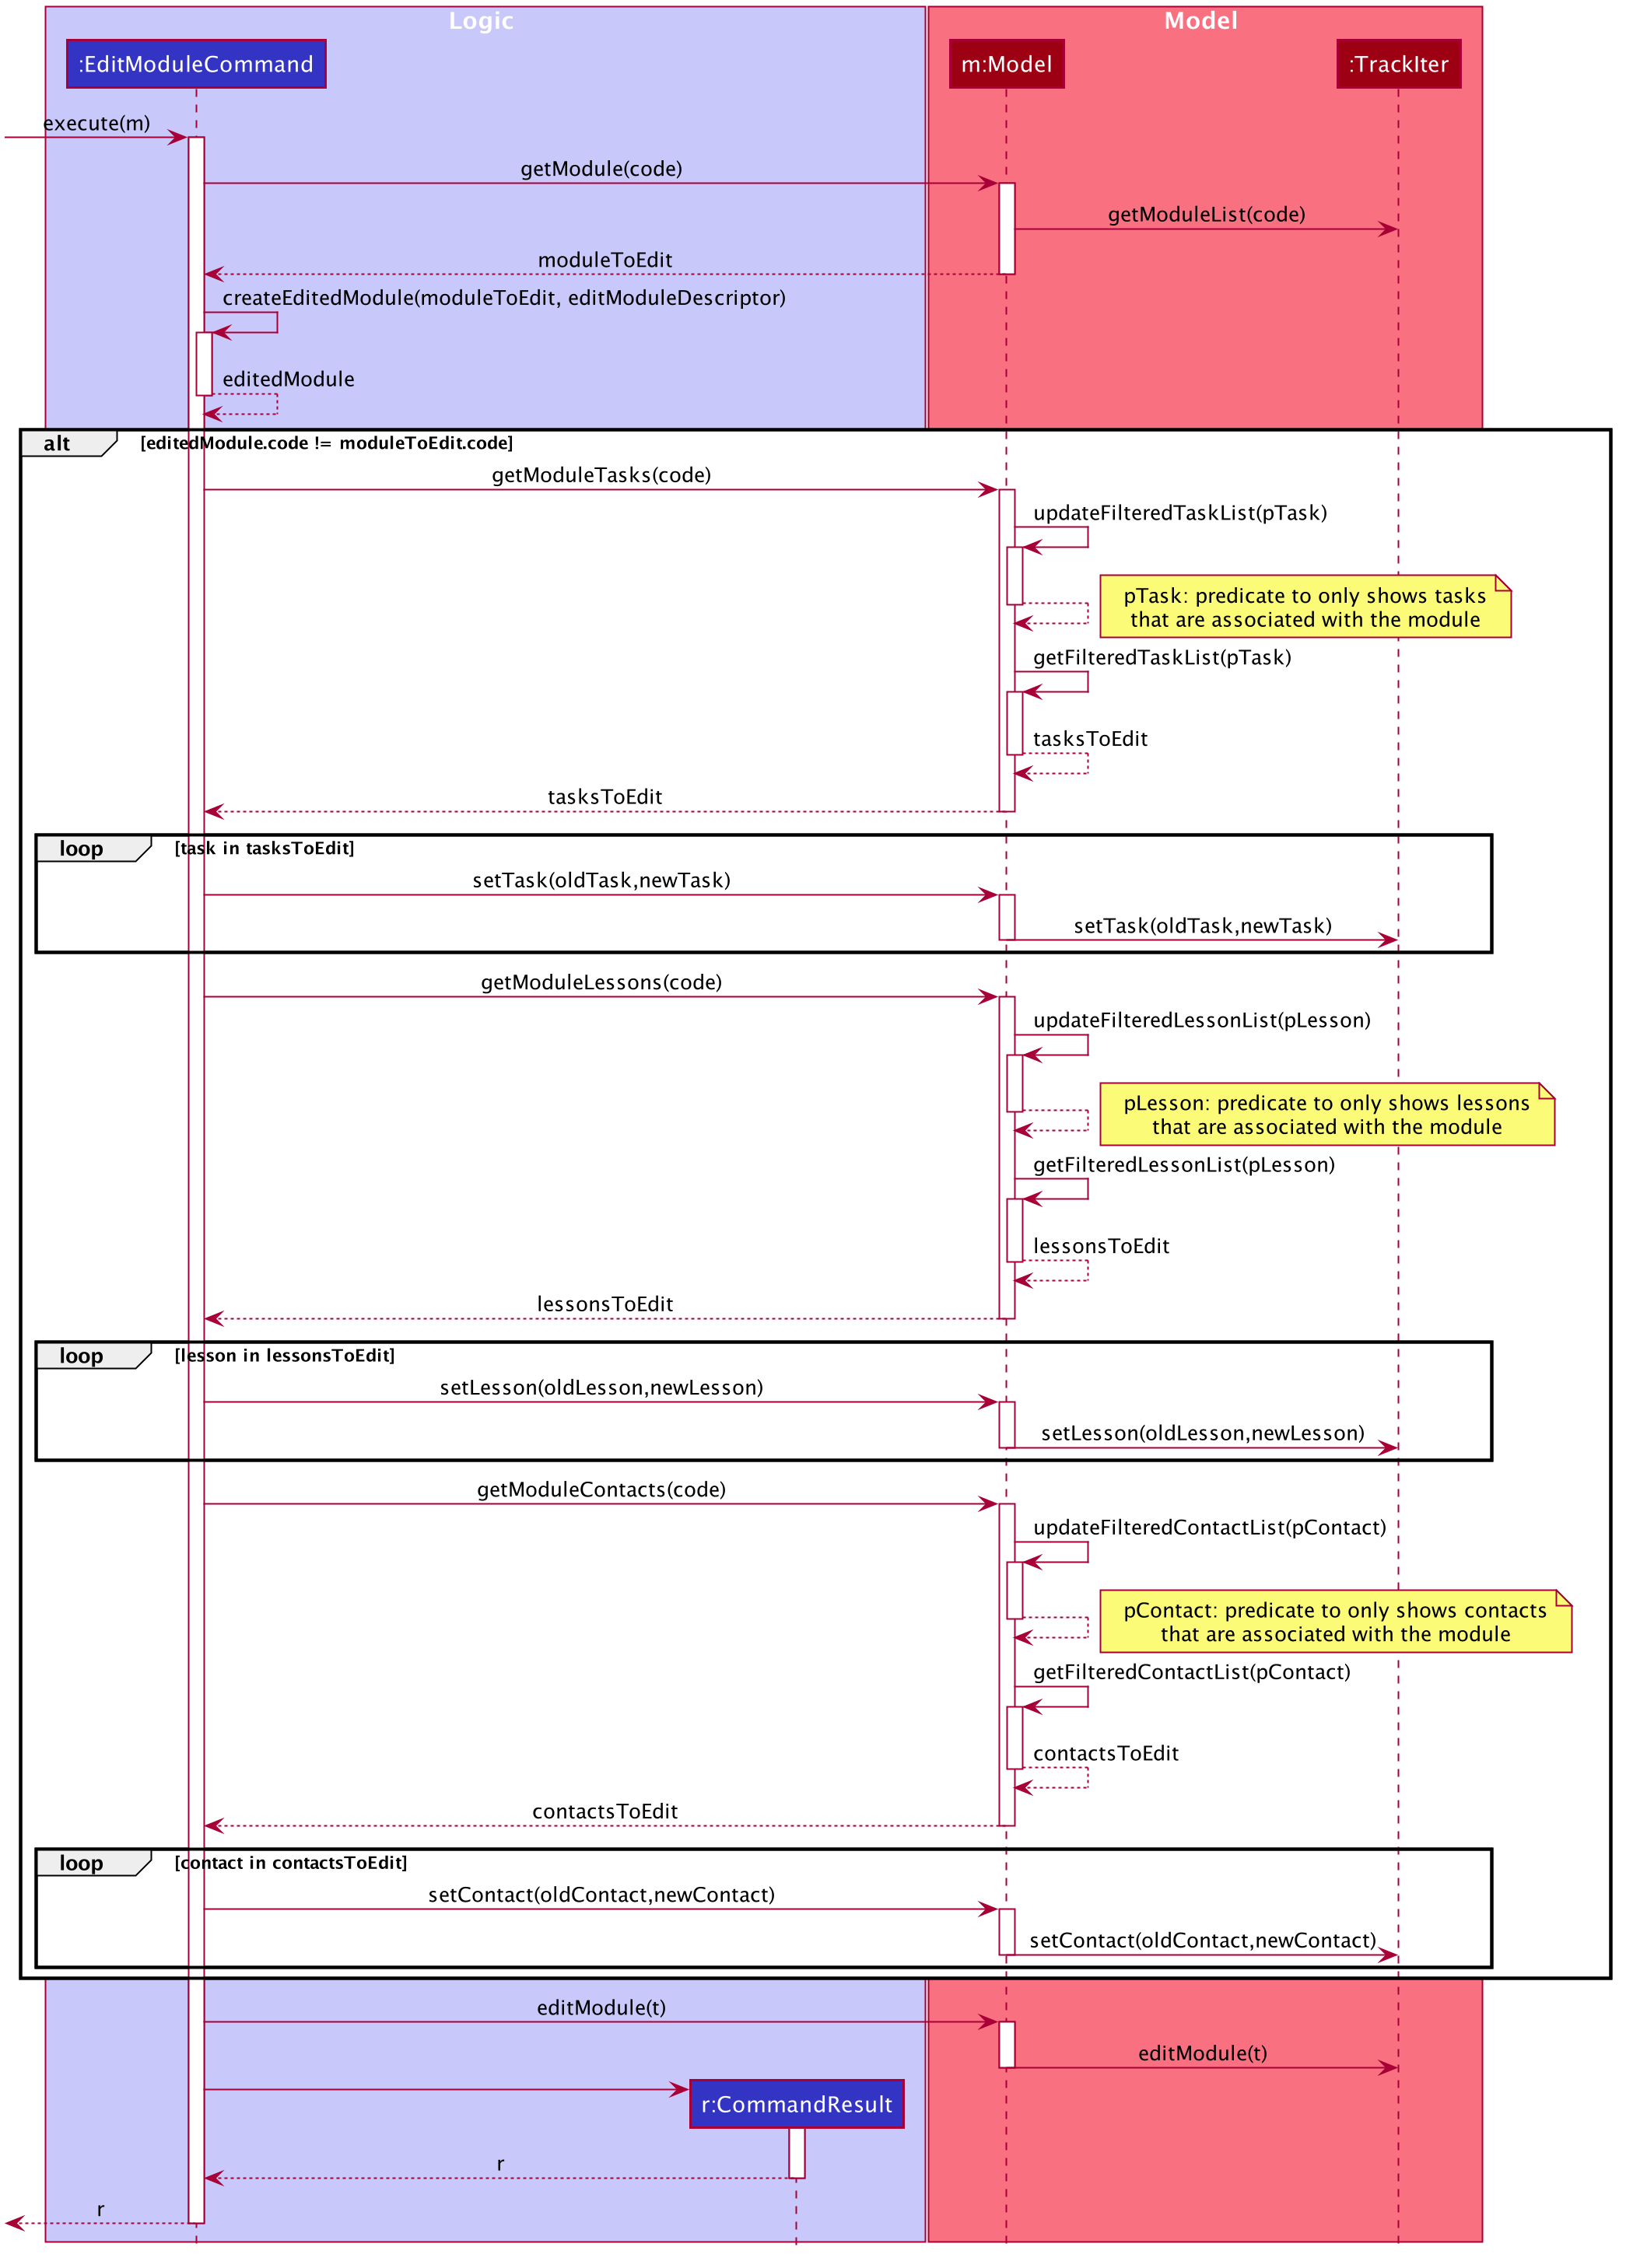
The following steps will describe the execution of the EditModuleCommand in detail, assuming no errors are encountered.
- The
Model’sgetModule(code)is called and it will return an Optionalto edit. If the returned optional is empty, a `CommandException` will be thrown. - The
Model’screateEditedModuleis called to create the neweditedModuleto replace the oldModule - If
editedModuleis equal to the oldModule, aCommandExceptionwill be thrown. - If the
codeofeditedModulecoincides with one of thecodeof existing module, aCommandExceptionwill be thrown. - If the
codeof theeditedModuleis different from the oldModule’scode:- The
Model’sgetModuleTasks()is called to get the list of tasks that are associated with the module - For each task in the above step, a
newTaskis created by replacing its oldcodewith the newcode, thenModel’ssetTask()is called to replaceoldTaskwithnewTask - The
Model’sgetModuleLessons()is called to get the list of lessons that are associated with the module - For each lesson in the above step, a
newLessonis created by replacing its oldcodewith the newcode, thenModel’ssetLesson()is called to replaceoldLessonwithnewLesson - The
Model’sgetModuleContacts()is called to get the list of contacts that associated with the module - For each contact in the above step, a
newContactis created by deleting the oldcodefrom the set of tags and add in the newcode, thenModel’ssetContact()is called to replaceoldContactwithnewContact
- The
- The
Model’ssetModule()is called to edit the module from TrackIt - The
Uicomponent will detect this change and update the GUI. - Assuming the above steps are all successful, the
EditModuleCommandwill then create aCommandResultobject and return the result.
The following Sequence Diagram will illustrate the above steps in greater detail :
4.2. Lesson Manager
(Contributed by Minh)
TrackIt@NUS allows users to keep track of their weekly lessons. The lesson manager is one of TrackIt@NUS’s basic components.
The common commands for the lesson manager include:
-
add- Creates a new lesson -
edit- Modifies an existing lesson -
delete- Deletes an existing lesson
TrackIt@NUS also gives users a better understanding of their lessons by allowing users to view lessons in certain categories. Users can view lessons specific to a module and lessons on a specific day.
4.2.1 Rationale
(Contributed by Minh)
Lessons are an integral part of any student’s day-to-day life. Hence, TrackIt@NUS includes a lesson manager for students to keep track of their lessons. Each lesson must belong to a unique module. When users click into a specific module tab, they can see the lessons belonging to that module.
![]() The module must exist (i.e. there must be a module with the specified
The module must exist (i.e. there must be a module with the specified CODE), otherwise, the add and
edit commands will not work.
4.2.2 Current Implementation
(Contributed by Minh)
In this section, we will outline the key operations of the Lesson Manager, namely:
AddLessonCommandDeleteLessonCommandEditLessonCommand
We will also elaborate on one more key operation that is used in the module tabs, namely getModuleLessons.
The add, delete, and edit commands are all implemented in similar ways. When executed they will:
- call on the relevant Model methods
- update the
UniqueLessonListdepending on the command - Save the updated lesson list to
data/trackIter.json - return the relevant CommandResult message
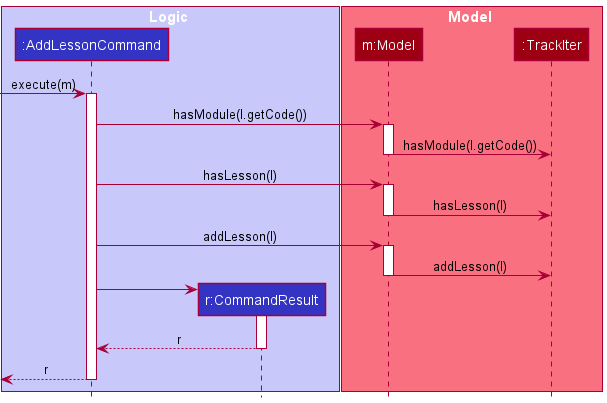
The following steps will describe the execution of the AddLessonCommand, assuming no errors are encountered:
- When
AddLessonCommandis executed, it will first call the model’shasModulemethod to ensure that the specified module exists - Following this, it will call the model’s
hasLessonmethod to ensure that the lesson does not yet exist in the app - If both checks pass,
AddLessonCommandwill call the model’saddLessonmethod - The model will then call the
addLessonmethod of TrackIter, and adds the lesson to the app.
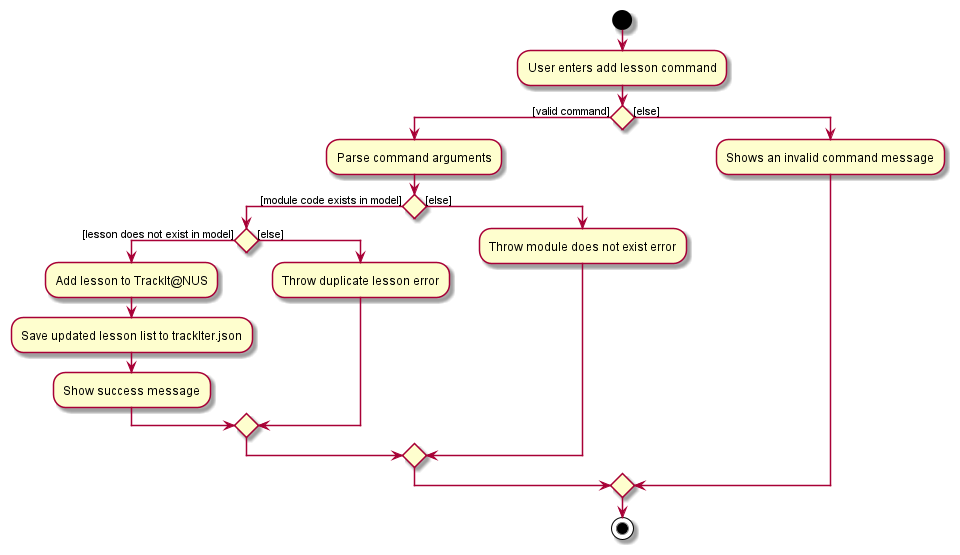
The following shows the sequence diagram of the AddLessonCommand.
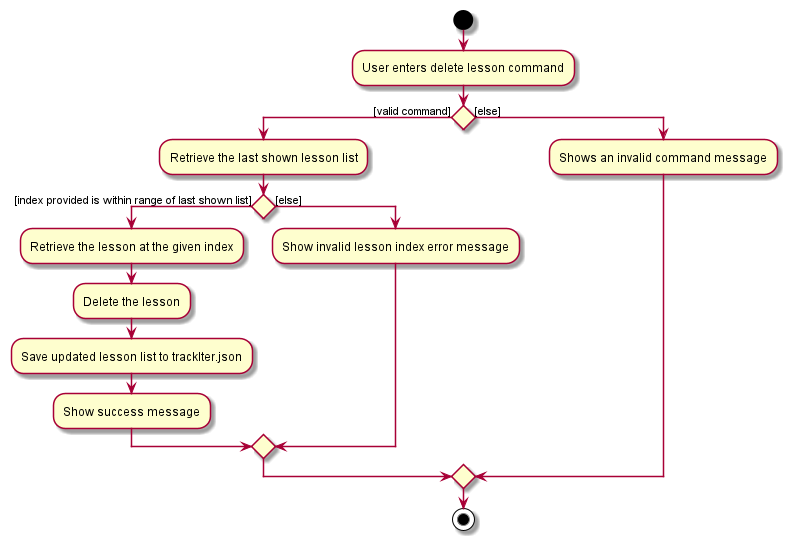
The following steps will describe the execution of the DeleteLessonCommand, assuming no errors are encountered:
- When the
DeleteLessonCommandis executed, it will first call the model’sgetFilteredLessonListmethod to determine the last shown list of lessons - Then, it will call the index’s
getZeroBasedmethod to find the zero-based index of the lesson it must delete - Then, it will check if this index is within range
- If it is, it calls the model’s
deleteLessonmethod. - The model will then call the
removeLessonmethod of TrackIter, which deletes the lesson in question from the app.
The following shows the sequence diagram of the DeleteLessonCommand.
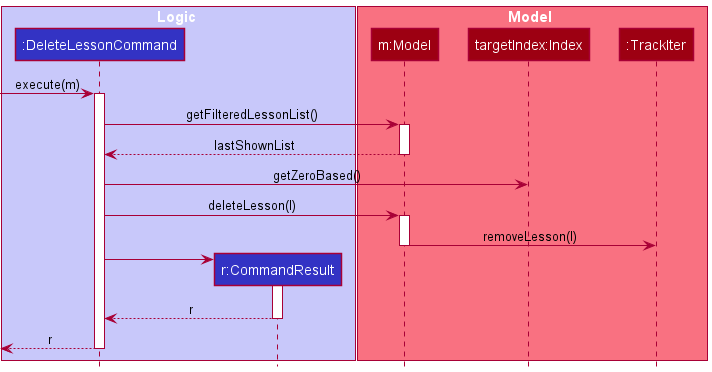
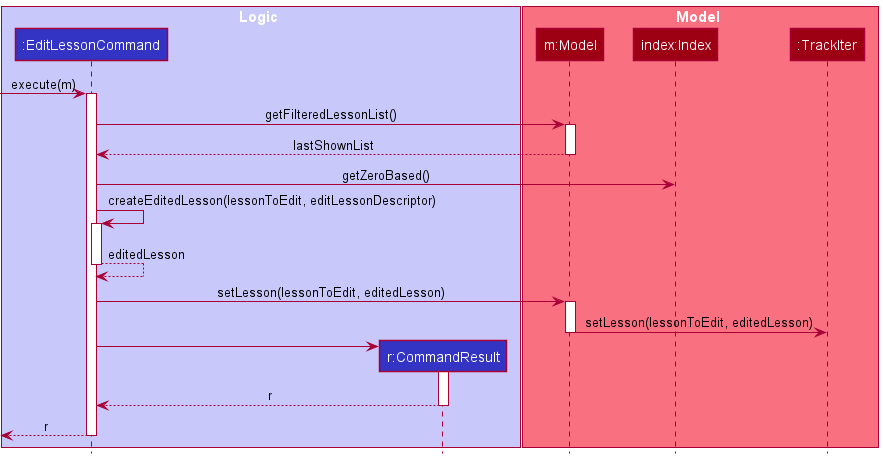
The following steps will describe the execution of the EditLessonCommand, assuming no errors are encountered:
- When the
EditLessonCommandis executed, it will first call the model’sgetFilteredLessonListmethod to determine the last shown list of lessons - Then, it will call the index’s
getZeroBasedmethod to find the zero-based index of the lesson we must edit - It will then check if the index is within range
- If it is, it calls the model’s
setLessonmethod - The model will then call the
setLessonmethod of TrackIter, which replaces the original lesson with the edited version in the app.
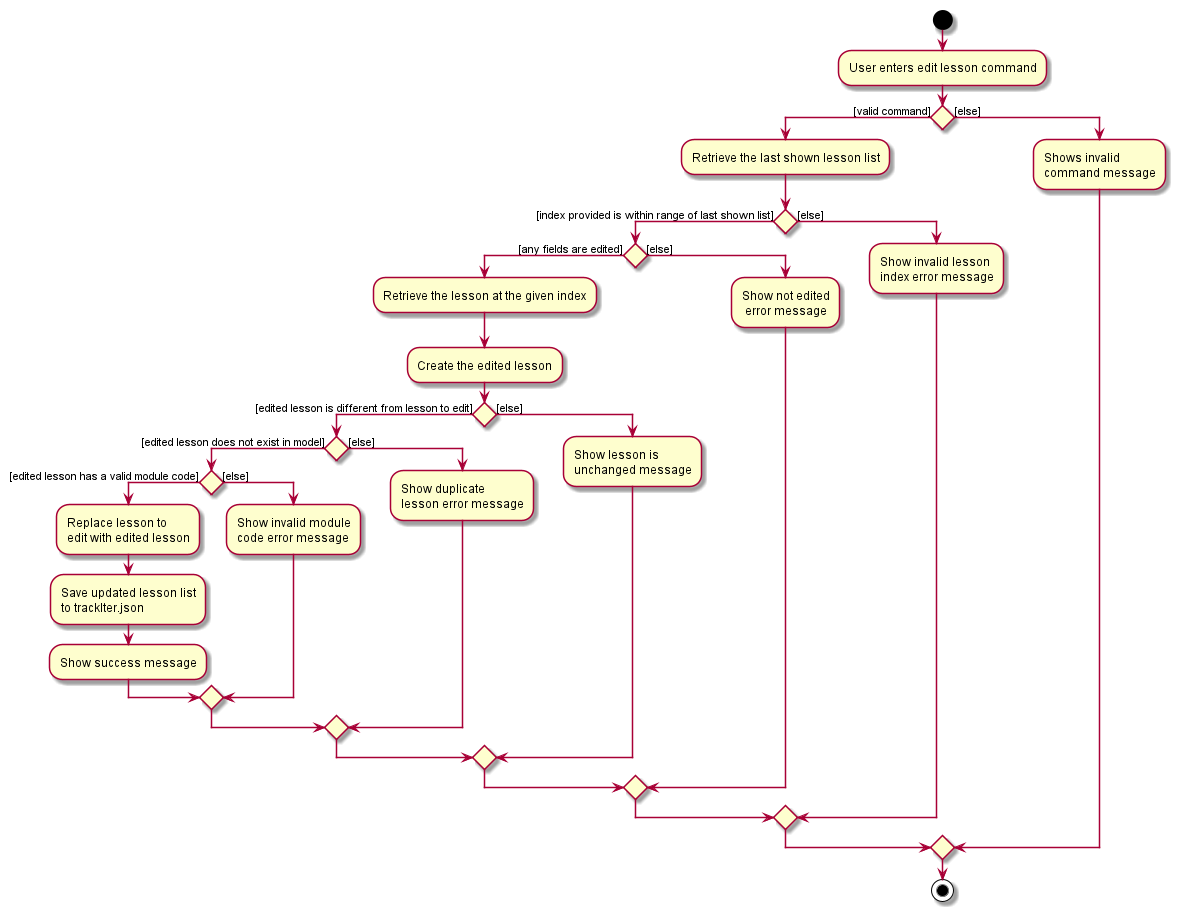
The follow shows the sequence diagram of the EditLessonCommand.
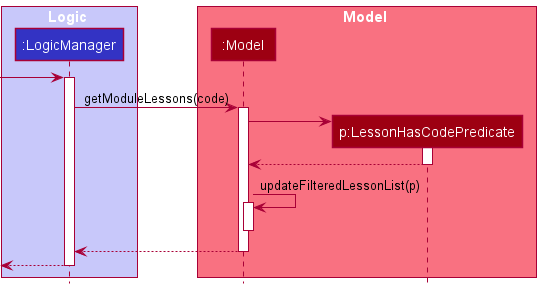
The getModuleLessons function takes in a Module Code and returns all lessons that belong to the specified module.
When getModuleLessons is called, it uses the LessonHasCodePredicate to update the lesson list in the app to only show
the lessons that belong to the specified module code.
This is the sequence diagram of getModuleLessons.
4.3 Task Manager
(Contributed by Simon)
TrackIt@NUS allows users to keep track of his/her tasks. The task manager is one of TrackIt@NUS’s basic components.
The common commands for the task manager include:
-
add- Creates a new task -
edit- Modifies an existing task -
delete- Deletes an existing task
TrackIt@NUS also gives users a better understanding of their tasks by allowing users to view tasks in certain categories. Users can view overdue tasks, tasks on a specific day, future tasks (tasks that have deadlines more than a week away), and specific module tasks.
4.3.1 Rationale
(Contributed by Simon)
Tasks are an integral part of any student’s day-to-day life. Hence, TrackIt@NUS includes a task manager for students to
keep track of all their tasks. To better support NUS students, a task can either belong to a module or not. When
adding a task, users can choose to the include the m/CODE parameter in order to add a task that belongs to
a module. When users click into a specific module tab, they can see the tasks belonging to each module.
![]() A task does not have to belong a module. In this case, the module parameter of the task is
simply treated as null and the task can only be viewed in the upcoming tab.
A task does not have to belong a module. In this case, the module parameter of the task is
simply treated as null and the task can only be viewed in the upcoming tab.
![]() The module must exist (i.e. there must be a module with the specified
The module must exist (i.e. there must be a module with the specified CODE) otherwise the add and
edit commands will not work.
![]() To remove a task from a module, simply type
To remove a task from a module, simply type T edit INDEX m/ (use the m/ prefix but leave the CODE parameter empty).
4.3.2 Current Implementation
(Contributed by Simon)
In this section, we will outline the key operations of the Task Manager, namely:
AddTaskCommandDeleteTaskCommandEditTaskCommand
We will also elaborate on one more key operation that is used in the module tabs, namely getModuleTasks
, getOverdueTasks, getDayUpcomingTasks, getFutureTasks.
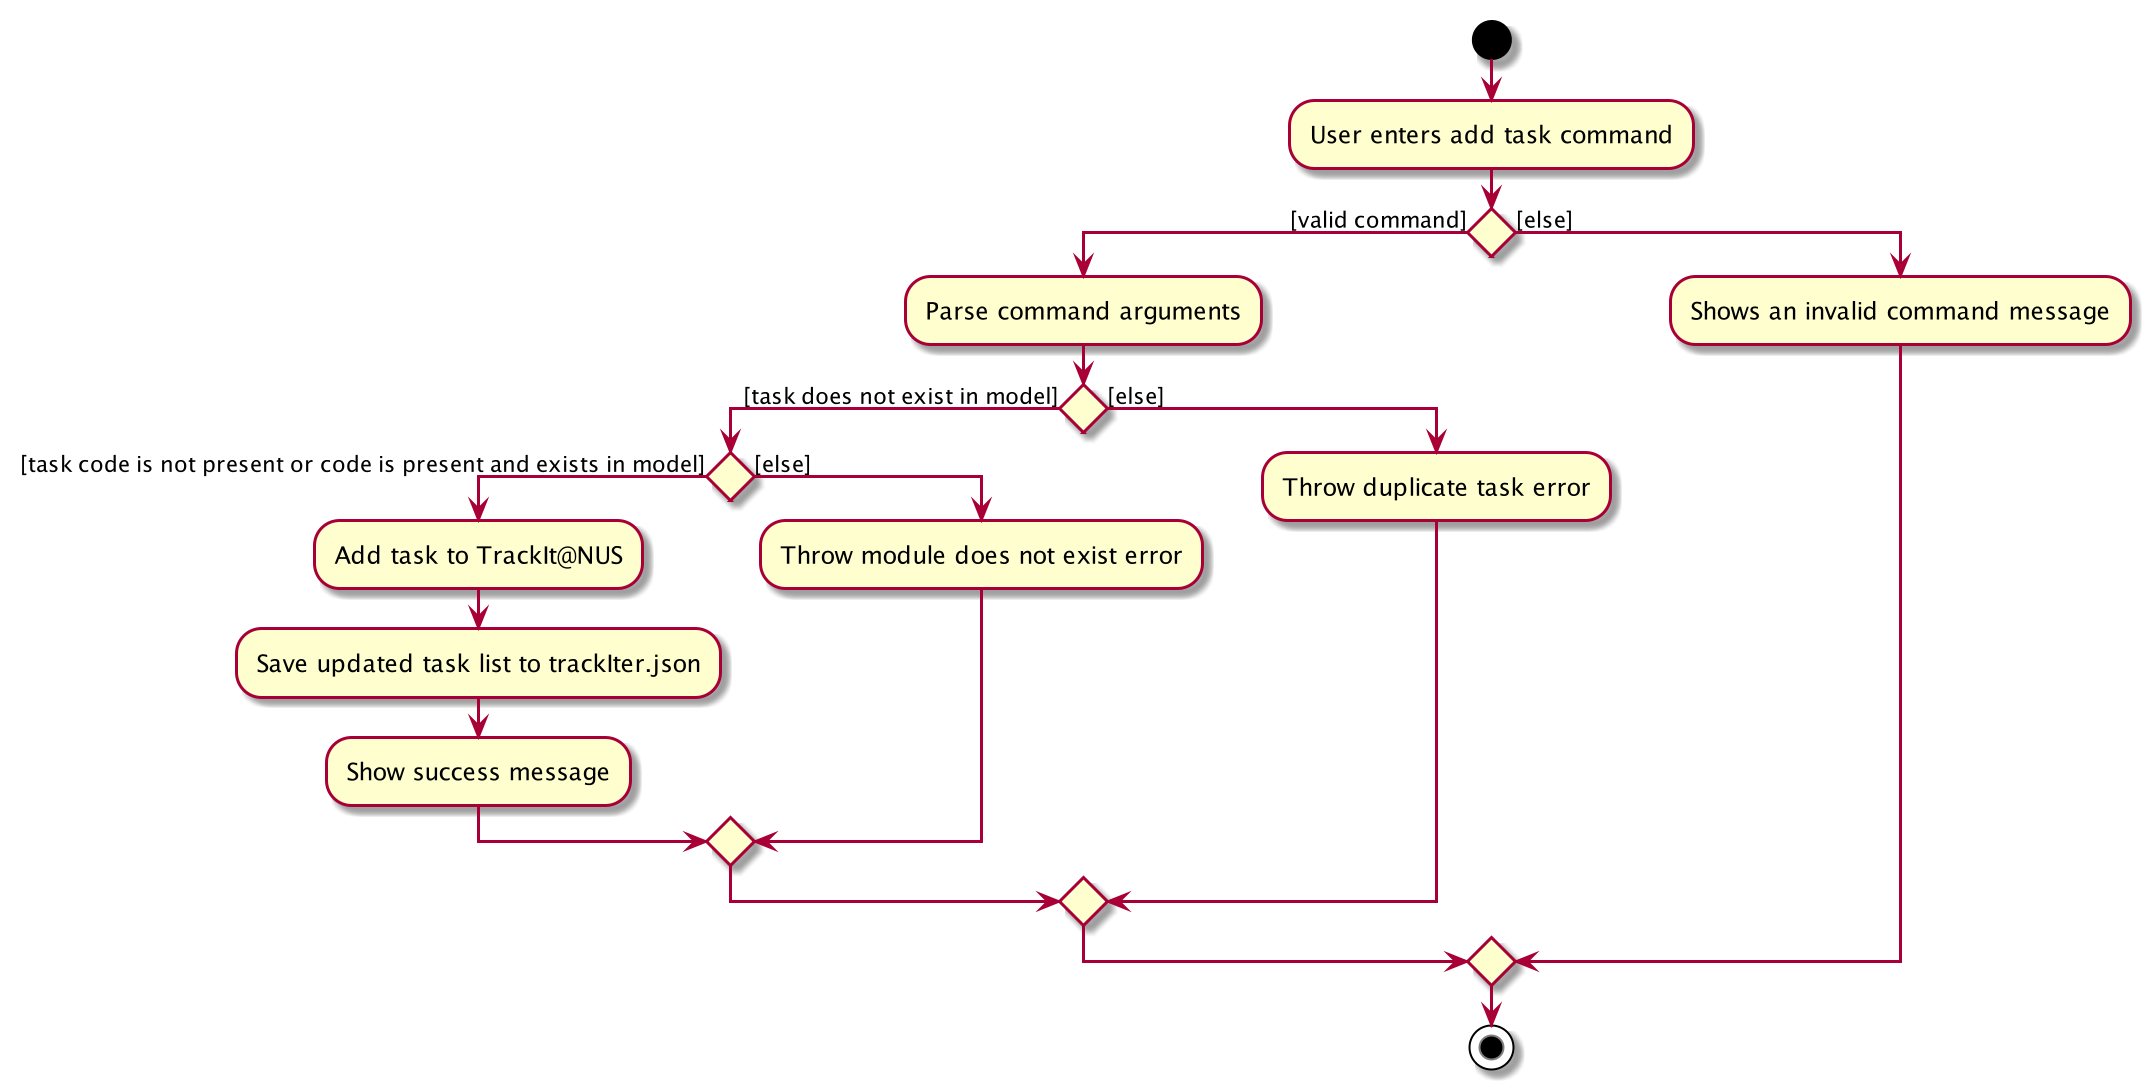
The add, delete, and edit commands are all implemented in similar ways. When they are executed they will:
- call on the relevant Model methods
- update the
UniqueTaskListdepending on the command - Save the updated task list to
data/trackIter.json - return the relevant CommandResult message
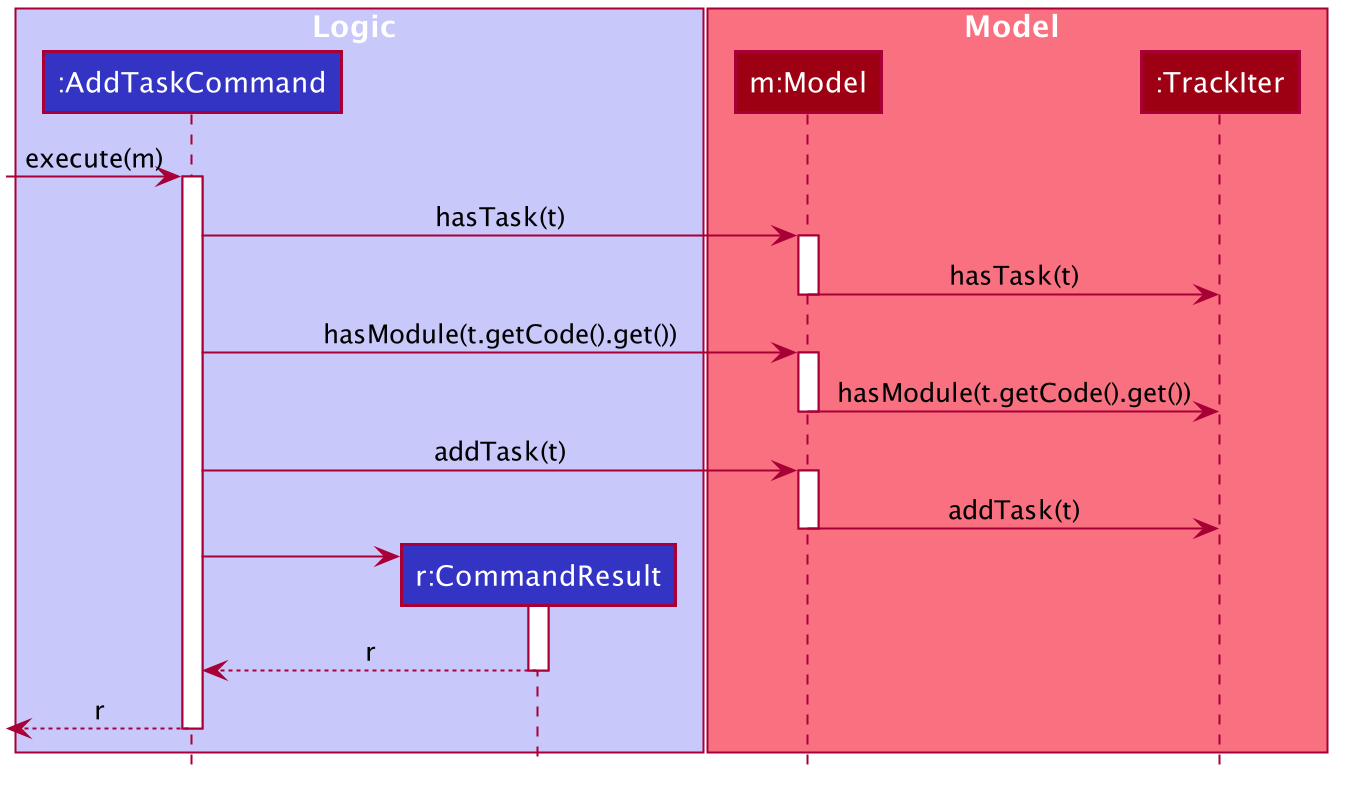
The following steps will describe the execution of the AddTaskCommand, assuming no errors are encountered:
- When
AddTaskCommandis executed, it will first call the model’shasTaskmethod to ensure that the task does not yet exist in the app - Following this, if the task is added with a non-null module code, it will call the model’s
hasModulemethod to ensure that the specified module exists - If both these checks pass,
AddTaskCommandwill call the model’saddTaskmethod. - The model will then call the
addTaskmethod of TrackIter, and adds the task to the app.
The following shows the sequence diagram of the AddTaskCommand.
The following steps will describe the execution of the DeleteTaskCommand, assuming no errors are encountered:
- When the
DeleteTaskCommandis executed, it will first call the model’sgetFilteredTaskListmethod to determine the last shown list of tasks - Then, it will call the index’s
getZeroBasedmethod to find the zero-based index of the task it must delete - Then, it will check if this index is within range
- If it is, it calls the model’s
deleteTaskmethod. - The model will then call the
removeTaskmethod of TrackIter, which deletes the task in question from the app.
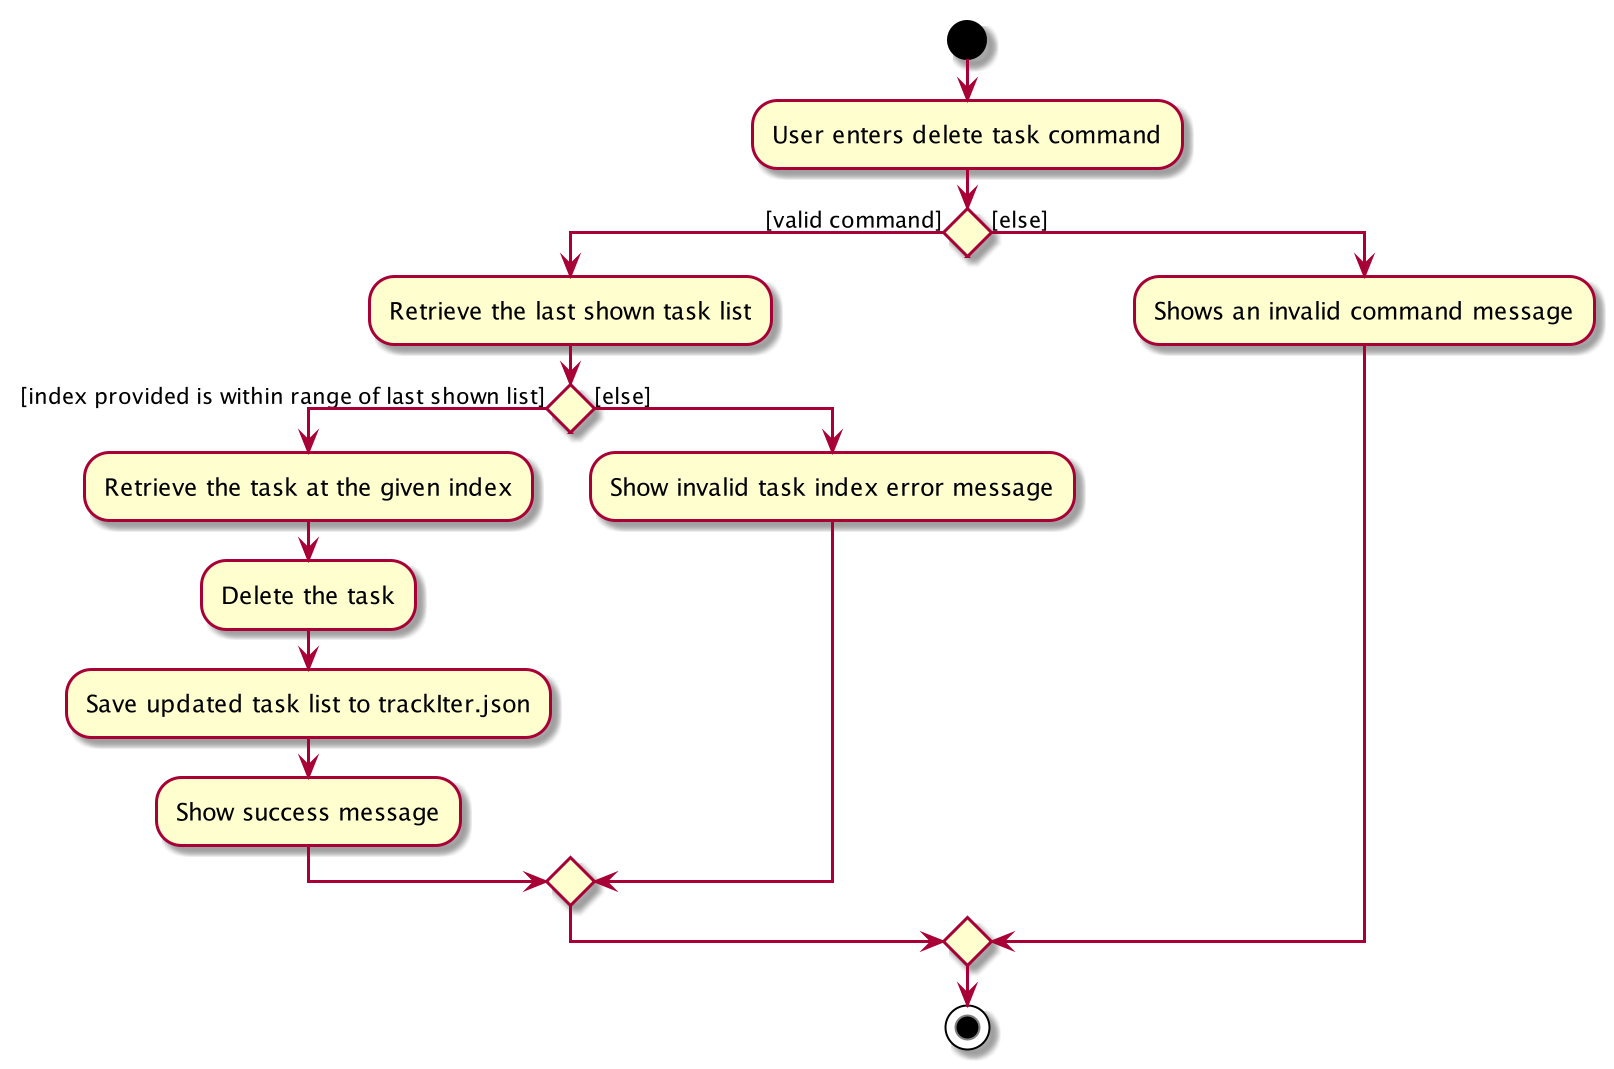
The following shows the sequence diagram of the DeleteTaskCommand.
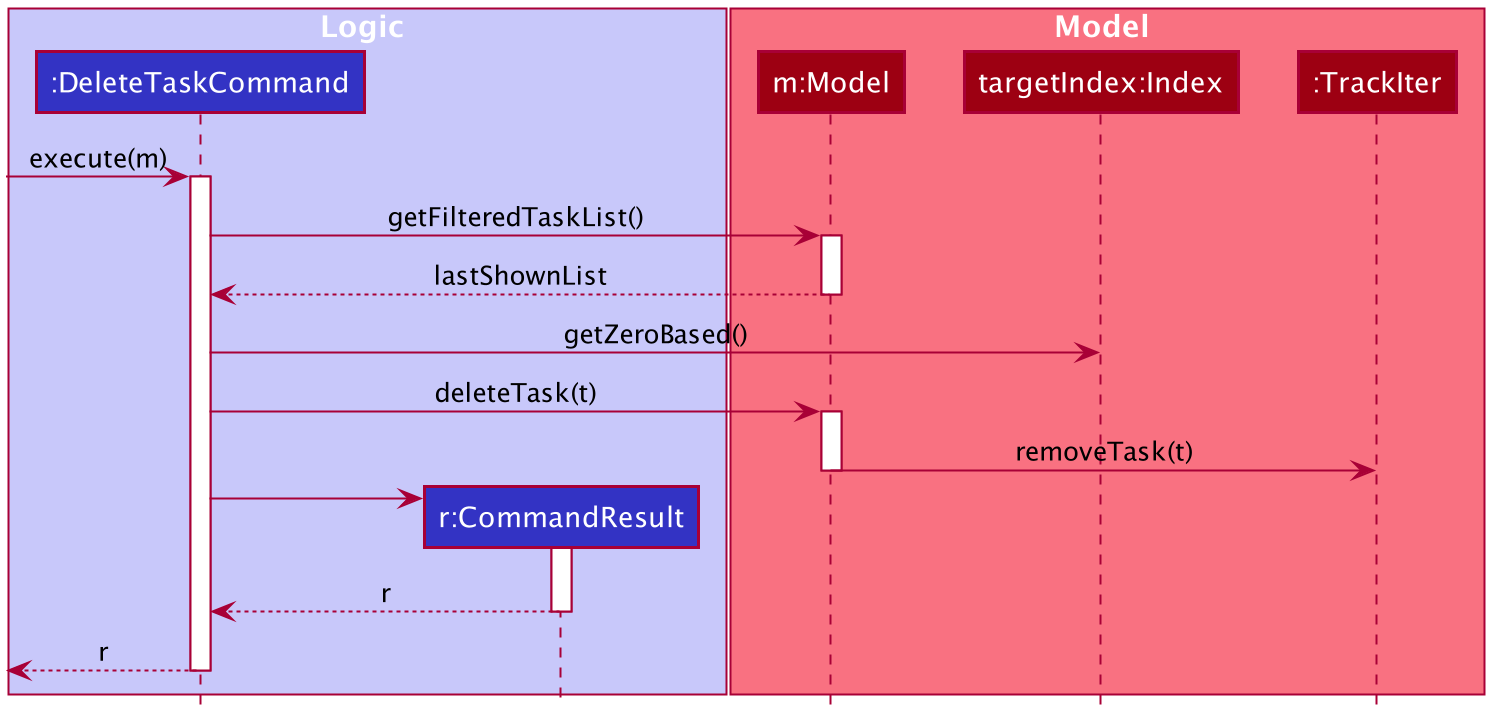
The following steps will describe the execution of the EditTaskCommand, assuming no errors are encountered:
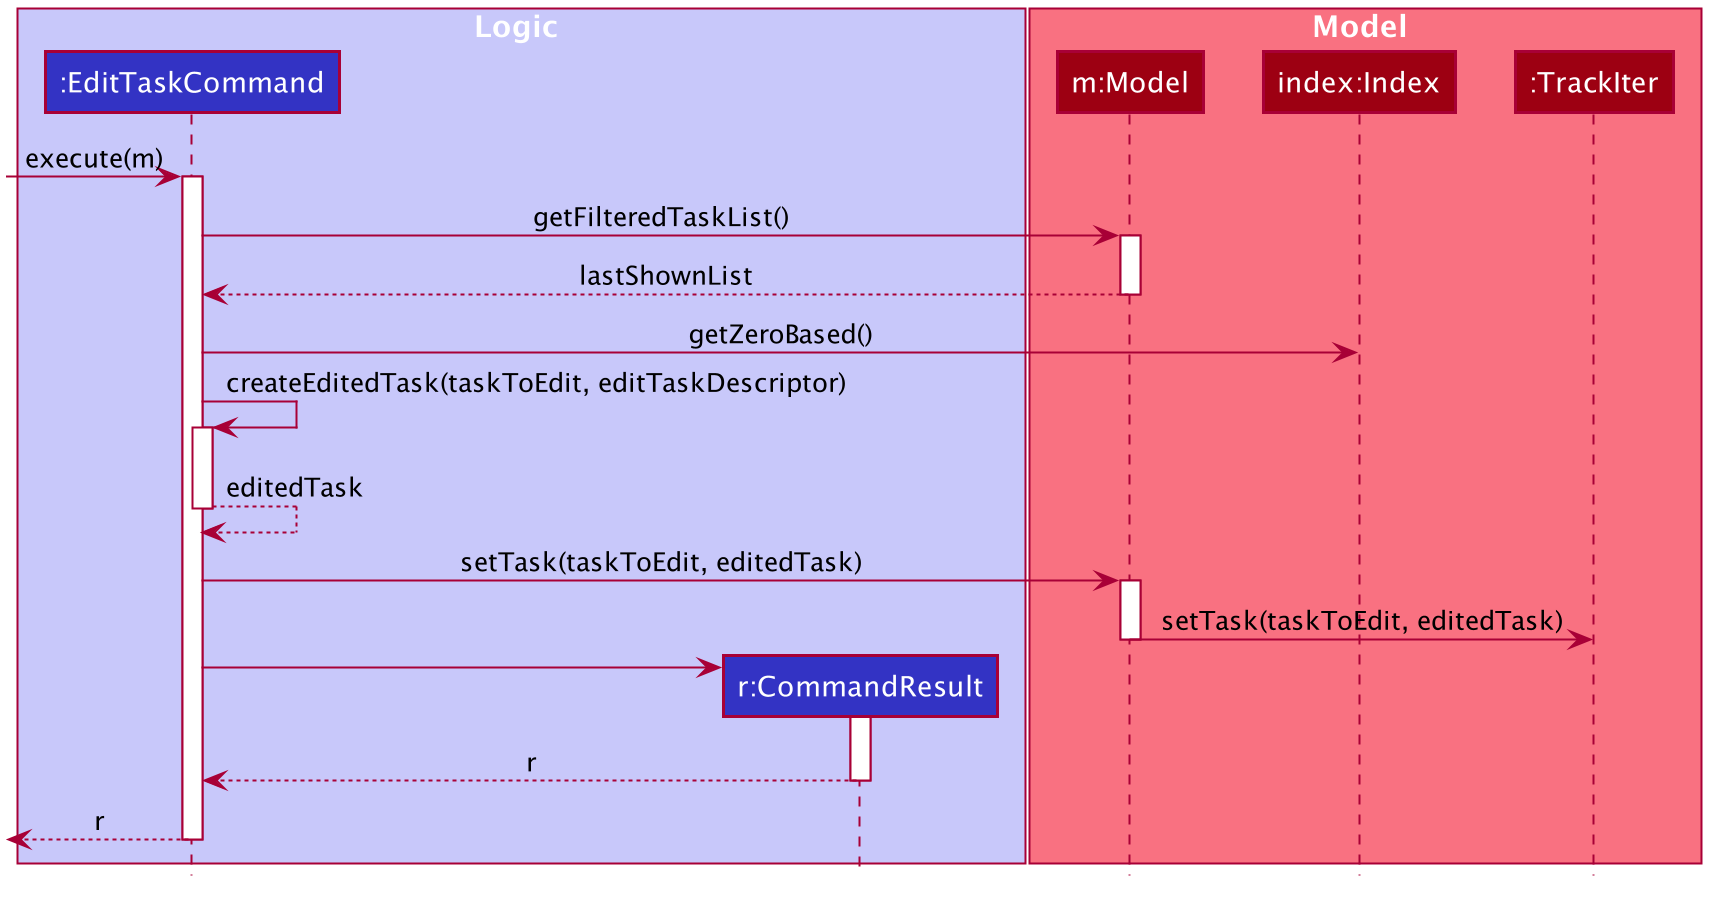
- When the
EditTaskCommandis executed, it will first call the model’sgetFilteredTaskListmethod to determine the last shown list of tasks - Then, it will call the index’s
getZeroBasedmethod to find the zero-based index of the task we must edit - It will then check if the index is within range
- If it is, it calls the model’s
setTaskmethod - The model will then call the
setTaskmethod of TrackIter, which replaces the original task with the edited version in the app.
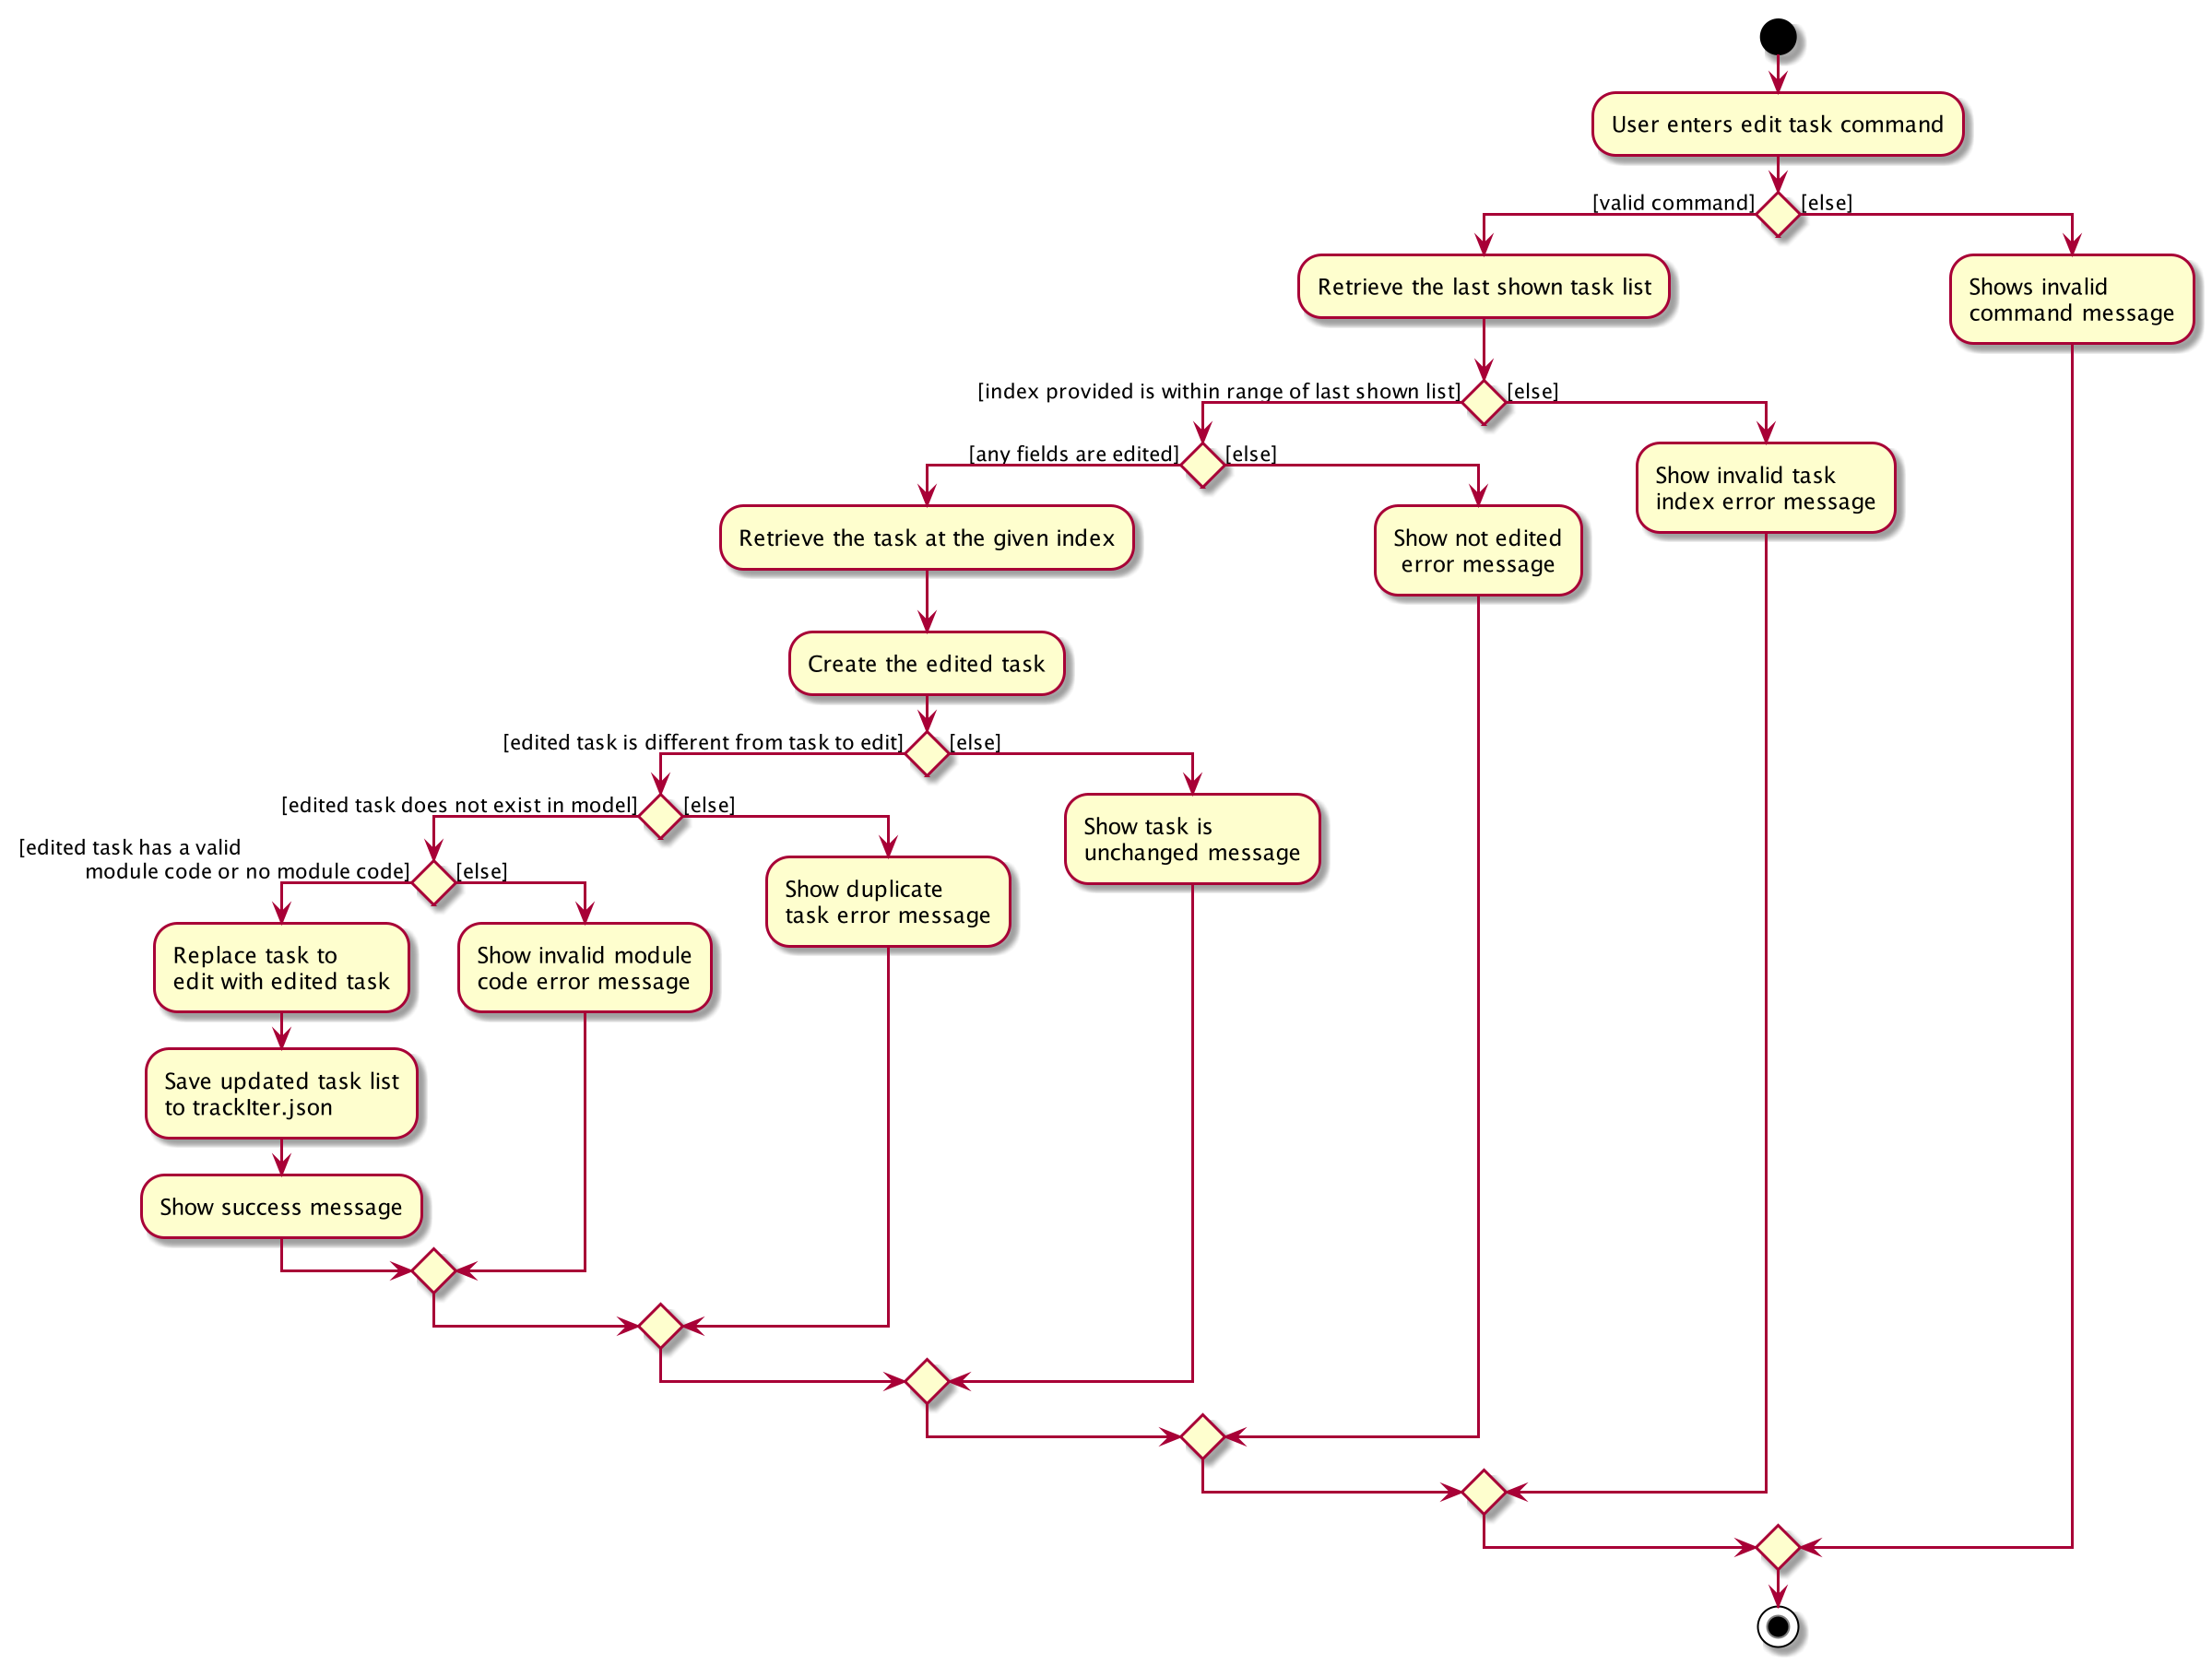
The follow shows the sequence diagram of the EditTaskCommand assuming no errors are encountered.
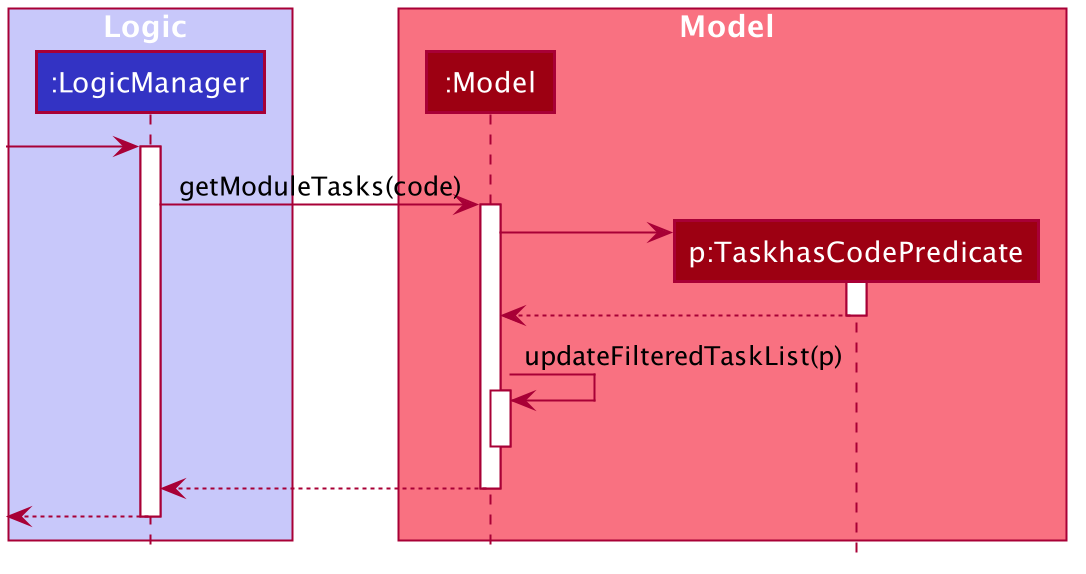
The getModuleTasks function takes in a Module Code and returns all tasks that belong to the specified module.
. When getModuleTasks is called, it uses the TaskHasCodePredicate to update the task list in the app to only show
the tasks that belong the specified module code.
This is the sequence diagram of getModuleTasks.
getOverdueTasks, getDayUpcomingTasks, and getFutureTasks are all implemented in very similar ways. In fact, the
only differences are the predicates used.
4.3.3 Design Considerations
(Contributed by Simon)
As mentioned, a task may or may not belong to a module. In the case it does not, we store the module code as
null. A task also may or may not have a remark. In the case it does not, we store the remark as the empty
string. These 2 optional fields made the EditTaskCommand more challenging to implement. We wanted the user to be
able to remove an existing module code or remark simply by typing T edit INDEX m/ and T edit INDEX r/ respectively.
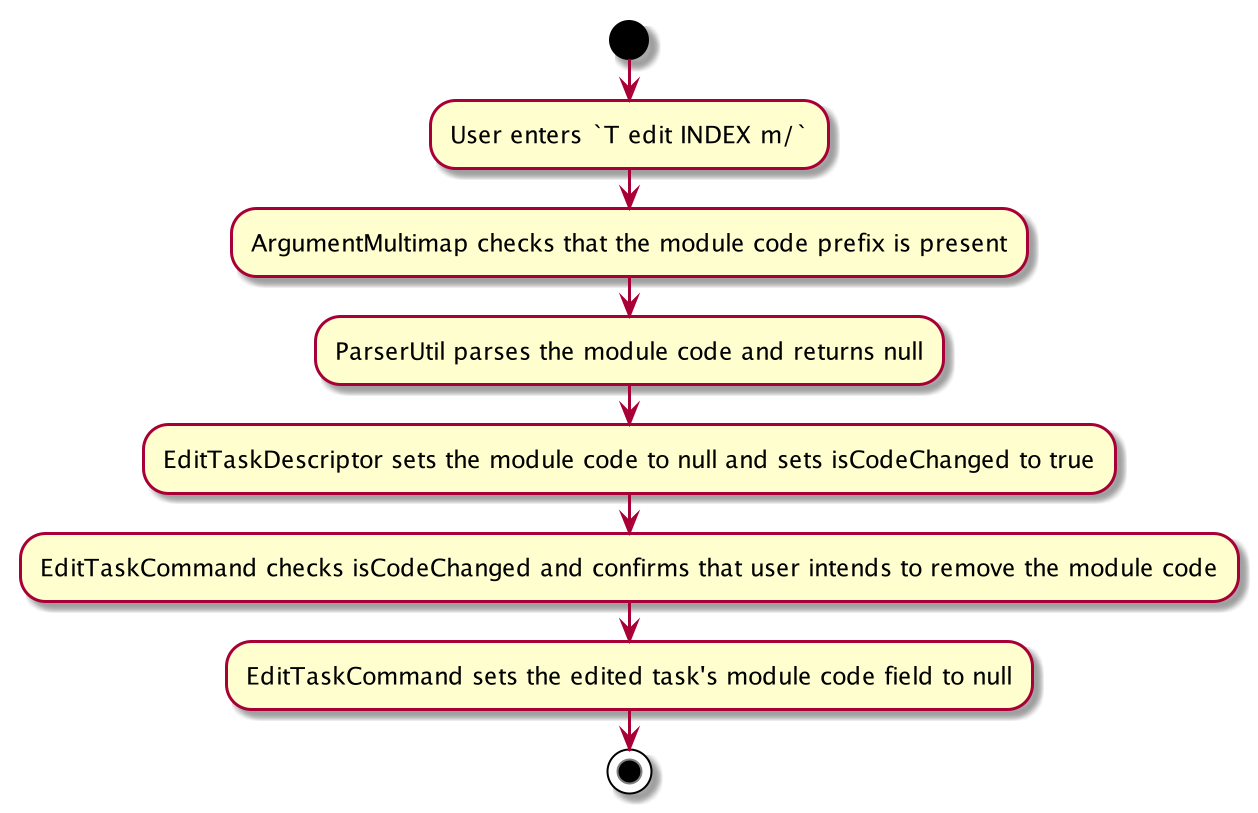
The original AB3 implementation of edit commands, which would default to the original field if the edited
field was null, would not be sufficient. Hence, we added 2 additional boolean variables - isRemarkChanged and
isCodeChanged, to know whether users wanted to remove the existing module code or remark.
4.4 Contact Manager
(Contributed by Minh)
TrackIt@NUS allows users to manage their contacts. The contact manager is one of TrackIt@NUS’s basic components.
The common commands for the contact manager include:
-
add- Creates a new contact -
edit- Modifies an existing contact -
delete- Deletes an existing contact
We will also elaborate on one more key operation that is used in the module tabs, namely getModuleContacts.
4.4.1 Rationale
(Contributed by Minh)
Managing contacts is an essential part of any student’s life. Hence, TrackIt@NUS includes a contact manager for students to keep track of all their contacts. To better support NUS students, a contact can hold any number (can be 0) of tags. If a tag matches an existing module code, editing/deleting the module will edit/delete the tag as well.
![]() To remove all tags from a contact, simply type
To remove all tags from a contact, simply type C edit INDEX t/ (use the t/ prefix but do not provide any tag).
4.4.2 Current Implementation
(Contributed by Minh)
In this section, we will outline the key operations of the Contact Manager, namely:
AddContactCommandDeleteContactCommandEditContactCommand
The add, delete, and edit commands are all implemented in similar ways. When they are executed they will:
- call on the relevant Model methods
- update the
UniqueContactListdepending on the command - Save the updated contact list to
data/trackIter.json - return the relevant CommandResult message
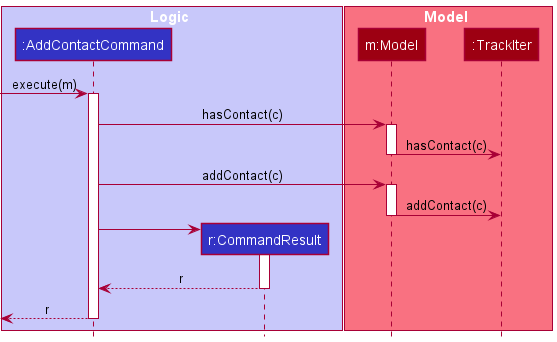
The following steps will describe the execution of the AddContactCommand, assuming no errors are encountered:
- When
AddContactCommandis executed, it will first call the model’shasContactmethod to ensure that the contact does not yet exist in the app. - If the check passes,
AddContactCommandwill call the model’saddContactmethod. - The model will then call the
addContactmethod of TrackIter, and adds the contact to the app.
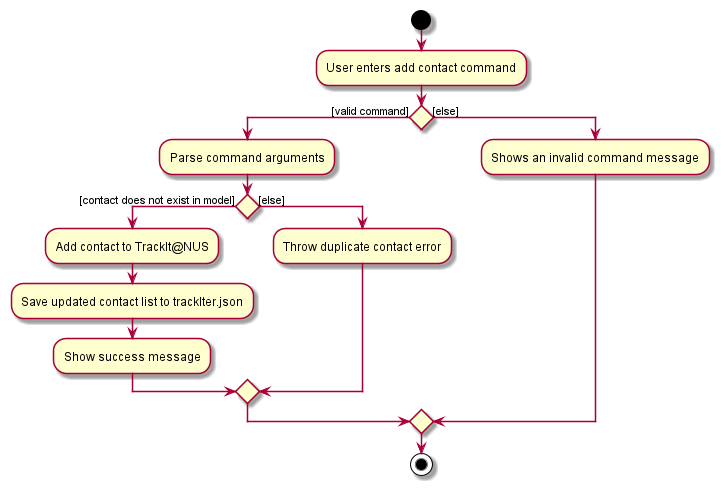
The following shows the sequence diagram of the AddContactCommand.
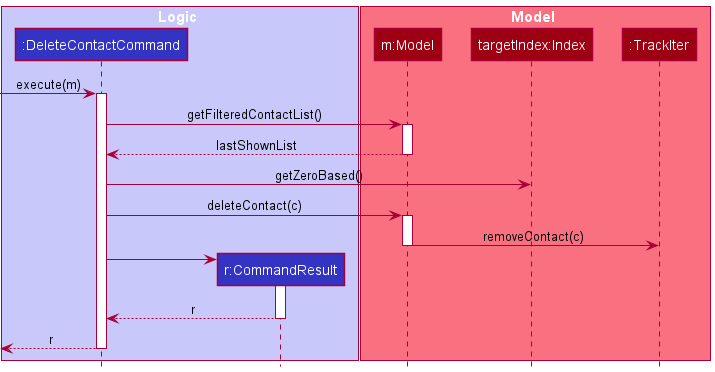
The following steps will describe the execution of the DeleteContactCommand, assuming no errors are encountered:
- When the
DeleteContactCommandis executed, it will first call the model’sgetFilteredContactListmethod to determine the last shown list of contacts. - Then, it will call the index’s
getZeroBasedmethod to find the zero-based index of the contact it must delete. - Then, it will check if this index is within range.
- If it is, it calls the model’s
deleteContactmethod. - The model will then call the
removeContactmethod of TrackIter, which deletes the contact in question from the app.
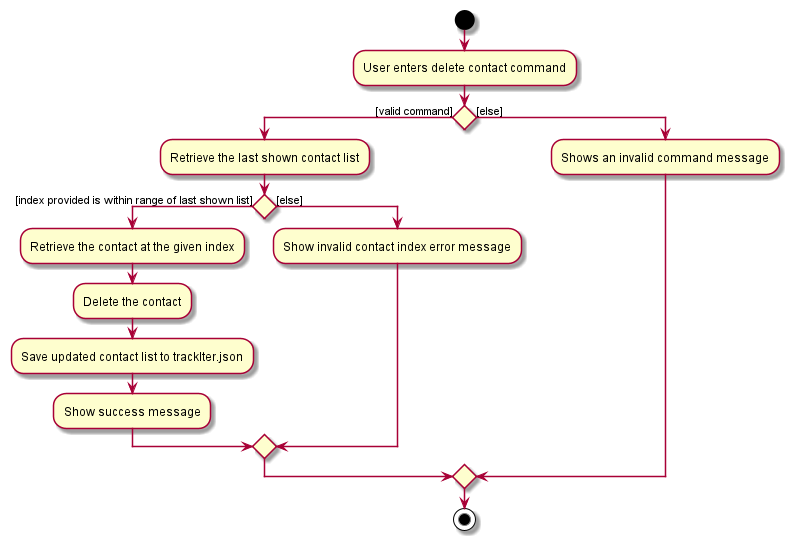
The following shows the sequence diagram of the DeleteContactCommand.
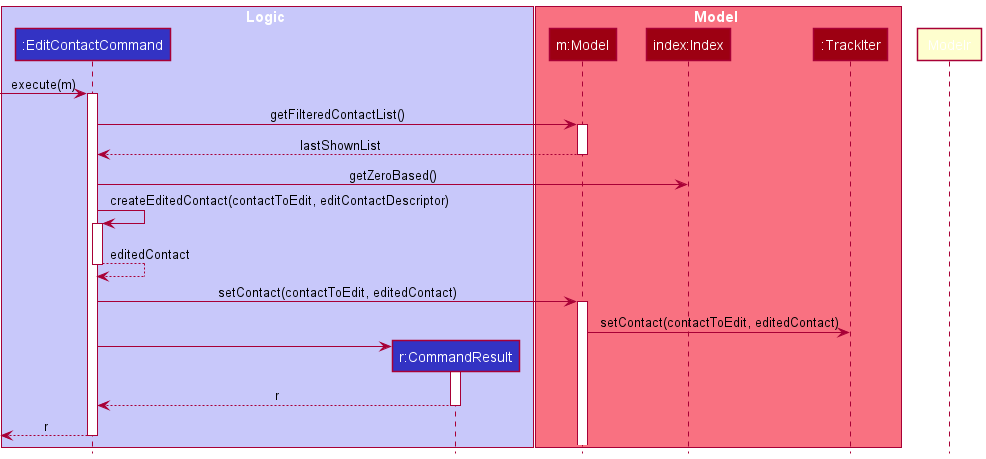
The following steps will describe the execution of the EditContactCommand, assuming no errors are encountered:
- When the
EditContactCommandis executed, it will first call the model’sgetFilteredContactListmethod to determine the last shown list of contacts. - Then, it will call the index’s
getZeroBasedmethod to find the zero-based index of the contact we must edit. - It will then check if the index is within range.
- If it is, it calls the model’s
setContactmethod. - The model will then call the
setContactmethod of TrackIter, which replaces the original contact with the edited version in the app.
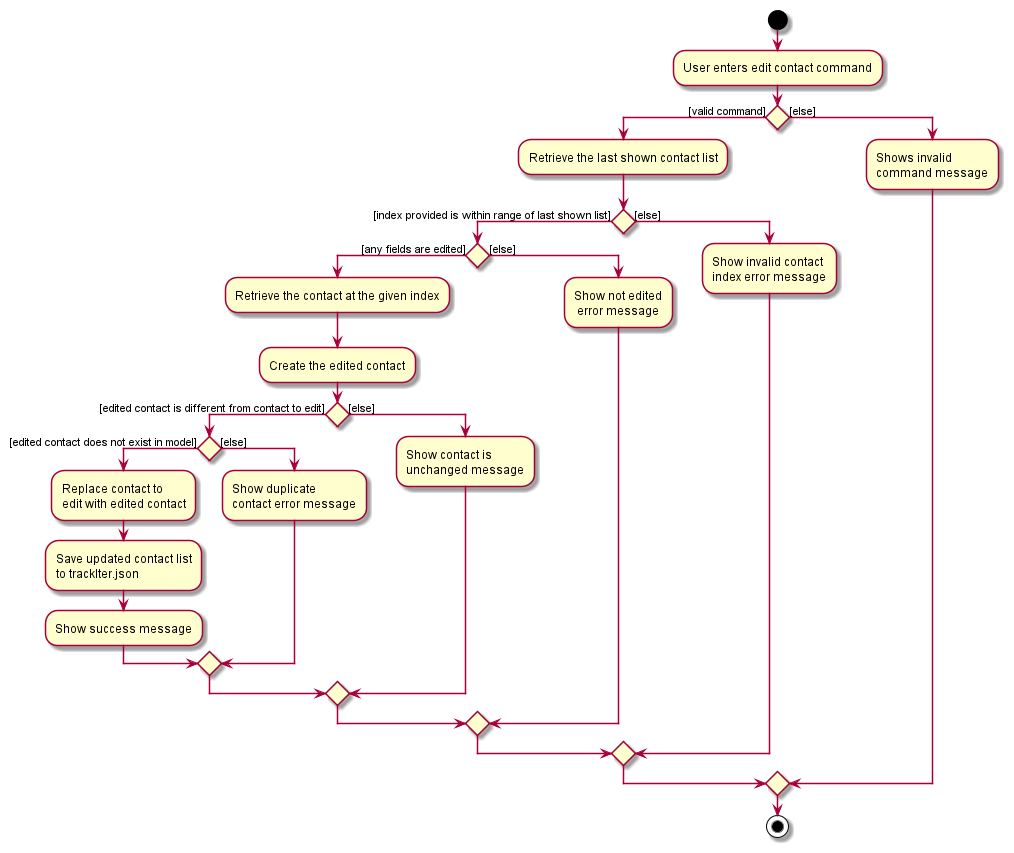
The follow shows the sequence diagram of the EditContactCommand assuming no errors are encountered.
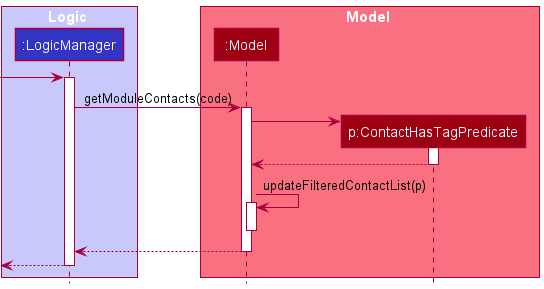
The getModuleContacts function takes in a Module Code and returns all contacts that have a tag that matches the specified module.
When getModuleContacts is called, it uses the ContactHasTagPredicate to update the contact list in the app to only show
the contacts that have the desired tag.
This is the sequence diagram of getModuleContacts.
4.4.2 Design Considerations
(Contributed by Minh)
A number of fields in a contact (namely phone number and e-mail address) are optional. In the case they are not specified,
we store them as null. Similar to tasks, we wanted users to be able to remove any optional field simply by
specifying the /p or /e flag without providing a parameter.
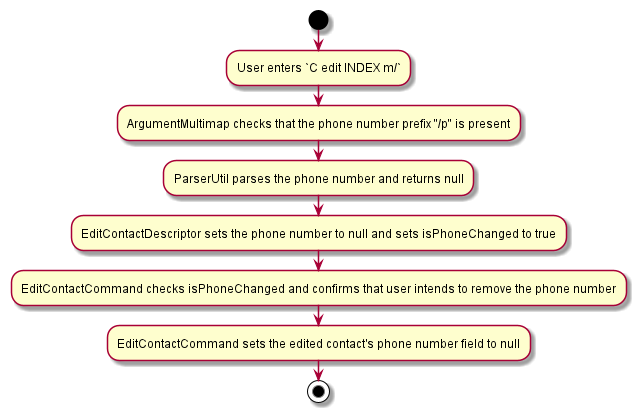
The original AB3 implementation of edit commands, which would default to the original field if the edited
field was null, would not be sufficient. Hence, we added 2 additional boolean variables - isPhoneChanged and
isEmailChanged, to know whether users wanted to remove the existing phone number and/or e-mail address.
4.5 Logging
(Contributed by Simon)
- We are using
java.util.loggingpackage for logging. - The
LogsCenterclass is used to manage the logging levels and logging destinations - The
Loggerfor a class can be obtained usingLogsCenter.getLogger(Class)which will log messages according to the specified logging level - Log messages are output through the console and to a
.logfile - The output logging level can be controlled using the
logLevelsetting in the configuration file (see Configuration for more info) - When choosing a level for a log message, follow the conventions stated below
4.5.1 Logging Levels
-
SEVERE: A critical problem detected which may cause the termination of the application -
WARNING: Can continue, but with caution -
INFO: Information showing the noteworthy actions by the App -
FINE: Details that is not usually noteworthy but may be useful in debugging e.g. print the actual list instead of just its size
4.6. Configuration
Certain properties of the application can be controlled (e.g user preferences file location, logging level) through the configuration file (default: config.json).
5. Documentation
(Contributed by Simon)
Refer to the guide here
6. Testing
(Contributed by Simon)
Refer to the guide here
7. Dev Ops
Refer to the guide here
Appendix A: Product Scope
(Contributed by Simon)
Target user profile:
- university students
- take multiple modules
- want to easily know the events lined up in their week ahead
- want to have their personal todos integrated with the academic calendar
- want to access related contacts when they browse a module
- want to keep track of module details (relevant lessons, tasks, and contacts)
- prefer desktop apps over other types
- can type fast
- prefers typing to mouse interactions
- is reasonably comfortable using CLI apps
Value proposition
- An all-in-one student life manager, that simplifies the lives of university students by combining the ability to manage four key aspects of student life into one app. Students will be able to know every important thing they have upcoming as well as every module-related thing they currently have.
- TrackIt@NUS can manage your student life faster than the typical mouse/GUI app.
Appendix B: User stories
(Contributed by Tiffany and Wei Hong)
Priorities: High (must have) - * * *, Medium (nice to have) - * *, Low (unlikely to have) - *
| Priority | As a … | I want to … | So that I can… |
|---|---|---|---|
* * * |
student | get an overview of the upcoming tasks I have | plan my schedule for the day |
* * * |
‘last-minute’ student | have my tasks sorted in order of deadlines | prioritise which task to do first to not miss any deadlines |
* * * |
student | get the timings of my upcoming lessons | avoid missing or coming late for my lessons |
* * * |
student | get the timings of my upcoming lessons | remind myself to complete the relevant tasks and necessary revision before lesson |
* * * |
hardworking student | track pending tasks of a specific module | plan the things to do while studying for that module |
* * * |
student | view the lessons I have for a specific module | make the necessary preparation and revision for that module |
* * * |
lazy student | include weekly recurring lessons | save the trouble of adding the same lessons every week |
* * * |
struggling student | quickly access the contact information of my TA/Prof | easily contact them for help |
* * * |
careless student | edit the details of my tasks, modules, lessons and contacts | rectify mistakes I made |
* * * |
student | delete any tasks when they are completed | focus better on the tasks that have yet to be completed |
* * * |
student | delete any contacts | no longer have details of contacts that I no longer need |
* * * |
student | delete any modules after I am done reading them | remove the relevant tasks and lessons that I no longer need |
* * |
new user | access a built-in help guide | get familiarised to the commands that I can use quickly |
* * |
forgetful user | view the commands summary without referring to the user guide | find the commands that I need quickly |
* * |
forgetful student | group my friends by those that are taking the same modules as I am | share resources or ask for help much more easily |
* * |
organised student | assign priority ratings to my tasks | know what has to be done first (coming in v1.5) |
* * |
clumsy student | receive a warning message when I try to add lessons that clash | prevent clashes in my schedule (coming in v1.5) |
* |
student | set biweekly or monthly recurring lessons | keep track of some lessons that may be biweekly or monthly (coming in v1.5) |
* |
student | edit a task’s remarks without having to retype the entire remark | make small changes much more easily (coming in v1.5) |
* |
student | be able to sort my contacts by other parameters | find relevant contacts more easily (coming in v1.5) |
* |
design-centric user | customise the colors tag of each module | associate modules with the colours that I prefer (coming in v1.5) |
* |
active command line user | switch between the different views using command line | view the information in the different views with greater ease (coming in v1.5) |
* |
user | be able to set reminders that might not be related to a module | make use of the calendar function to organize not just my school work but my own life |
Appendix C: Use cases
(Contributed by Tiffany and Wei Hong)
(For all use cases below, the System is the TrackIt@NUS application and the Actor is the user, unless specified otherwise)
Navigation
Use case: UC01 - Viewing the Upcoming tab

MSS:
   1.  User requests to go to the Upcoming tab
   2.  TrackIt@NUS switches to the Upcoming tab, where user can view all upcoming lessons and tasks
   Use case ends.
Use case: UC02 - Viewing the Contacts tab

MSS:
   1.  User requests to go to the Contacts tab
   2.  TrackIt@NUS switches to the Contacts tab, where user can view all contacts
   Use case ends.
Use case: UC03 - Viewing the Help tab

MSS:
   1.  User requests to view the help tab
   2.  TrackIt@NUS opens the help window showing the list of commands and their explanations
   Use case ends.
Use case: UC04 - Going to a different tab

MSS:
   1.  User requests to go to a different tab
   2.  TrackIt@NUS switches to the requested tab
   Use case ends.
Use case: UC05 - Exiting the App

MSS:
   1.  User requests to exit the app
   2.  TrackIt@NUS closes the app window
    Use case ends.
Module
Use Case: UC06 - Adding a Module

Preconditions: Module must not already exist in the app.
Guarantees: Updated module list with the requested module added.

MSS:
   1.  User requests to add a new module
   2.  TrackIt@NUS adds the requested module
   Use case ends.

Extensions
   1a. The given module code already exists in the app
      1a1. TrackIt@NUS shows an error message
      Use case resumes at step 1.

   1b. The given module code is invalid
      1b1. TrackIt@NUS shows an error message
      Use case resumes at step 1.

   1c. The given module name is invalid
      1c1. TrackIt@NUS shows an error message
      Use case resumes at step 1.
Use Case: UC07 - Editing a Module

Preconditions: Module must exist in the app.
Guarantees: Updated module list with the requested module edited.

MSS:
   1.  User requests to edit an existing module
   2.  TrackIt@NUS replaces the original module with the edited one
   Use case ends.

Extensions:
   1a. The given module code does not exist in the app
      1a1. TrackIt@NUS shows an error message
      Use case resumes at step 1.

   1b. The given module code is invalid
      1b1. TrackIt@NUS shows an error message
      Use case resumes at step 1.

   1c. The given module name is invalid
      1c1. TrackIt@NUS shows an error message
      Use case resumes at step 1.
Use Case: UC08 - Deleting a Module

Preconditions: Module must exist in the app.
Guarantees: Updated module list with the requested module removed.

MSS:
   1.  User requests to delete an existing module
   2.  TrackIt@NUS deletes the module
   Use case ends.

Extensions:
   1a. The given module does not exist in the app
      1a1. TrackIt@NUS shows an error message
      Use case resumes at step 1.
Lesson
Use Case: UC09 - Adding a Lesson

Preconditions: Module must exist in the app.
Guarantees: Updated lesson list with the requested lesson added.

MSS:
   1.  User requests to add a lesson
   2.  TrackIt@NUS adds the requested lesson
   Use case ends.

Extensions:
   1a. The given module code does not exist
      1a1. TrackIt@NUS shows an error message
      Use case resumes at step 1.

   1b. The given module code is invalid
      1b1. TrackIt@NUS shows an error message
      Use case resumes at step 1.

   1c. The given lesson already exists in the app
      1c1. TrackIt@NUS shows an error message
      Use case resumes at step 1.

   1d. The given start time is after the end time
      1d1. TrackIt@NUS shows an error message
      Use case resumes at step 1.

   1e. The given address is too long (> 20 characters)
      1e1. TrackIt@NUS shows an error message
      Use case resumes at step 1.
Use Case: UC10 - Editing a Lesson

Preconditions: Lesson must exist in the app.
Guarantees: Updated lesson list with the requested lesson edited.

MSS:
   1.  User requests to edit a lesson
   2.  TrackIt@NUS replaces the original lesson with the edited lesson
   Use case ends.

Extensions
   1a. The given module code does not exist
      1a1. TrackIt@NUS shows an error message
      Use case resumes at step 1.

   1b. The given module code is invalid
      1b1. TrackIt@NUS shows an error message
      Use case resumes at step 1.

   1c. The given lesson already exists in the app
      1c1. TrackIt@NUS shows an error message
      Use case resumes at step 1.

   1d. The given start time is after the end time
      1d1. TrackIt@NUS shows an error message
      Use case resumes at step 1.

   1e. The given address is too long (> 20 characters)
      1e1. TrackIt@NUS shows an error message
      Use case resumes at step 1.

   1f. No field is provided to edit
      1f1. TrackIt@NUS shows an error message
      Use case resumes at step 1.

   1g. The requested lesson does not exist (provided index is invalid)
      1g1. TrackIt@NUS shows an error message
      Use case resumes at step 1.
Use Case: UC11 - Deleting a Lesson

Preconditions: Lesson must exist in the app.
Guarantees: Updated lesson list with the requested lesson removed.

MSS:
   1.  User requests to delete a lesson
   2.  TrackIt@NUS deletes the requested lesson
   Use case ends.

Extensions:
   1a. The requested lesson does not exist (provided index is invalid)
      1a1. TrackIt@NUS shows an error message
      Use case resumes at step 1.
Use Case: UC12 - View the lessons for a module

Preconditions: Module must exist in the app.
Guarantees: Show all the module's lessons.

MSS:
   1.  User views a module's page
   2.  TrackIt@NUS shows all the module's lessons
   Use case ends.

Extensions
   1a. The given module code does not exist
      1a1. User cannot view the module's page
      Use case ends.

   1b. The given module does not have any lessons
      1b1. Module page shows no lessons
      Use case resumes at step 1.
Use Case: UC13 - View a certain day's lessons

Guarantees: Shows a certain day's lessons.

MSS:
   1.  User views the Upcoming tab
   2.  TrackIt@NUS shows every day's lessons for the next week
   Use case resumes at step 1.

Extensions:
   1a. The given day does not have any lessons
      1a1. TrackIt@NUS shows no lessons for that day
      Use case ends.
Task
Use Case: UC14 - Adding a Task

Preconditions: Requested task does not currently exist in the app.
Guarantees: Updated task list with the requested task added.

MSS:
   1.  User requests to add a task
   2.  TrackIt@NUS adds the requested task
   Use case ends.

Extensions

   1a. The given task already exists in the app
      1a1. ackIt@NUS shows an error message
      Use case resumes at step 1.

   1b. The given date is in the wrong format (must be in `dd/mm/yyyy`)
      1b1.TrackIt@NUS shows an error message
      Use case resumes at step 1.

   1c. The given name is invalid
      1c1.TrackIt@NUS shows an error message
      Use case resumes at step 1.
Use Case: UC15 - Adding a Task to a Module

Preconditions: Module must exist in the app.
Guarantees: Updated task list with the requested task added.

MSS:
   1.  User requests to add a task to a specific module
   2.  TrackIt@NUS adds the requested task to the specified module
   Use case ends.

Extensions:
   1a. The given task already exists in the app
      1a1. TrackIt@NUS shows an error message
      Use case resumes at step 1.

   1b. The given module is in the wrong format
      1b1. TrackIt@NUS shows an error message
      Use case resumes at step 1.

   1c. The given name is invalid
      1c1. TrackIt@NUS shows an error message
      Use case resumes at step 1.
Use Case: UC16 - Editing a Task

Preconditions: Task exists in the app.
Guarantees: Updated task list with the requested task edited.

MSS:
   1.  User requests to edit a task
   2.  TrackIt@NUS edits the requested task
   Use case ends.

Extensions:
   1a. The edited task already exists in the app
      1a1. TrackIt@NUS shows an error message
      Use case resumes at step 1.

   1b. The given name is invalid
      1b1. TrackIt@NUS shows an error message
      Use case resumes at step 1.

   1c. The given date is in the wrong format
      1c1. TrackIt@NUS shows an error message
      Use case resumes at step 1.
Use Case: UC17 - Editing a Task to belong to another Module

Preconditions: Task exists in the app, Module exists in the app.
Guarantees: Updated task list with the requested task's module field changed.

MSS:
   1.  User requests to change a task to another module
   2.  TrackIt@NUS moves the requested task to the specified module
   Use case ends.

Extensions:
   1a. The edited task already exists in the app
      1a1. TrackIt@NUS shows an error message
      Use case resumes at step 1.
Use Case: UC18 - Editing a Task not to belong to any Module

Preconditions: Task exists in the app.
Guarantees: Updated task list with the requested task not belonging to any module.

MSS:
   1.  User requests to remove the module field from the task
   2.  TrackIt@NUS removes the module field from the task
   Use case ends.

Extensions:
   1a. The edited task already exists in the app
      1a1. TrackIt@NUS shows an error message
      Use case resumes at step 1.
Use Case: UC19 - Deleting a Task

Preconditions: Task exists in the app.
Guarantees: Updated task list with the requested task removed.

MSS:
   1.  User requests to delete task
   2.  TrackIt@NUS deletes the requested task
   Use case ends.

Extensions:
   1a. The requested task does not exist (provided index is invalid)
      1a1. TrackIt@NUS shows an error message
      Use case resumes at step 1.
Use Case: UC20 - View a day's Tasks

Guarantees: Show's all that day's tasks.

MSS:
   1.  User views the Upcoming tab
   2.  TrackIt@NUS show every day's tasks for the next week
   Use case ends.

Extensions:
   1a. The given day does not have any tasks
      1a1. TrackIt@NUS shows no tasks for that day
      Use case ends.
Use Case: UC21 - Viewing a Module's Tasks

Preconditions: Module exists in the app.
Guarantees: Shows all the tasks that belong the specified module.

MSS:
   1.  User views the requested module's page
   2.  TrackIt@NUS shows all the tasks that belong to the specified module
   Use case ends.

Extensions:
   1a. The requested module does not exist
      1a1. User cannot view the module's page
      Use case ends.

   1b. The requested module does not have any tasks
      1b1. TrackIt@NUS shows no tasks
      Use case ends.
Contact
Use Case: UC22 - Adding a Contact

Preconditions: Contact must not already exist in the app.
Guarantees: Updated contact list with the requested contact added.

MSS:
   1.  User requests to add contact
   2.  TrackIt@NUS adds the requested contact
   Use case ends.

Extensions:
   1a. The requested contact already exists in the app
      1a1. TrackIt@NUS shows an error message
      Use case resumes at step 1.

   1b. The provided name is invalid (wrong format)
      1b1. TrackIt@NUS shows an error message
      Use case resumes at step 1.

   1c. The provided email is invalid (wrong format)
      1c1. TrackIt@NUS shows an error message
      Use case resumes at step 1.

   1c. The provided phone number is invalid (wrong format)
      1c1. TrackIt@NUS shows an error message
      Use case resumes at step 1.
Use Case: UC23 - Editing a Contact

Preconditions: Contact must exist in the app.
Guarantees: Updated contact list with the requested contact edited.

MSS:
   1.  User requests to edit contact
   2.  TrackIt@NUS edit the requested contact
   Use case ends.

Extensions:
   1a. The edited contact already exists in the app
      1a1. TrackIt@NUS shows an error message
      Use case resumes at step 1.

   1b. The provided name is invalid (wrong format)
      1b1. TrackIt@NUS shows an error message
      Use case resumes at step 1.

   1c. The provided email is invalid (wrong format)
      1c1. TrackIt@NUS shows an error message
      Use case resumes at step 1.

   1d. The provided phone number is invalid (wrong format)
      1d1. TrackIt@NUS shows an error message
      Use case resumes at step 1.
Use Case: UC24 - Deleting a Contact

Preconditions: Contact must exist in the app.
Guarantees: Updated contact list with the requested contact removed.

MSS:
   1.  User requests to delete contact
   2.  TrackIt@NUS removes the requested contact
   Use case ends.

Extensions:

   1a. The requested contact does not exists in the app (index provided is invalid)
      1a1. TrackIt@NUS shows an error message
      Use case resumes at step 1.
Use Case: UC25 - View a Module's Contacts

Preconditions: Module must exist in the app.
Guarantees: Shows all contacts associated with the requested module

MSS:
   1.  User views any module page
   2.  TrackIt@NUS shows the module's contact
   Use case ends.

Extensions:
   1a. The requested module does not exist in the app
      1a1. User cannot view the module page
      Use case ends.
Appendix D: Non-Functional Requirements
(Contributed by Long)
- Should work on any mainstream OS as long as it has Java
11or above installed. - A user with above average typing speed for regular English text (i.e. not code, not system admin commands) should be able to accomplish most of the tasks faster using commands than using the mouse.
- A user should be able to easily see why their commands are invalid
- The app should be able to run with or without internet connection
- The app should not require user to install
- Features implemented should be easily testable by manual testing, and possible to be tested by automated testing.
- The UI of the app makes users comfortable using it
- Users of the app find the app intuitive and easy to use
- The app should be able to save data locally
- The app should be for a single user i.e. (not a multi-user product).
- The app should be able to start up sufficiently fast (<5s).
- The app should not crash in the event of invalid user input
- The app should be able to handle 150 tasks, lessons, contacts and modules in total without a noticeable performance degradation.
Appendix E: Glossary
(Contributed by Simon)
Appendix F: Instructions for Manual Testing
(Contributed by Simon)
Given below are instructions to test the app manually.
![]() These instructions only provide a starting point for testers to work on, testers are expected to
do more exploratory testing.
These instructions only provide a starting point for testers to work on, testers are expected to
do more exploratory testing.
Launch and Shutdown
- Initial Launch
- Download the jar file and copy it into an empty folder
- Open the folder containing the jar and enter the command
java -jar trackitnus.jarin the terminal
Expected: Shows a GUI with a list of upcoming tasks and lessons
- Download the jar file and copy it into an empty folder
- Saving Window Preferences
- Resize the window to an optimal size. Move the window to a different location. Close the window
- Re-launch the app, following the steps in the previous test
Expected: The most recent window size and location is retained
- Resize the window to an optimal size. Move the window to a different location. Close the window
Adding a Module
- Adding a module from any view
- Prerequisites: Arguments are valid and compulsory parameters (module code and module name) are provided
- Test Case:
M add m/CS1231 n/Discrete Mathematics
Expected: Adds a module with the module codeCS1231and module nameDiscrete Mathematics. The new module code will appear on the sidebar, you can click on it to view the module
- Test Case:
M add m/CS1231 n/Not so discrete Mathematics
Expected: The module is not added. An error message saying that the module already exists (assuming you did the 1st test case) is shown
- Test Case:
M add m/cs1231 n/Discrete Mathematics
Expected: The module is not added. An error message saying that the module code is the incorrect format is shown
- Other incorrect add commands to try:
M add m/ n/Discrete Mathematics,M add m/CS1231 n/,M add m/ n /Discrete Mathematics
Expected: Similar to previous test case
- Prerequisites: Arguments are valid and compulsory parameters (module code and module name) are provided
Adding a Lesson
- Adding a lesson to a module:
- Prerequisites:
- Arguments are valid and compulsory parameters are provided
- The module must exist (the module code must belong to an existing module)
- The type must be one of
lec/lecture,tut/tutorial,lab/laboratory,rec/recitation, orsec /sectional
- The date provided must have the form
Day HH:mm-HH:mm
- The start time of the date must be earlier than the end time
- The address provided cannot be longer than 20 characters
- Arguments are valid and compulsory parameters are provided
- Test Case:
L add m/CS1101S t/Lab d/Fri 16:00-18:00 a/COM1-0215
Expected: The lesson is added to theCS1101Smodule
- Test Case:
L add m/CS1101S t/testing d/Fri 16:00-18:00 a/COM1-0215
Expected: The lesson is not added. An error message about the allowed types is shown
- Other incorrect commands to try:
L add m/CS1101S t/testing d/Fri 16:00-18:00 a/COM1-0215,L add m/CS1101S t/Lab d/Fri 16:00-18:00 a/Too long of an address to be a valid address,L add m/CS1101S t/testing d/Fri 20:00-18:00 a/COM1-0215
Expected: Similar to previous test case
- Prerequisites:
Adding a Task
- Adding a task
- Prerequisites:
- Arguments are valid and compulsory parameters are provided
- The date must be in the form
dd/mm/yyyy
- Arguments are valid and compulsory parameters are provided
- Test Case:
T add n/Buy cake for Mom d/12/12/2020
Expected: Adds a task by the nameBuy cake for Momto TrackIt@NUS
- Test Case:
T add n/Buy cake for Dad d/11/11/2020 r/Get extra chocolate
Expected: Adds a task by the nameBuy cake for Dadwith a remarkGet extra chocolateto TrackIt@NUS
- Test Case:
T add n/Buy cake for Mom d/12/12/2020
Expected: The task is not added. An error message saying that the task already exists (assuming you did the first test case) is shown
- Test Case:
T add n/Buy noodles for Mom d/12/12/20202
Expected: The task is not added. An error message saying that the date is in the wrong format is shown
- Prerequisites:
- Adding a task to a module
- Prerequisites:
- Arguments are valid and compulsory parameters are provided
- The module must exist (the module code must belong to an existing module)
- Arguments are valid and compulsory parameters are provided
- Test Case:
T add n/Do Assignment d/12/12/2020 m/CS1101S
Expected: Adds a task by the nameDo Assignmentto theCS1101Smodule
- Test Case:
T add n/Do Tutorial d/12/12/2020 m/CS1101S r/Check first 3 questions
Expected: Adds a task by the nameDo Tutorialwith a remarkCheck first 3 questionsto theCS1101Smodule
- Test Case:
T add n/Do Assignment d/12/12/2020 m/cs1101s
Expected: The task is not added. An error message saying that the module code is of the wrong format is shown
- Prerequisites:
Adding a Contact
- Adding a contact from any view
- Prerequisites: Arguments are valid and compulsory parameters are provided
- Test Case:
C add n/Tom p/98989898 e/tom@mail.com
Expected: The contact is added to TrackIt@NUS
- Test Case:
C add
Expected: The contact is not added. An error message about valid command format is shown
- Test Case:
C add n/
Expected: The contact is not added. An error message saying the name must be a non-empty string is shown
- Other wrong commands to try:
C add n/Tom p/abc,C add n/Tom e/abc,C add n/Tom t/123-abc
Expected: Similar to previous test case
- Prerequisites: Arguments are valid and compulsory parameters are provided
Editing a Module
- Editing a module’s code
- Prerequisites: Arguments are valid and compulsory parameters are provided
- Test Case:
M edit CS2030S m/CS2030
Expected: The module code changes. All the lessons, tasks, and contacts associated with this module code wil be changed as well
- Test Case:
M edit CS1101S m/ma1102R
Expected: The module code does not change. An error message saying that the new module code is invalid is shown
- Test Case:
M edit CS2030 m/CS2100
Expected: The module code does not change. An error message saying that the new module code already exists (assuming the moduleCS2100exists in TrackIt@NUS) is shown
- Prerequisites: Arguments are valid and compulsory parameters are provided
- Editing a module’s name
- Test Case:
M edit CS2030 n/New Name
Expected: The module name changes
- Test Case:
M edit CS2030 n/Inva/id Name
Expected: The module name does not change. An error message saying that the provided name is of the wrong format is shown
- Test Case:
Editing a Lesson
- Editing a Lesson
- Prerequisites:
- Arguments are valid and compulsory parameters are provided
- The module must exist (the module code must belong to an existing module)
- The type must be one of
lec/lecture,tut/tutorial,lab/laboratory,rec/recitation, orsec/sectional
- The date provided must have the form
Day HH:mm-HH:mm
- The start time of the date must be earlier than the end time
- The address provided cannot be longer than 20 characters
- The index provided must be a lesson index seen on the current window
- Arguments are valid and compulsory parameters are provided
- Test Case:
L edit 1 t/tut
Expected: The lesson type is changed totutorial, unless it was originally a tutorial (in which case an error message is shown)
- Test Case:
L edit 1 m/CS2030S
Expected: The module that the lesson is associated to is changed toCS2030S, unless it originally belonged toCS2030S(in which case an error message is shown)
- Test Case:
L edit -1
Expected: An error message about the invalid command format is shown
- Prerequisites:
Editing a Task
- Editing a Task
- Prerequisites:
- Arguments are valid and compulsory parameters are provided
- The date must be in the form
dd/mm/yyyy
- The index provided must be a task index seen on the current window
- Arguments are valid and compulsory parameters are provided
- Test Case:
T edit 1 n/New Task Name
Expected: The task name changes toNew Task Name
- Test Case:
T edit 1 d/11/11/2021
Expected: The task date changes to11/11/2021, unless its original date was11/11/2021(in which case an error message is shown)
- Test Case:
T edit -1
Expected: An error message about the invalid task index is shown
- Prerequisites:
- Editing a Task to change or remove the module code
- Prerequisites: The module must exist (the module code must belong to an existing module)
- Test Case:
T edit 1 m/MA1101R
Expected: The first task in the current window changes to belong toMA1101R, unless it originally belonged toMA1101R(in which case an error message is shown)
- Test Case:
T edit 1 m/
Expected: The first task in the current window no longer has a module code
- Prerequisites: The module must exist (the module code must belong to an existing module)
- Editing a Task to change or remove the remark
- Test Case:
T edit 1 r/New remark
Expected: The first task in the current window has its remark change toNew Remark
- Test Case:
T edit 1 r/
Expected: The first task in the current window has its remark removed, unless it originally did not have a remark (in which case an error message is thrown)
- Test Case:
Editing a Contact
- Editing a Contact
- Prerequisites: The index provided must be a contact index seen on the current window
- Test Case:
C edit 1 p/9999999
Expected: The first contact in the current window has his/her phone number changed to9999999, unless it was originally9999999(in which case an error message is shown)
- Test Case:
C edit 1 e/new@email.com
Expected: The first contact in the current window has his/her email changed tonew@email.com
- Test Case:
C edit -1
Expected: An error message about the invalid contact index is shown
- Prerequisites: The index provided must be a contact index seen on the current window
- Editing a Contact to change or remove tags
- Test Case:
C edit 1 t/newtag
Expected: The first contact in the current window has all of his/her old tags removed and replaced with 1 tagnewtag
- Test Case:
C edit 1 t/
Expected: The first contact in the current window has all of his/her old tags removed, unless the contact has no tags originally (in which case an error message is shown)
- Test Case:
Deleting a Module
- Deleting a Module
- Prerequisites: The module must exist (the module code must belong to an existing module)
- Test Case:
M delete CS2030S
Expected: The moduleCS2030Sis deleted
- Test Case:
M delete cs2030s
Expected: An error message about the invalid command format is shown
- Prerequisites: The module must exist (the module code must belong to an existing module)
Deleting a Lesson
- Deleting a Lesson
- Prerequisites: The index provided must be a lesson index seen on the current window
- Test Case:
L delete 1
Expected: The first lesson in the current window is deleted
- Test Case:
L delete -1
Expected: An error message about the invalid lesson index is shown
- Prerequisites: The index provided must be a lesson index seen on the current window
Deleting a Task
- Deleting a Task
- Prerequisites: The index provided must be a task index seen on the current window
- Test Case:
T delete 1
Expected: The first task in the current window is deleted
- Test Case:
T delete -1
Expected: An error message about the invalid task index is shown
- Prerequisites: The index provided must be a task index seen on the current window
Deleting a Contact
- Deleting a Contact
- Prerequisites: The index provided must be a contact index seen on the current window
- Test Case:
C delete 1
Expected: The first contact in the current window is deleted
- Test Case:
C delete -1
Expected: An error message about the invalid contact index is shown
- Prerequisites: The index provided must be a contact index seen on the current window
Viewing Help
- Opens the help window
- Test Case:
help
Expected: Opens the help window
- Test Case:
Changing Tabs
- Changes the tab
- Test Case: Click on the Upcoming tab
Expected: Switches the Upcoming tab. The upcoming tab is highlighted in the sidebar
- Test Case: Click on the Contacts tab
Expected: Switches to the Contacts tab. Contacts tab is highlighted in the sidebar
- Test Case: Click on any of the module tabs
Expected: Switches to the module tab that was clicked. The specific module tab is highlighted in the sidebar
- Test Case: Click on the Help tab
Expected: Switches the Help tab. Help tab is highlighted in the sidebar.
- Test Case: Click on the Upcoming tab
Exiting the Program
- Exiting the Program
- Test Case:
exit
Expectation: Exits the program
- Test Case: Click on the red cross at the top left corner of TrackIt@NUS
Expectation: Exits the program
- Test Case:
Appendix G: Effort
(Contributed by Long)
The team has put in a tremendous amount of effort to this project, with a single simple principle in mind: create an app that our targeted users will prefer over existing commercial apps, and do so while maintain a production-grade codebase. In the following section, the effort will be further elaborated.
App’s functionality & User Experience
When we first start the project, we were quite surprised that the app must be optimized for CLI, which is not a common thing for most of the commercial apps nowadays. Hence, tremendous effort has been put into optimizing the app for the most natural & intuitive User Experience (more details in the Feature Design Consideration).
To achieve that, the team has had countless debates on how new features should be implemented, and there were even a topic about task’s remark that took the team 3 days of debate to settle.
4 days before the deadline, the app didn’t have the edit module features, since we knew for sure that an user will almost never need to edit a module’s name or code while using the app (since if they entered it wrongly in the first place they could have fixed it right away). Yet, because of the strive for perfection, we didn’t want to leave a possible situation where “bad” UX happens (Since in the extremely rare case some users will still need to edit that). So we decided to write an additional few hundreds LOC, and did a lot more testing for that new feature (Since EditModule is a very complicated feature to implement)
We don’t aim to create an app with a load of features, but aim to create one with just enough features to get all tasks done, and to make our users feel comfortable & happy in the process. Our app may look “simple”, but simple is the ultimate sophistication.
Compared to AB3
Our app can be thought of as a superset of AB3. AB3 was concerned primarily with the management of contacts. We recognised that contacts and friends were a crucial part of any student’s life. Hence, we decided to build upon AB3 by altering the app to be suited for students, and so that the app could help students conveniently manage their student lives.
Hence, we decided to implement module, lesson, and task managers on top of the existing AB3 contacts manager. Now, students will be able to keep track of all their academic and social commitments with a single app, where they previously had to use 4.
We put in a lot of effort to add these 3 extra features, working late most nights before our v1.2 demo. Furthermore, we decided after that we should integrate all 4 core features seamlessly, to improve upon the existing user experience. As such, for v1.3 users were able to:
- View all tasks, lessons, and contacts related to a module
- View all upcoming tasks, and lessons
- View all future tasks Again, this was no easy feat, and our team worked tirelessly to finish our features before v1.3.
We also enhanced the UI by introducing colour coding, making the fonts more aesthetic, and changing the default heights and widths to make the app more user-friendly. All these changes were extremely important to the overall user experience, and we knew that we had to get them just right, because the users will appreciate the little things that we do just to improve their user experience.
Maintaining a high-quality codebase
The code quality of the repo has been maintained at a high standard throughout the project. Following are the steps we took to maintain that:
-
All codes to be merged in requires an additional proof-read & approval from another team member
-
All codes to be merged in must follow the logic design principle & coding rules mentioned in “Code Design Principle” section.
-
IntelliJ’s code formatter were used throughout the entire development
-
The repo were cleaned up & refactored once or twice a week by a designated team member who will read all the codes
-
In additional to the above, during the code read up, any part of functioning codes that can be improved to be less bug-prone or cleaner will also be discussed and improve.
At the final stage of the project, the code has also gone through 3 different static analysis tool:
All warnings received by the three app have been looked into and necessary fixes have been done to ensure a high-quality codebase.
We are proud of this product!
