TrackIt@NUS - User Guide
TrackIt@NUS - User Guide
![]()
By: Team W13-4 Since: Aug 2020 License: MIT
Table of Contents
- Introduction
- Quick Start
-
Format and Usage
- 3.1 Common Symbols
- 3.2 Command Format
- 3.3 Duplicate Parameters
-
Application Layout
- 4.1 Upcoming Tab
- 4.2 Module Tabs
- 4.3 Contacts Tab
- 4.4 Help Tab
-
Features
- 5.1 Module
- 5.1.1 Module Command Parameters
- 5.1.2 Adding a Module :
M add - 5.1.3 Editing a Module :
M edit - 5.1.4 Deleting a Module :
M delete
- 5.2 Lesson
- 5.2.1 Lesson Command Parameters
- 5.2.2 Adding a Lesson :
L add - 5.2.3 Editing a Lesson :
L edit - 5.2.4 Deleting a Lesson :
L delete
- 5.3 Task
- 5.3.1 Task Command Parameters
- 5.3.2 Add a Task :
T add - 5.3.3 Editing a Task :
T edit - 5.3.4 Deleting a Task :
T delete
- 5.4 Contact
- 5.4.1 Contact Command Parameters
- 5.4.2 Add a Contact :
C add - 5.4.3 Editing a Contact :
C edit - 5.4.4 Deleting a Contact :
C delete
- 5.5 Help
- 5.6 Exit
- 5.1 Module
- FAQ
- Glossary
- Command Summary
1. Introduction
(Contributed by Wei Hong)
Welcome to the TrackIt@NUS user-guide!
Are you struggling to use many different applications to manage your school work? Having to toggle between NUSMODS, LumiNUS and your own to-do list to find your school work can be a real hassle. If you happen to be feel this way, then you are in luck! TrackIt@NUS is a all-in-one desktop app for you to manage your modules, lessons, tasks, and contacts. It boasts a beautiful upcoming view and module view so that busy student like you to to easily organize your school life, helping you to Track Less, and Live More.
TrackIT@NUS is optimized for use via a Command Line Interface (CLI) while still having the benefits of a Graphical User Interface (GUI). If you can type fast, you will be able to manage your academic and social commitments much more efficiently than by using other traditional GUI apps.
What are you waiting for? Head on to Section 2, Quick Start to learn more
2. Quick Start
(Contributed by Wei Hong)
-
Ensure you have Java 11 or above on your Computer. You may install it here.
-
Download the latest version of TrackIt@NUS from here.
-
Copy the file to the folder you want to use as the home folder for TrackIt@NUS.
-
Double-click the file to start the app. A GUI similar to Figure 1 shown below should appear in a few seconds. You are now on the main page of TrackIt@NUS. Note how the app contains some sample data.
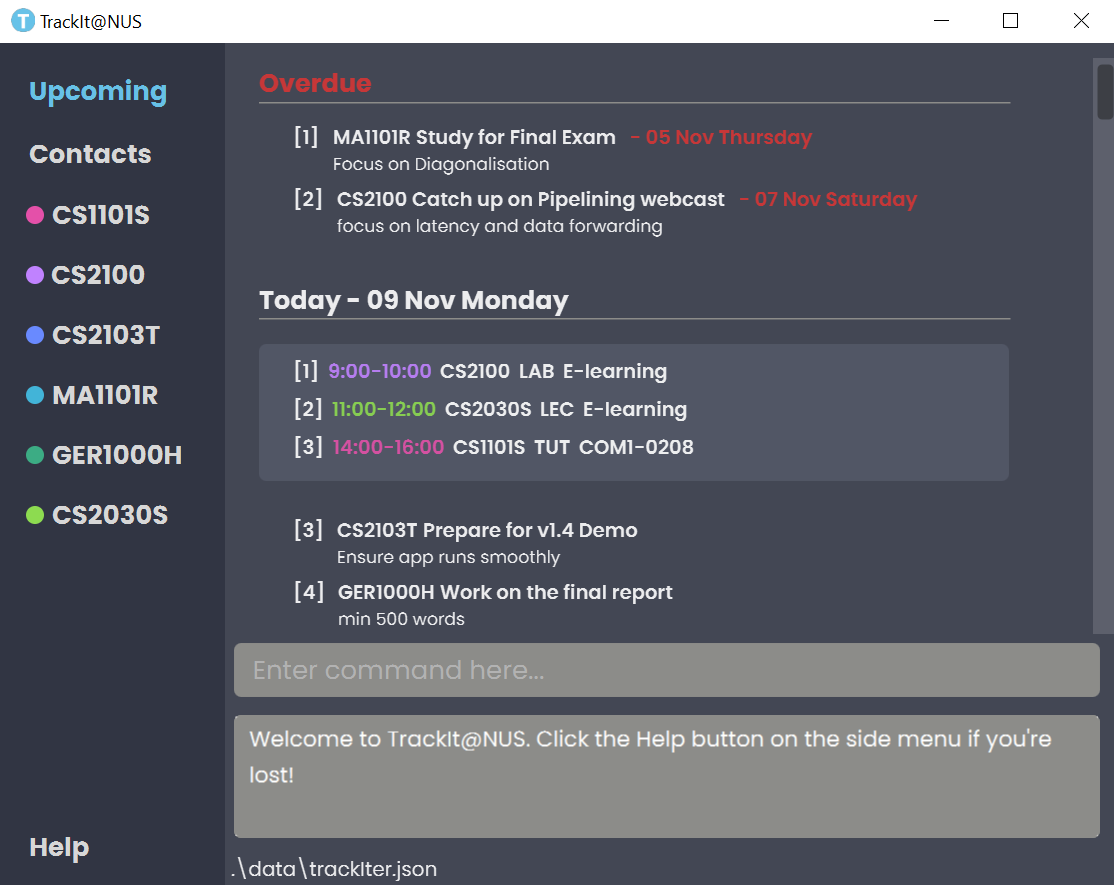
Figure 1 - GUI of TrackIt@NUS
Before you start using the TrackIt@NUS, you can first get familiarised with the app’s Format and Usage, as well as its Application Layout.
Once you are ready to type your first command, you can type in the Command Box at the bottom of the screen and press Enter on your keyboard to execute it.
Try typing help and pressing Enter to navigate to the Help Tab!
For details on the commands you can use, please refer to Section 5 - Features.
3. Format and Usage
(Contributed by Tiffany)
There are many things you can use TrackIt@NUS for. We have structured this document so it is easy for you to find what you need. In the Common Symbols, Command Format, and Commands and their Purposes sections, you will find useful tips on reading this document. It is then followed by the Features section, where the main features of TrackIt@NUS are documented.
3.1 Common Symbols
| Symbol | Description |
|---|---|
| This symbol indicates that something important to take note of. | |
| This symbol indicates that a tip is being mentioned. | |
| This symbol indicates something to be careful of. |
3.2 Command Format
Since TrackIt@NUS is a CLI application, knowing how to use commands is important. The following section shows you how to interpret and use commands in the app. All commands follow similar formats as outlined below and examples will be provided to help you understand their usage. Examples of commands and their formats will be written in code-blocks.
The table below explains some important technical terms. An example will be provided to help you visualize these terms.
| Technical Term | Explanation |
|---|---|
| Command type | Depending on whether you are dealing with a Module, Task, Lesson or Contact, the type is M, T, L or C respectively. |
| Command word | The first word of the command. It determines the action the app should carry out. |
| Parameter | The word or group of words following the command word. They are values given to a command to perform the specified action. |
| Prefix | The word that at the start of a parameter. It distinguishes one parameter from another. |
Example: M add m/CODE n/MODULE_NAME
Breakdown:
-
Command type -
M
-
Command word -
add
-
Parameters -
CODEandMODULE_NAME
-
Prefix -
m/,n/
The following table explains how you can use a command with the provided format. More examples will be provided for each command in Section 5, Features. Words in the upper case are the parameters to be supplied by you.
| Format | Meaning | Example |
|---|---|---|
lower_case/A lower case letter, followed by a forward slash |
These are prefixes. They are used to separate the different parameters of a command. |
n/, d/, t/Note that prefixes cannot have spaces: n / is not a prefix, and will not be recognized. |
UPPER_CASEWords in upper case |
These are parameters. They need to be supplied to complete certain commands |
To create a new contact with the name John, we use the add contact command.Suppose the add contact command looks like this: C add n/NAMESimply replace NAME with John to create John’s contact: C add n/John
|
[UPPER_CASE]Words in upper case, surrounded by square brackets |
These are optional parameters and need not be included for some commands. | Suppose a command contains two parameters: n/NAME [t/TAG]The first parameter NAME is compulsory.The second parameter TAG is optional.Since a TAG is optional, both of these commands are valid:<ul><li> C add n/John</li><li>C add n/John t/Friend</li></ul> |
UPPER_CASE…[UPPER_CASE]...An ellipsis ... following any words in upper case |
These are parameters that can be used multiple times or none at all. | The following parameter can be used multiple times: t/TAG...This means that it can be: <ul><li>Left empty</li><li>Used one time: t/friend</li><li>**Used multiple times: t/friend t/groupmate</li></ul> |
![]() Parameters can be in any order. e.g. if the command specifies
Parameters can be in any order. e.g. if the command specifies n/NAME p/PHONE_NUMBER, p/PHONE_NUMBER n/NAME is also acceptable.
3.3 Duplicate Parameters
You can specify the same parameter more than once in each command. Depending on the command, you will receive different outcomes:
| Parameter | Explanation | Example |
|---|---|---|
| Could be used multiple times | All occurrences will be used when executing the command | In the add contactcommand, you can create a contact with multiple tags.You can input multiple tags by chaining them: t/CS1101S t/TAThis will give a contact these tags. |
| Can only be used once | Only the last occurrence will be used when executing the command. | On executing M add m/CS2103T n/Favourite Mod n/Software Engineering, you will create a module with the name Software Engineering, and the name SE will be ignored. |
4. Application Layout
(Contributed by Tiffany and Wei Hong)
This section gives you a brief overview of the layout of TrackIt@NUS, and this will help you get used to our interface in a matter of minutes!
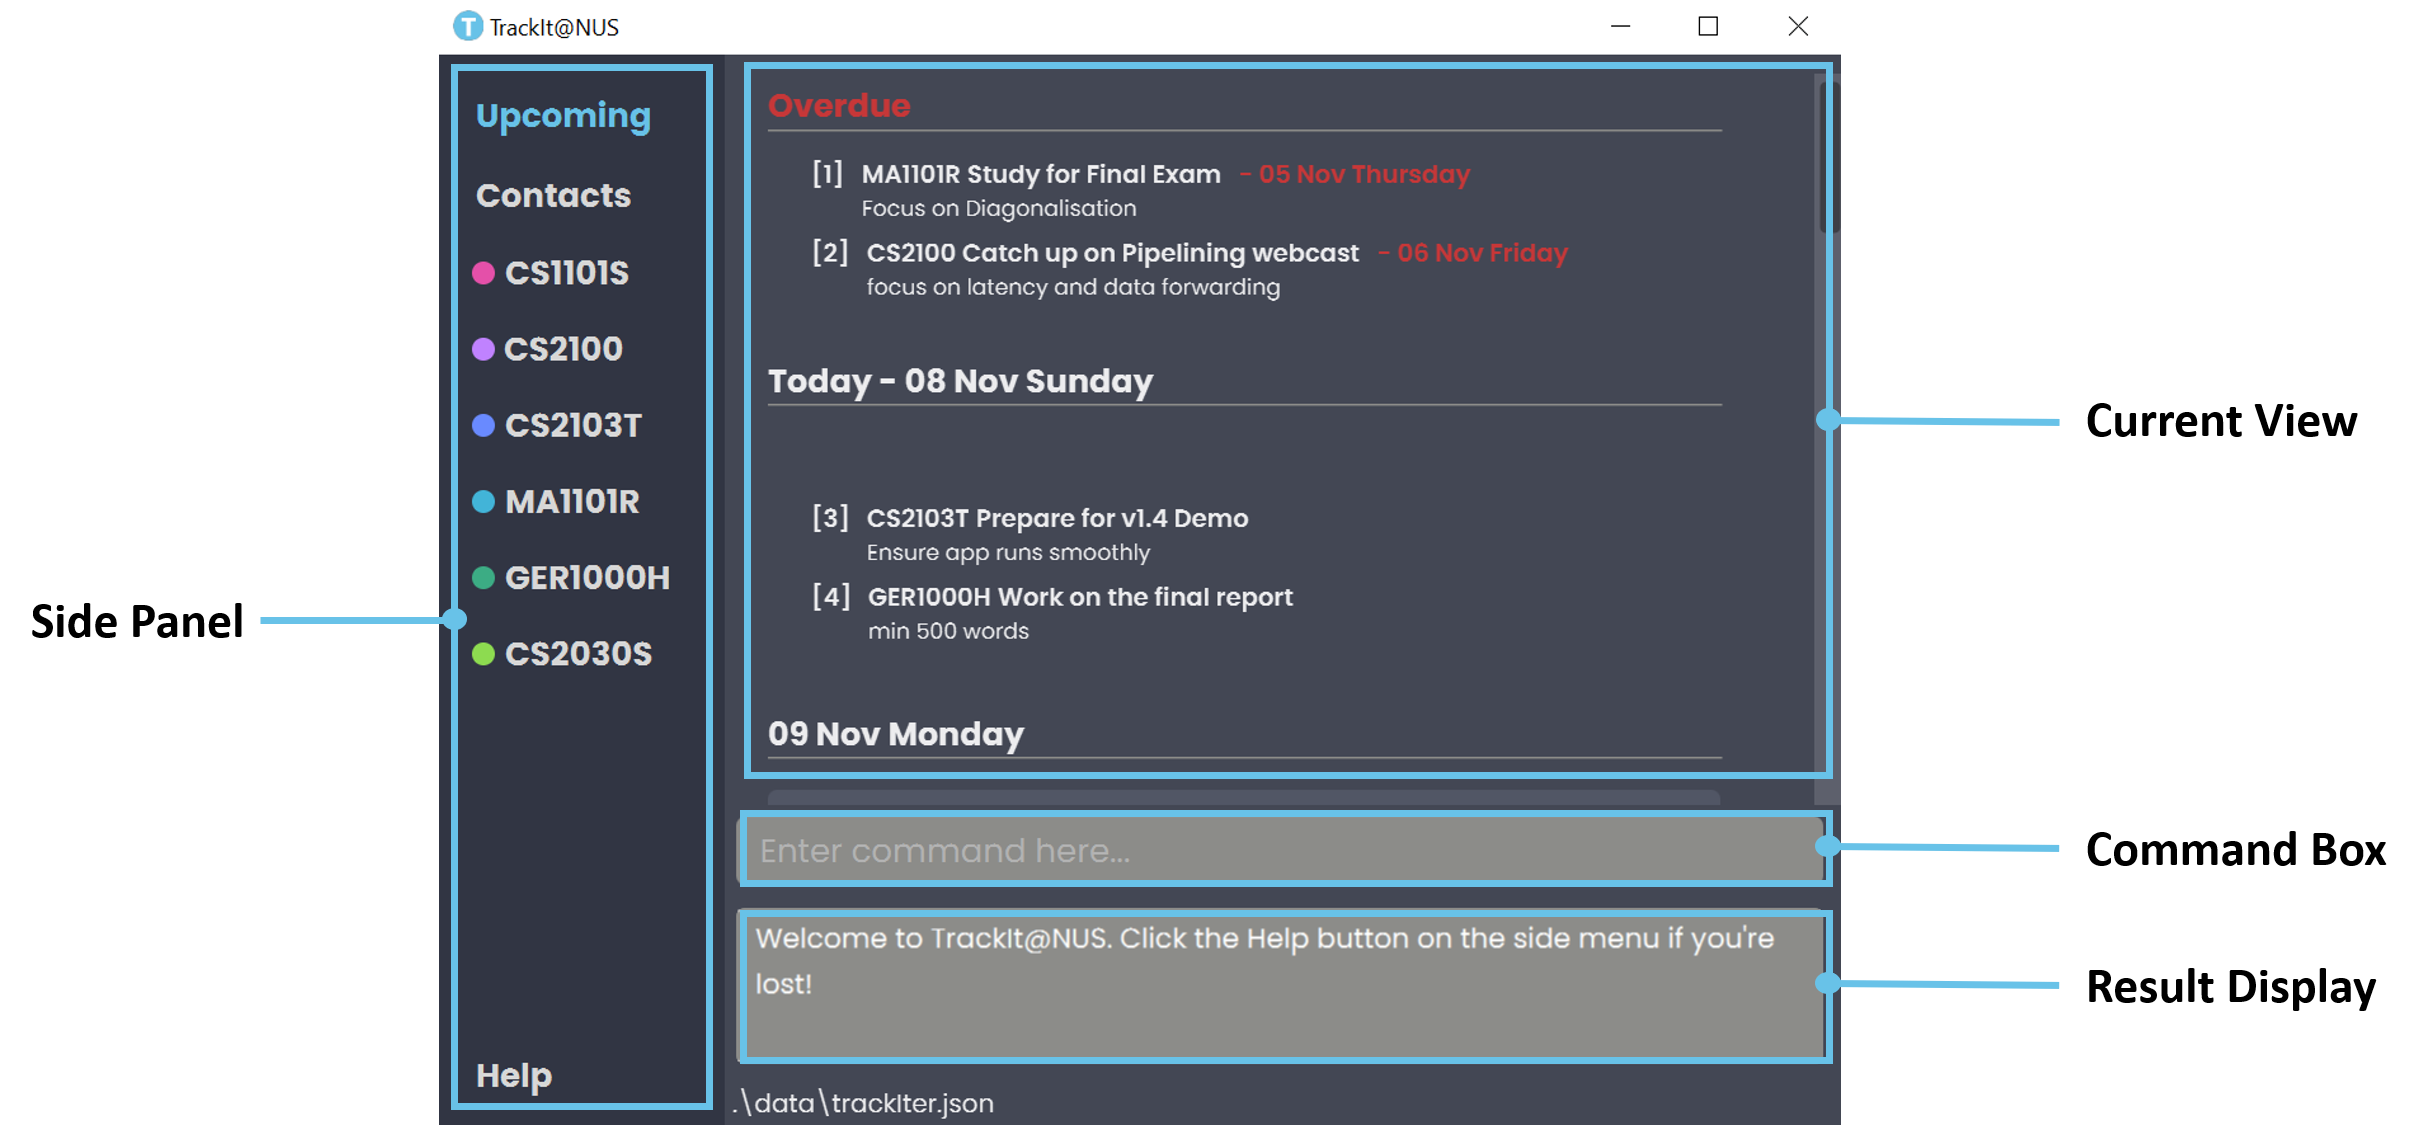 Figure 2 - Layout of TrackIt@NUS
TrackIT@NUS’s layout includes 4 main section:
-
Side Panel: This is where you can easily navigate between different tabs which will be displayed onCurrent View. -
Current View: This is where you see the display based on the current tab of theSide Panel. -
Command Box: This is where you type in your commands. -
Result Display: This is where the result message of your commands will show.
Within the Side Panel, there are 4 carefully designed tabs :
- The
Upcoming tab - The
Contacts tab - The various
Module tabs - The
Help tab
The Side panel on the left section allows you to easily navigate between the tabs. When you switch to a different tab, the new tab will be highlighted in blue in the Side panel.
The Current Display will show the display of the new tab.
4.1 Upcoming Tab
Built with a clean UI, the Upcoming tab is what you will see when you first run TrackIt@NUS! You will see an overview of all your upcoming lessons for the week, as well as the list of tasks that are due soon. With the Upcoming tab, you don’t have to worry about missing any lessons or deadlines anymore!
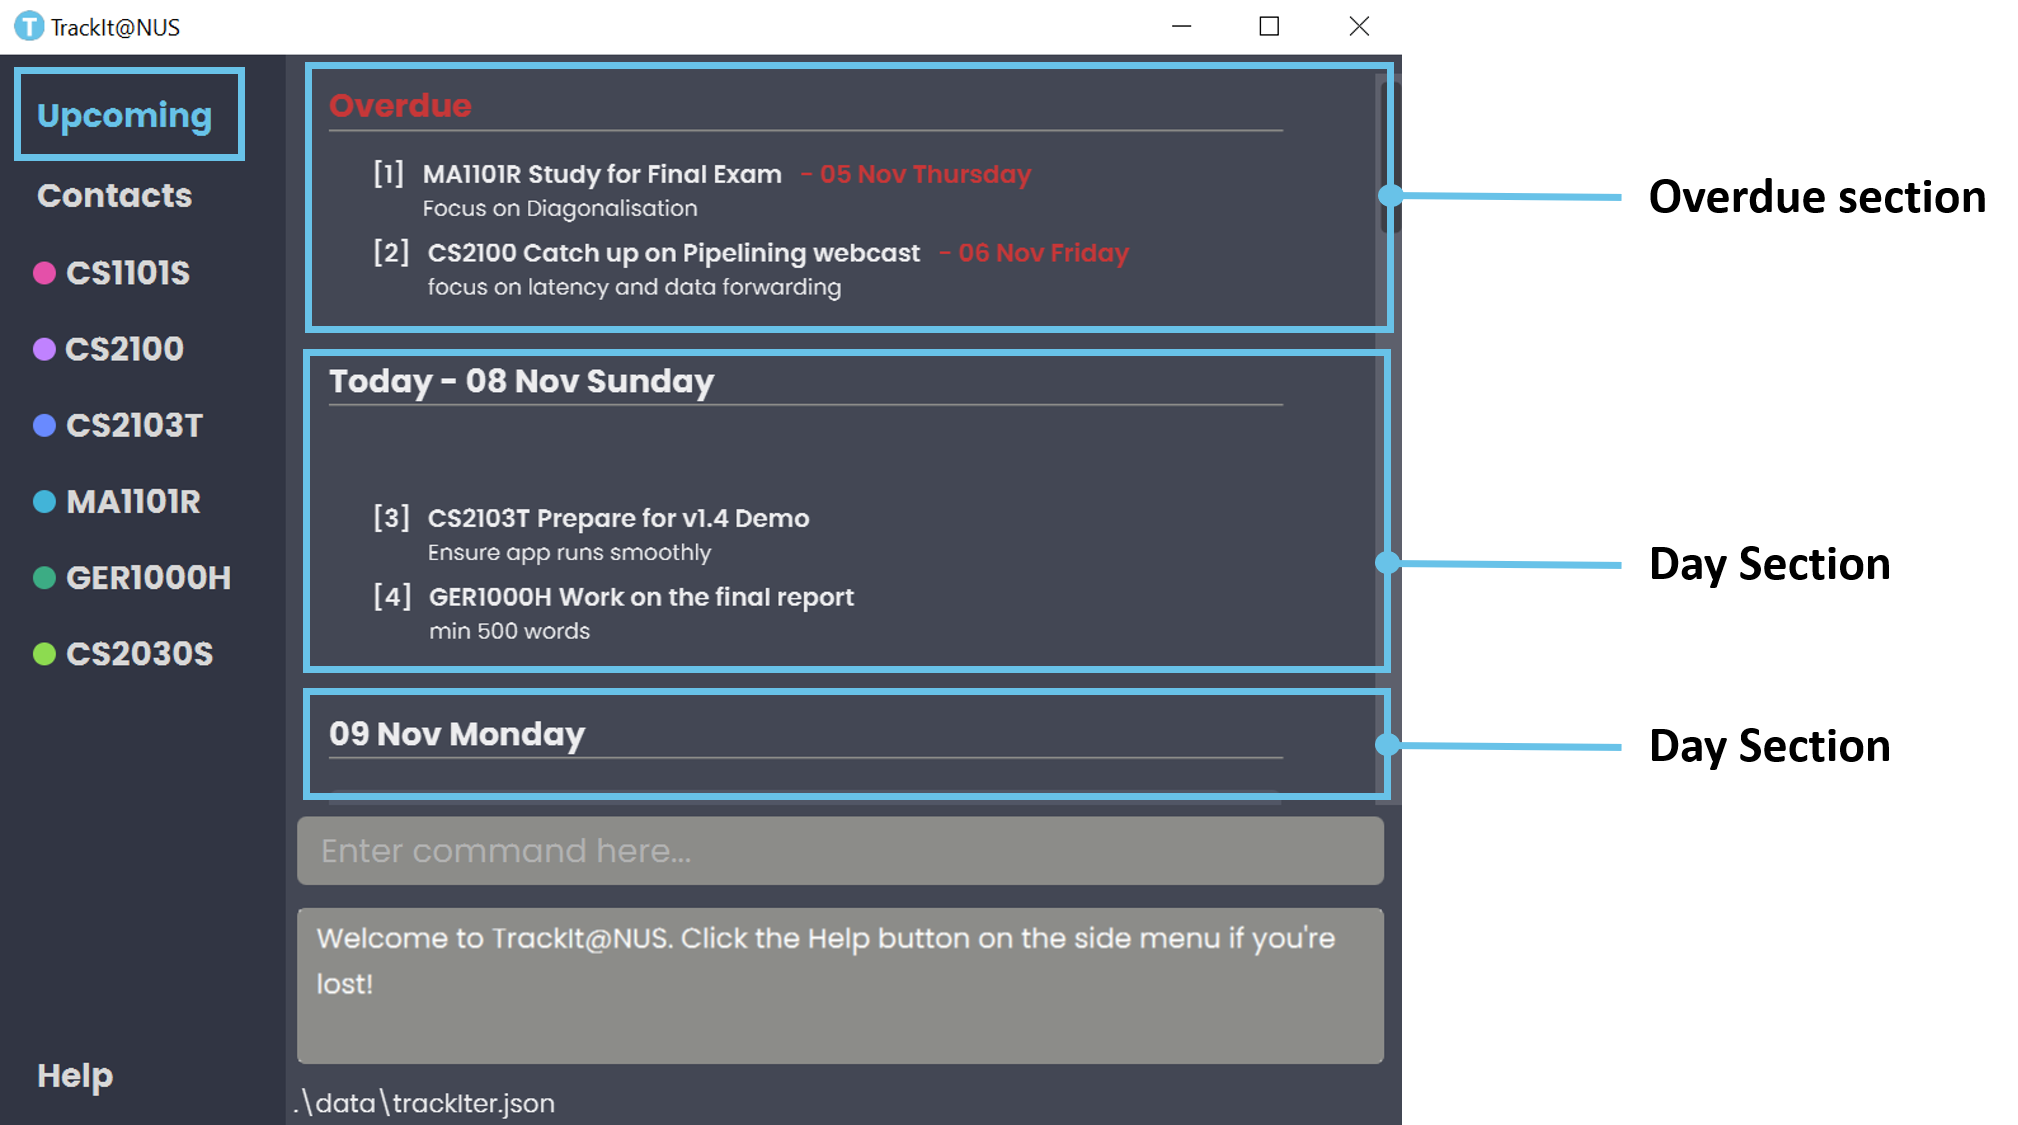 Figure 3 - Layout of Upcoming Tab
In the Upcoming tab, there are three main sections arranged in chronological order:
-
The
Overdue sectionis colored red; to warn you about the incomplete tasks that are past their deadline. These tasks will remain there until you delete them, so remember to complete them as soon as possible! -
The next 7
Daily sectionsshows your daily Lessons and Tasks for the next 7 days. This is where you can start planning your schedule for the day. -
The
Future sectionshows the Tasks that are only due at least 7 days later, so these are tasks that you don’t have to worry too much about for now.
4.2 Module Tabs
Besides the Upcoming tab, the Module tab is another highlight that you can look forward to! This is an all-in-one page with all the details that you will need for a specific module. With this, you don’t have to waste precious time toggling between your calendar, to-do list and contacts app anymore!
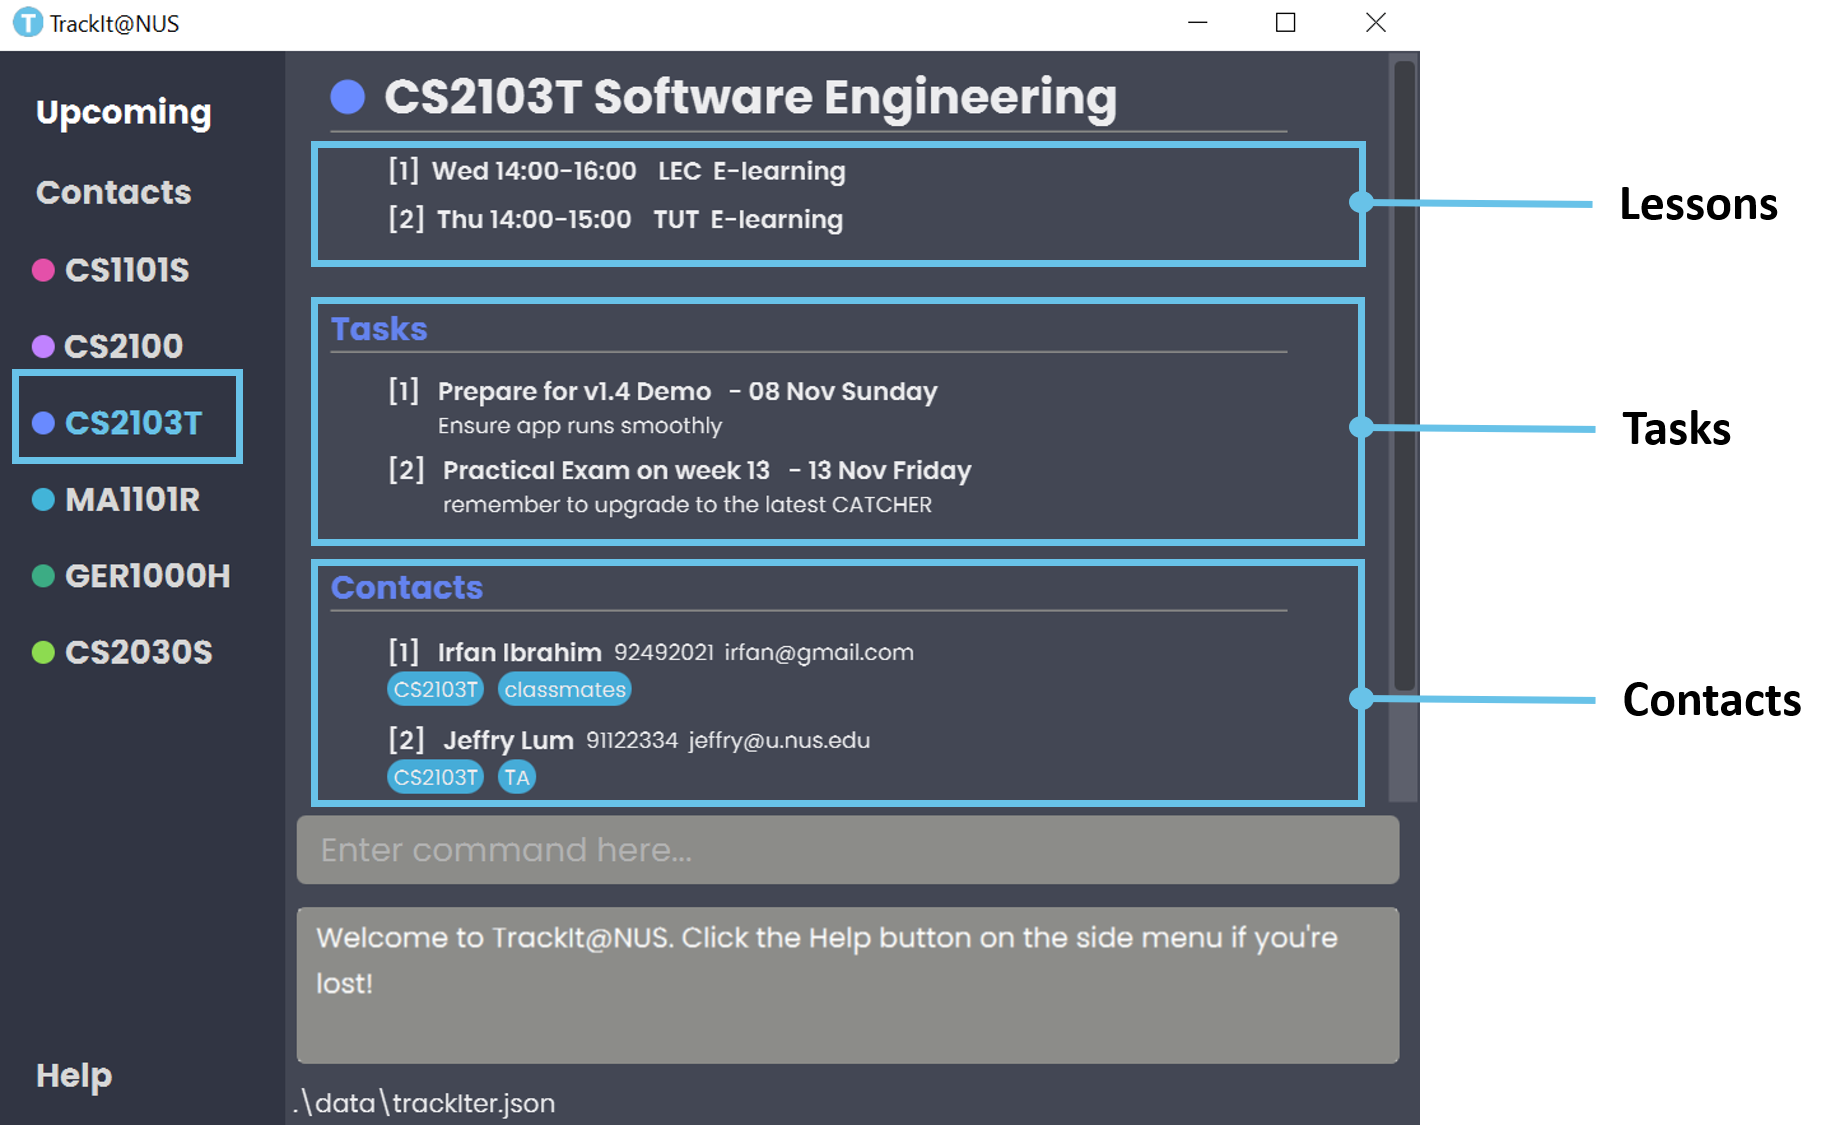 Figure 4 - Layout of Module Tab
The Module tab includes Lessons, Tasks and Contacts that are related to this module.
-
Lessons: List of lessons for this module. -
Tasks: List of tasks in chronological order. Don’t leave tutorials or assignments until the last day, chances are you won’t finish it on time!
 -
Contacts: List of relevant contacts for this module. Here’s where you can find help if you have difficulties with your assignments!
![]() Click here to find out more about Lessons, Tasks and Contacts .
Click here to find out more about Lessons, Tasks and Contacts .
4.3 Contacts Tab
So you might ask, why is there a need for the Contacts tab when I can add contacts in the Module tab? Well, the beauty of the Contacts tab is that you can add people who may not be taking the same modules as you but they are still relevant in your social life and/or school life! In this way, you can still include other useful contacts in TrackIt@NUS. How cool is that?
![]() Relevant contacts can include your course mates, hostel friends, or even just school mates!
Relevant contacts can include your course mates, hostel friends, or even just school mates!
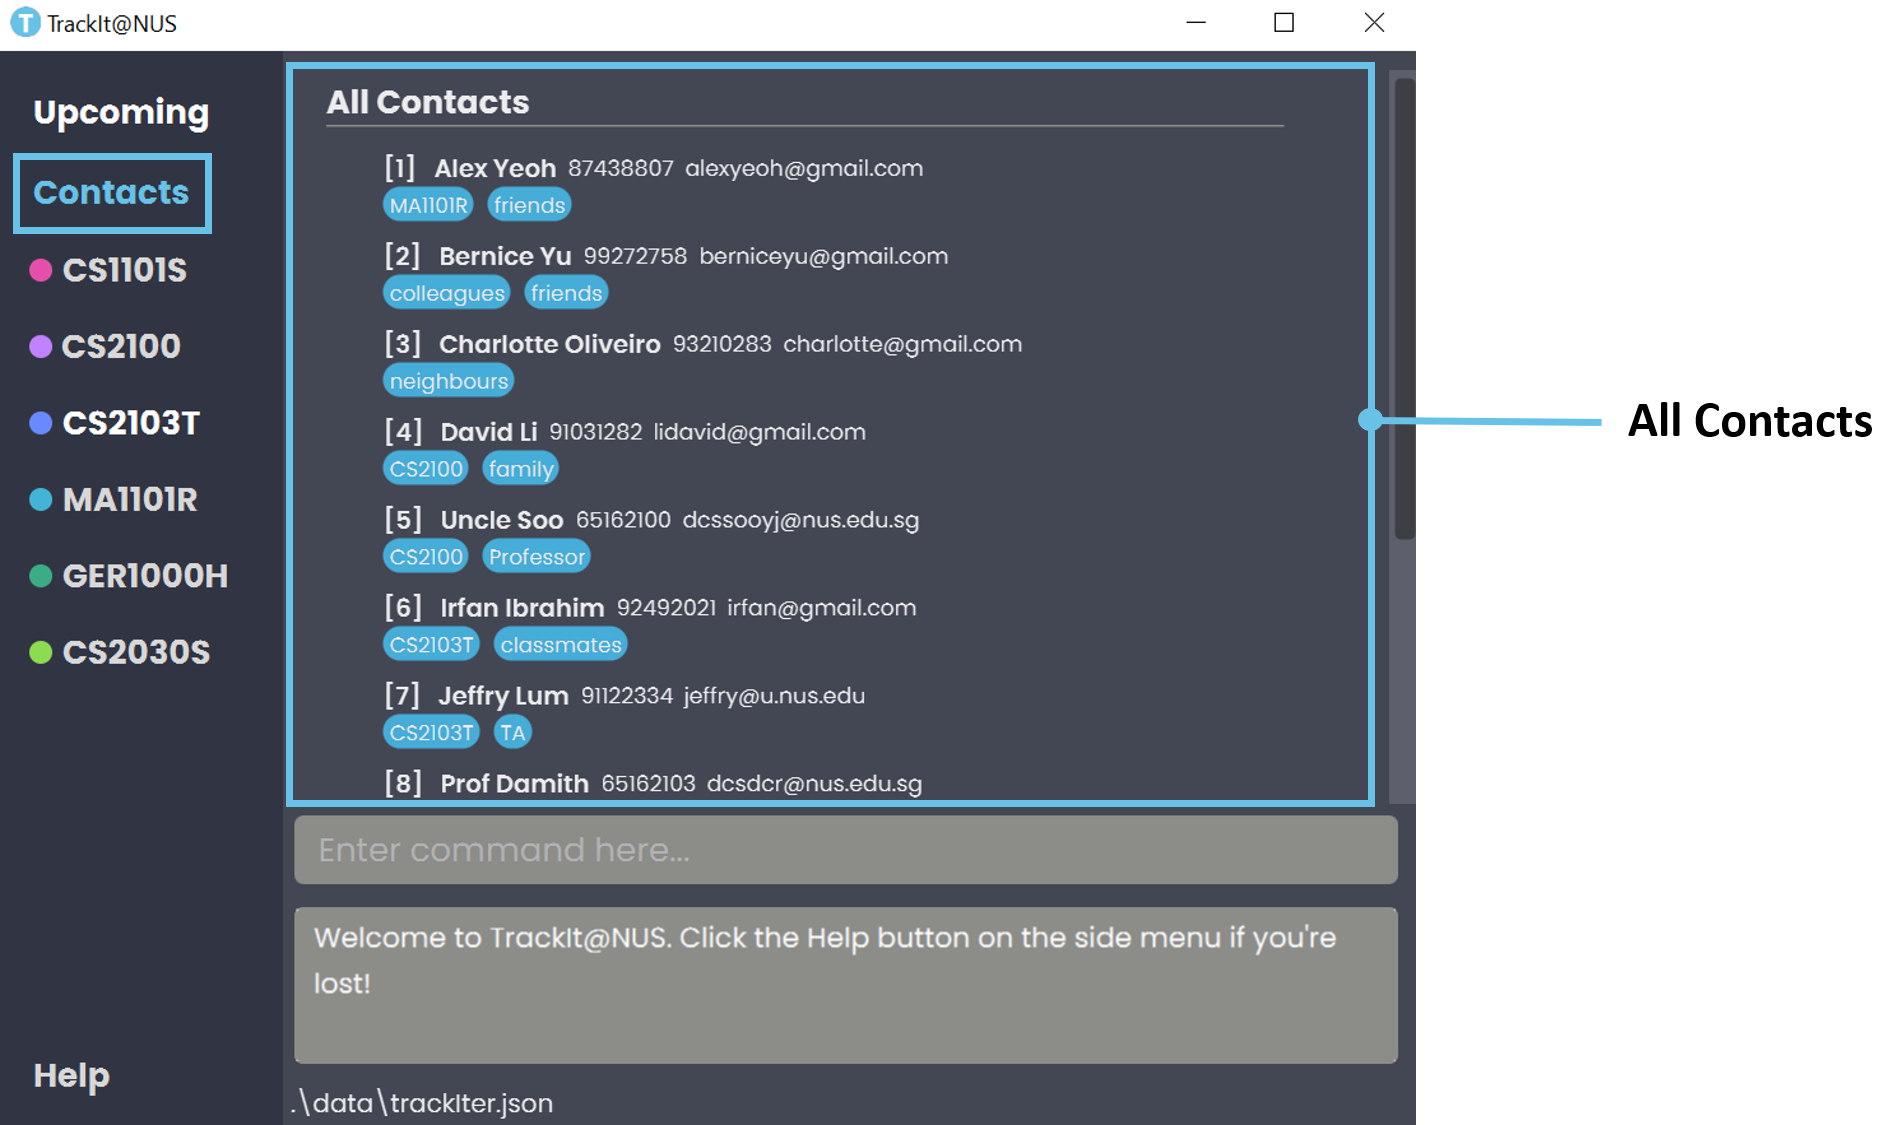 Figure 5 - Layout of Contacts Tab
![]() Click here to find out more about Contacts .
Click here to find out more about Contacts .
4.4 Help Tab
Feeling lost? If you are lazy to spend time looking through this long and detailed user guide to find a single command, here’s an extra bonus for you! This Help tab gives you a quick summary of the commands that you can use. This way, you can fire multiple commands in a matter of seconds and you can be one step closer to productivity!
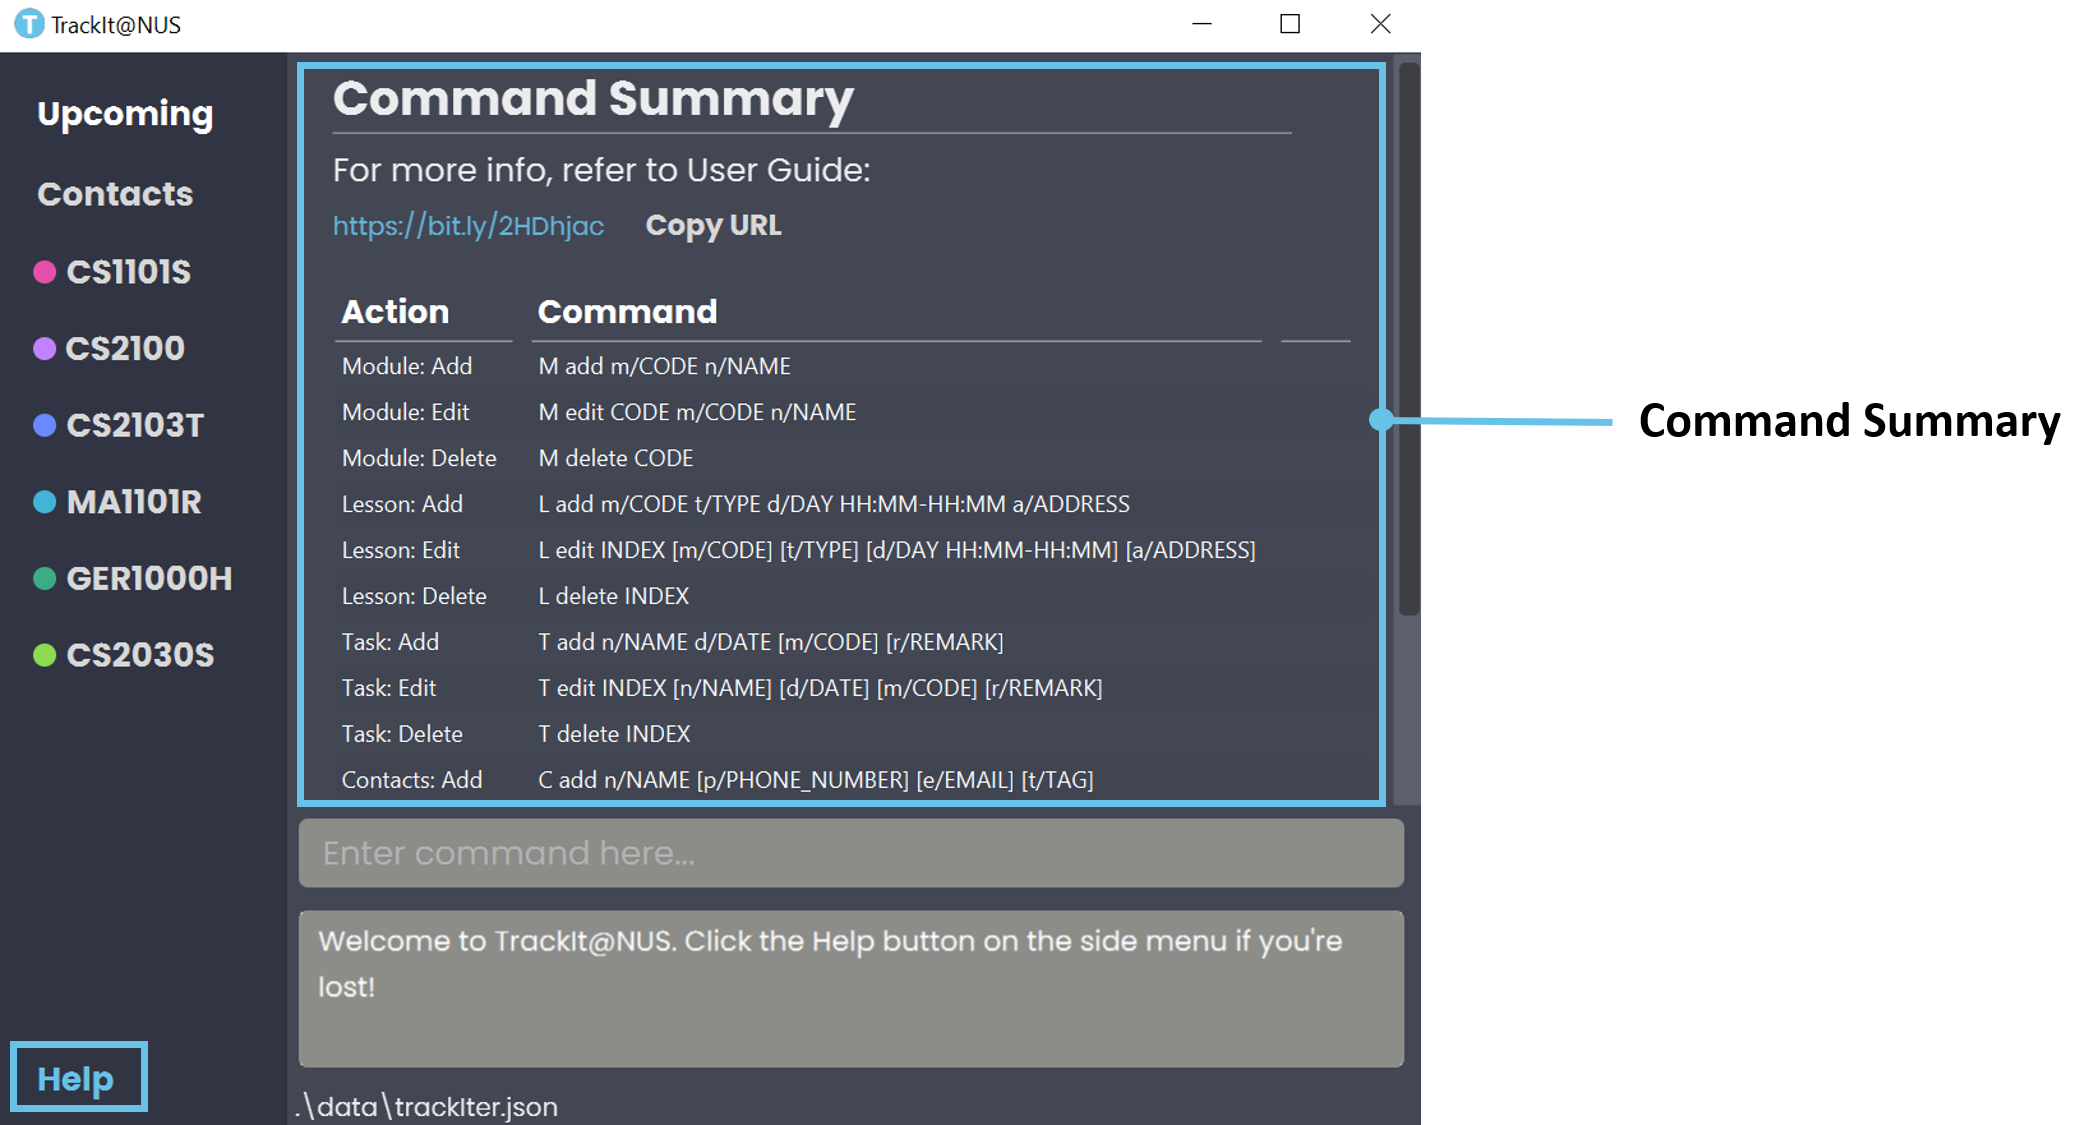 Figure 6 - Layout of Help Tab
5. Features
This section contains all the information you need to know about the features of TrackIt@NUS. To use each feature or sub-feature, you will need to enter the command into the Command Box.
5.1 Module
(Contributed by Long)
Module is the first thing you need to create when you start using the app, because each module will house its own lessons, tasks and related contacts. So, let’s find out how to create a new module!
5.1.1 Module Command Parameters
Here are the parameters used in the Module feature:
| Parameter | Description | Example |
|---|---|---|
CODE |
Refers to the unique code given to the module. | CS2103T |
NAME |
Refers to the module name. | Software Engineering |
5.1.2 Add a Module M add
You can use this command to create a new Module (Or a new category of things to worry about).
Format: M add m/CODE n/NAME
Example: To add the Module CS1231 Discrete Structures into TrackIt@NUS, follow these instructions.
| Parameter | Example |
|---|---|
CODE |
CS1231S |
NAME |
Discrete Structures |
- To add, type
M add m/CS1231S n/Discrete Structuresinto the command box. - Press
Enterto execute. - The Result Display will show the success message and you will see your new module in the side panel.
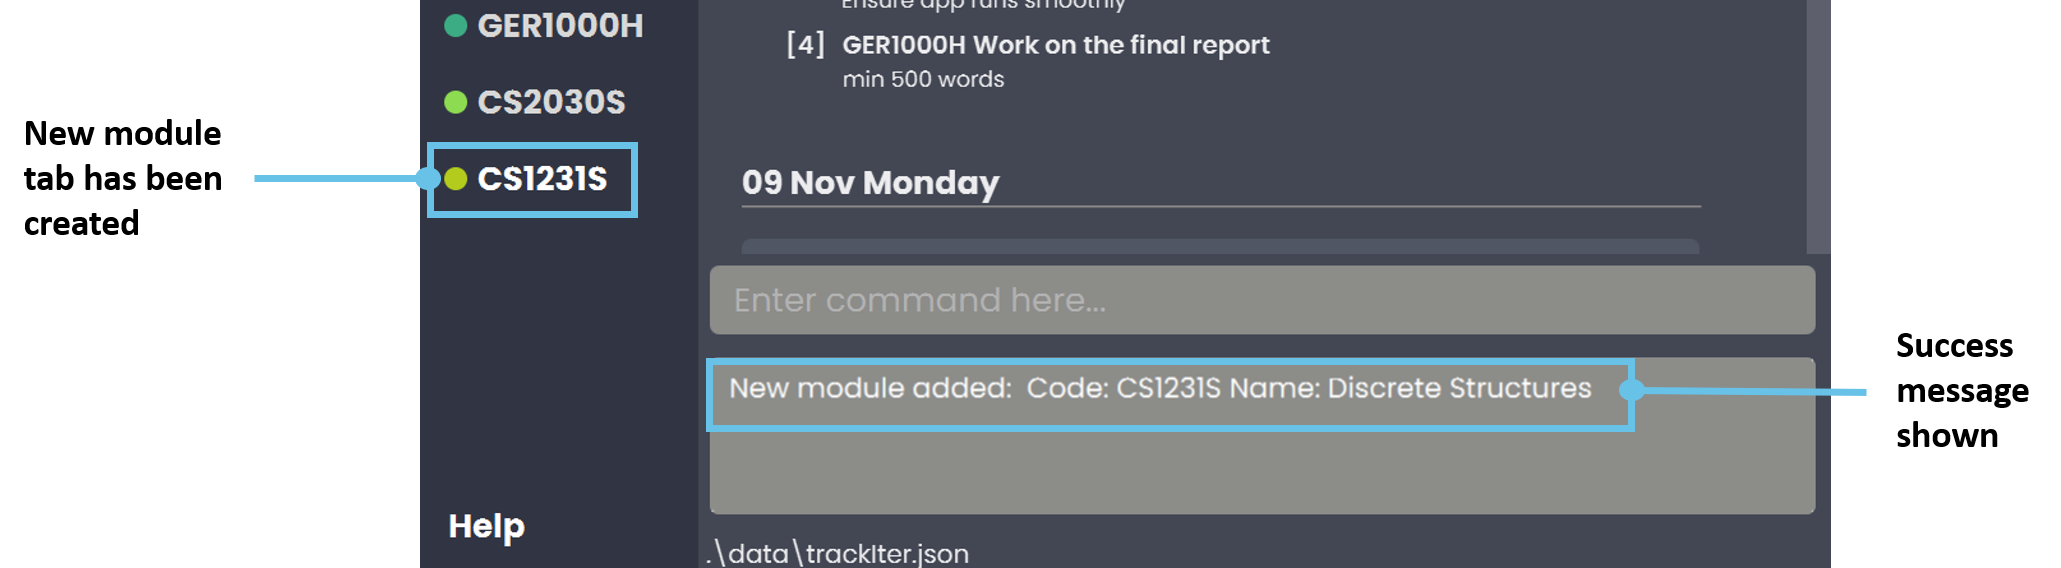 Figure 7 - Example outcome of adding a module
5.1.3 Edit a Module M edit
Because modules are displayed only on the side panel, they are not indexed. That’s why to edit and delete a module, its code will be used instead! This is how to edit a module’s code and/or name:
Format: M edit CODE [m/NEW_CODE] [n/NAME]
![]() The
The CODE provided must be present in the Module list.
Example: If you have spelled a module CS1231S’s code wrongly and wish to change it to the correct code CS1231, follow these instructions.
| Parameter | Example |
|---|---|
CODE |
CS1231S |
NEW_CODE |
CS1231 |
- Type
M edit CS1231S m/CS1231into the Command Box. - Press
Enterto execute. - The Result Display will show a success message and you will be able to view the correct module name in the corresponding module tab.
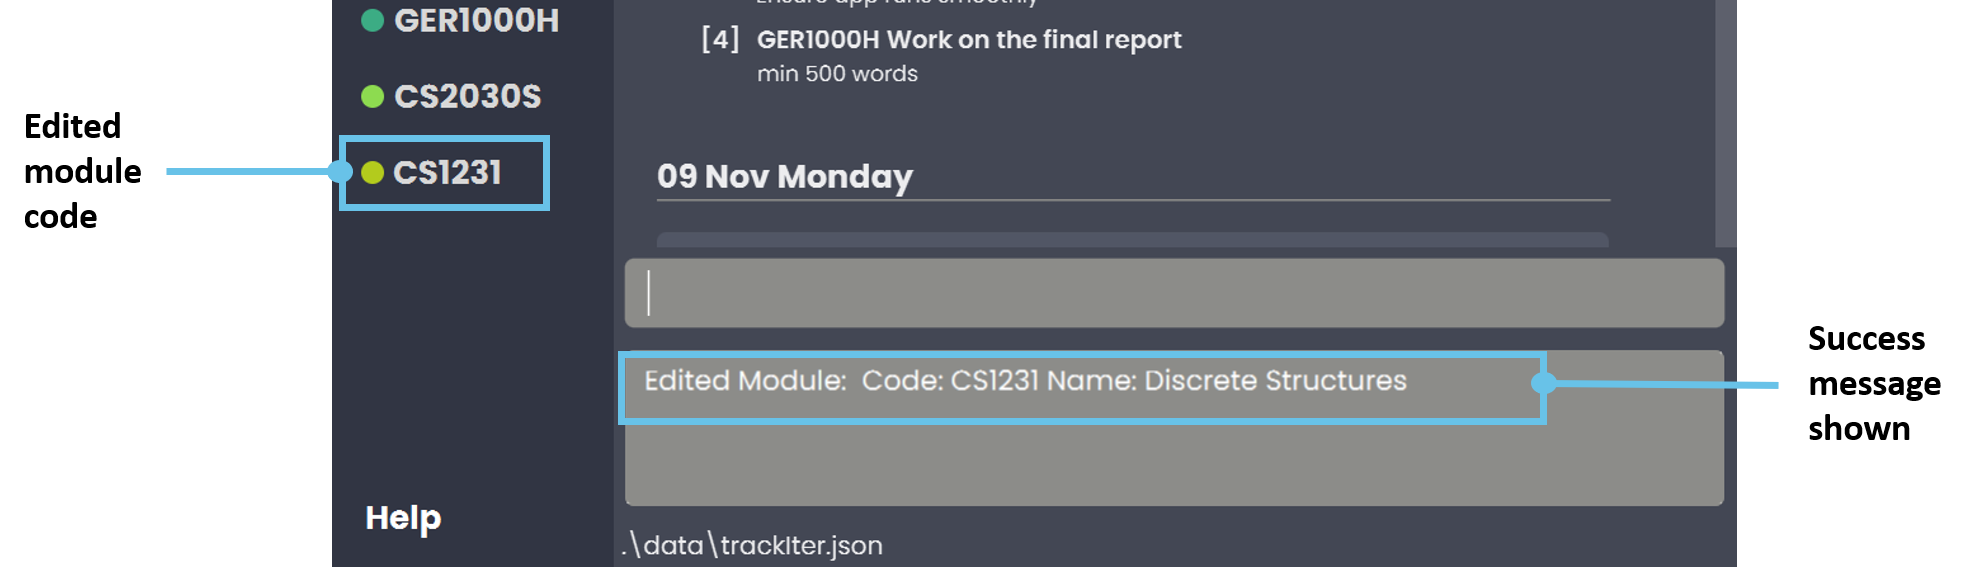 Figure 8 - Example outcome of editing a module
5.1.4 Delete a Module M delete
And what if you realized you accidentally added in a wrong module, or have finished one? Just delete that module! The command’s syntax is as follows:
Format: M delete CODE
![]() all related
all related tasks & lessons will be deleted as well, so check twice before you delete it!
![]()
contacts associated with that module will not be deleted. The tag will not be removed as well.
To delete the module CS1231:
| Parameter | Example |
|---|---|
CODE |
CS1231 |
- Type
M delete CS1231into the Command Box - Press
Enterto execute - The Result Display will show a success message and the module tab will be removed from the side panel.
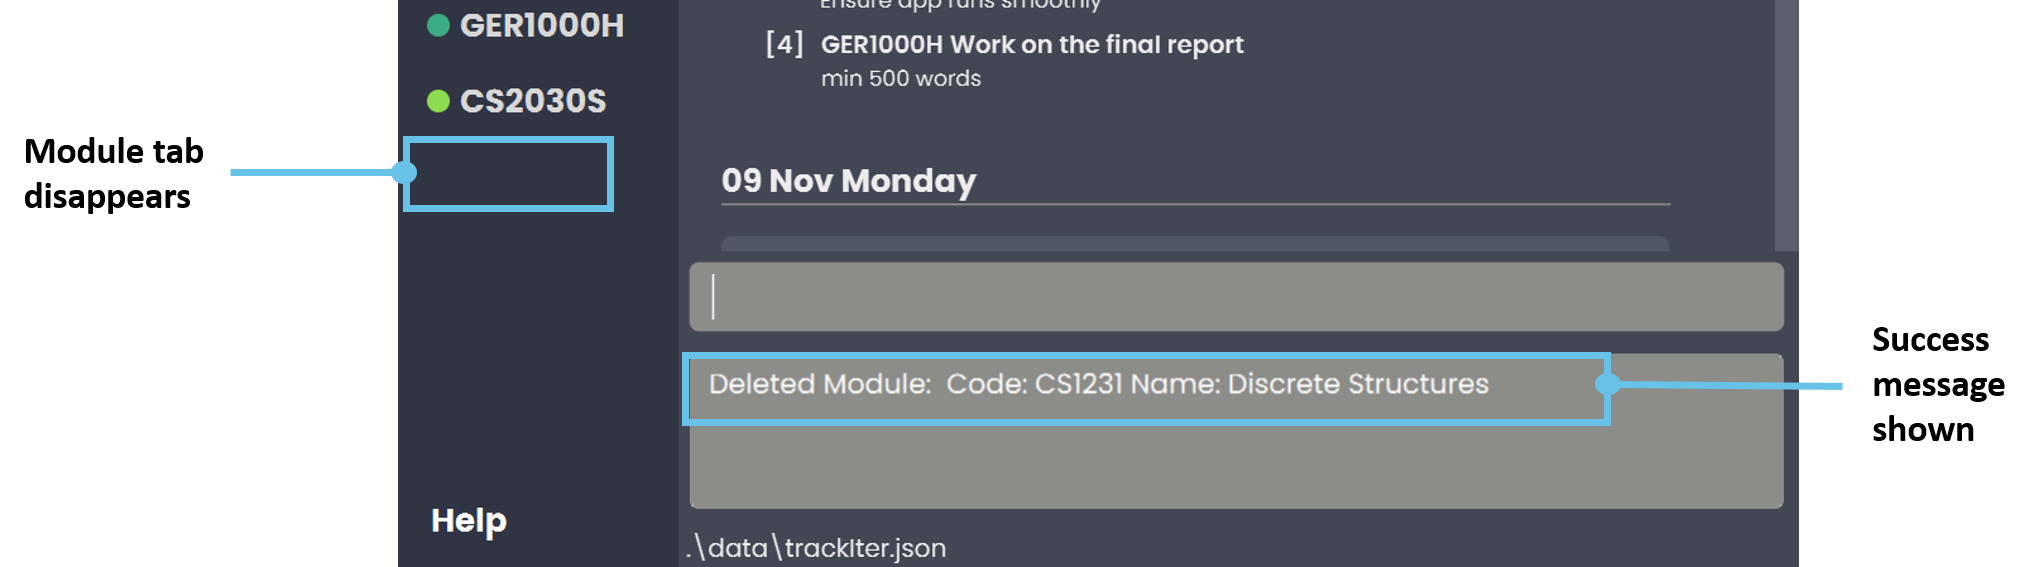 Figure 9 - Example outcome of deleting a module
5.2 Lesson
(Contributed by Minh)
Lectures, tutorials, labs, lectures, lectures, recitations, lectures… Sometimes, just looking at your crowded timetable makes you question your life choices.
While TrackIt@NUS can’t do much to make those lessons disappear, it can, at the very least, make sure you won’t miss any of them!
To view all your lessons (classes) for the next week, simply click on the Upcoming Tab, which sorts your lessons by day, and you will see something like the screenshot below, with lessons in the red outline.
To view the lessons of a specific module, click on any of the Module Tabs and you will see something like the screenshot below, with lessons in the red outline.
![]() As of v1.4, only weekly lessons are supported. Biweekly and monthly lessons may be added in subsequent versions.
As of v1.4, only weekly lessons are supported. Biweekly and monthly lessons may be added in subsequent versions.
You can also perform commands on the lessons as explained below.
5.2.1 Lesson Command Parameters
Here are the parameters used in the Module feature:
| Parameter | Description | Example |
|---|---|---|
INDEX |
Indicates the position of an item in a list. The specified INDEX must be within the range of the number of items in the list. |
1 refers to the first item in a list |
CODE |
Refers to the unique code given to the module. You can personalise this and give it your own code. However, we recommend you use the module’s official code. |
CS2103T |
TYPE |
Refers to the type of lesson. |
lecture/lec - lecturetutorial/tut - tutoriallaboratory/lab - laboratoryrecitation/rec - recitationsectional/sec - sectional |
DATE |
Indicates the weekly timing of a lesson. Must be in ddd H:mm-H:mm and 24-hour time format. |
mon 12:00-14:00 |
ADDRESS |
Indicates where a lesson is held. |
COM1-0215 |
![]() The time slots of the lessons can overlap. It’s a situation that no one wants to be in, but, unfortunately, does sometimes happen.
The time slots of the lessons can overlap. It’s a situation that no one wants to be in, but, unfortunately, does sometimes happen.
5.2.2 Add a Lesson L add
The command that makes you sigh every time you have to use it. Use this command to add a lesson to a module.
Format: L add m/CODE t/TYPE d/DATE a/ADDRESS
![]() You must create the Module first before you can add a lesson with that module code.
You must create the Module first before you can add a lesson with that module code.
Example: To add MA1101R tutorial in COM1-0121 that falls every Monday from 4-6pm, follow these instructions.
| Parameter | Example |
|---|---|
CODE |
MA1101R |
TYPE |
tutorial/ tut
|
DATE |
Mon 16:00-17:00 |
ADDRESS |
COM1-0121 |
- To add, type
L add m/MA1101R t/tutorial d/MON 16:00-17:00 a/COM1-0121into the command box. - Press
Enterto execute. - The Result Display will show the success message and you should see your new lesson in the Upcoming tab as well as the MA1101R module tab.
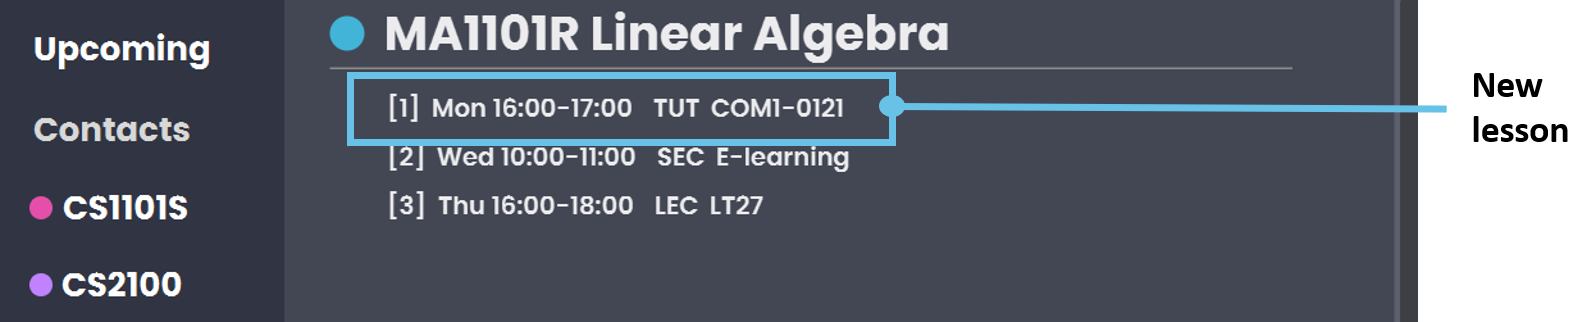 Figure 10 - Example outcome of adding a lesson
5.2.3 Edit a Lesson L edit
After adding a lesson, you might still want to change its details. This is the command to do so.
Format: L edit INDEX [m/CODE] [t/TYPE] [d/DATE] [a/ADDRESS]
![]() Note: the parameters
Note: the parameters m/CODE, t/TYPE, and d/DATE are optional;
however, at least one parameter must be provided (i.e. L edit 1 is not a valid command).
Example: To change the lesson timing to 5pm-6pm, follow these instructions.
| Parameter | Example |
|---|---|
INDEX |
1 |
DATE |
Mon 17:00-18:00 |
- Look for the lesson’s index which is on the left of the lesson.
- To add, type
L edit 1 d/MON 17:00-18:00into the command box. - Press
Enterto execute. - The Result Display will show the success message and you should see your lesson updated in the Upcoming tab as well as the MA1101R module tab.
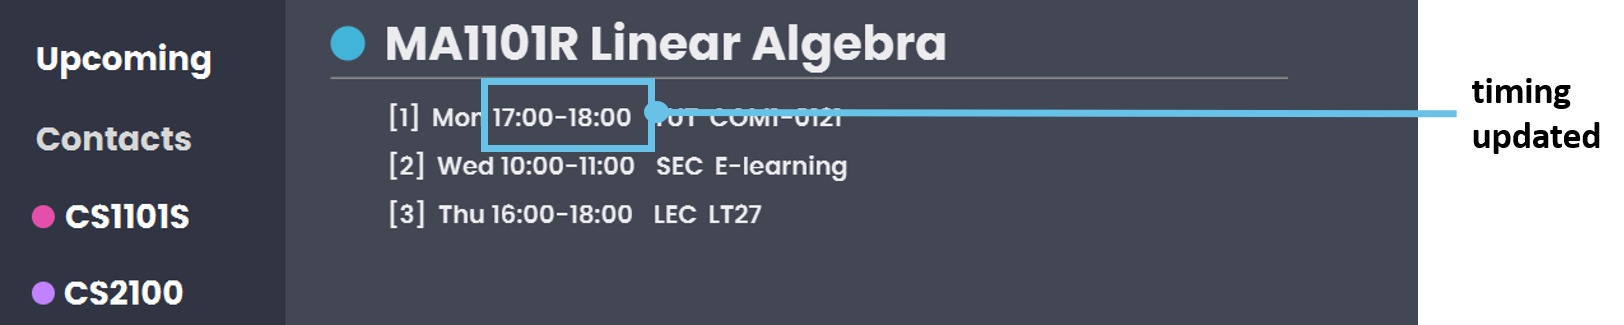 Figure 11 - Example outcome of editing a lesson
5.2.4 Delete a Lesson L delete
Sometimes, you might want to delete a particular lesson, probably since you’ve added it by mistake, or you hate it so much you want to forget its existence. This is the command to do so.
Format: L delete INDEX
Example: To delete a lesson, follow these instructions.
| Parameter | Example |
|---|---|
INDEX |
1 |
- Look for the lesson’s index which is on the left of the lesson.
- Type
L delete 1into the command box. - Press
Enterto execute. - The Result Display will show a success message and you should see your lesson disappear.
 Figure 12 - Example outcome of deleting a lesson
5.3 Task
(Contributed by Simon)
Managing all your tasks can be so stressful! TrackIt@NUS helps alleviate that stress with our built-in Task Manager
![]() To view all your tasks, simply click on the Upcoming Tab as shown below.
To view all your tasks, simply click on the Upcoming Tab as shown below.
This sorts all your tasks by date. To view module-specific tasks, click on any of the Module Tabs as shown below.
![]() All module-specific tasks are shown in the upcoming tab, but not vice versa.
All module-specific tasks are shown in the upcoming tab, but not vice versa.
You can also perform commands on the tasks as explained below.
5.3.1 Task Command Parameters
Here are the parameters used in the Task feature:
| Parameter | Description | Example |
|---|---|---|
INDEX |
Indicates the position of an item in a list. The specified INDEX must be within the range of the number of items in the list. |
1 - refers to the first item in a list |
CODE |
Refers to the unique code given to the module. You can personalise this and give it your own code. However, we recommend you use the module’s official code. |
MA1101R |
NAME |
Refers to the Task name | Assignment 1 |
DATE |
Indicates the date of a task deadline. Must be in dd/mm/yyyy format. |
01/01/2021 |
REMARK |
Refers to any (optional) additional remarks for a task. | For a task Assignment 1, a possible remark could be Focus on Chapters 1-3
|
5.3.2 Add a Task T add
After a day of school you realise that you now have a few more tasks to complete and wish to keep track of them. This is the command for adding a new task to TrackIt@NUS.
Format: T add n/NAME d/DATE [m/CODE] [r/REMARK]
Example: To add a task “MA1101R Assignment 1 due on 1 November 2020, covering Chapters 1-3” into TrackIt@NUS, follow these instructions.
| Parameter | Example |
|---|---|
NAME |
Assignment 1 |
DATE |
01/11/2020 |
Optional: [ CODE ] |
MA1101R |
Optional: [ REMARK ] |
Focus on Chapters 1-3 |
- To add, type
T add n/Assignment 1 m/MA1101R d/01/11/2020 r/Focus on Chapters 1-3into the command box. - Press
Enterto execute. - The result display will show the success message and you will see your new task in the Upcoming tab, and its corresponding module tab (if CODE field was filled).
![]() The
The DATE provided must be in the format dd/MM/yyyy.
![]() To give users greater freedom when adding tasks, you can add tasks with deadlines in the past.
To give users greater freedom when adding tasks, you can add tasks with deadlines in the past.
 Figure 13 - Example outcome of adding a task
5.3.3 Edit a Task T edit
After adding a task to TrackIt@NUS, you may want to change it, perhaps extend the deadline or change it’s remark. The edit command is what you should use to do so.
Format: T edit INDEX [n/NAME] [d/DATE] [m/CODE] [r/REMARK]
Examples:
-
T edit 1 n/Work on midterm reportchanges the name of the Task -
T edit 1 r/min 1000 wordschanges the remark of the Task -
T edit 1 m/CS2100changes the module code of the Task -
T edit 1 d/31/10/2020changes the deadline of the Task ( This will be used for the demonstration. )
| Parameter | Example |
|---|---|
INDEX |
1 |
DATE |
31/10/2020 |
- To add, type
T edit 1 d/31/10/2020into the command box. - Press
Enterto execute. - The result display will show the success message and you will see your edited task in the Upcoming tab, and its corresponding module tab (if CODE field was filled).
 Figure 14 - Example outcome of editing a task
![]() Here,
Here, INDEX refers to the index of the task you want to edit, as shown in the current tab. The
INDEX provided must be one of the task indexes shown in the current window.
![]() At least 1 field must be provided for editing (i.e.
At least 1 field must be provided for editing (i.e. T edit 1 is not allowed).
![]() Write
Write T edit 1 m/ to remove the module code from the task. Now, the task does not belong to any module. You
can also use T edit 1 r/ to remove the remark from the task.
![]() To give users greater freedom when adding tasks, you can add tasks with deadlines in the past.
To give users greater freedom when adding tasks, you can add tasks with deadlines in the past.
5.3.4 Delete a Task T delete
Once you have completed a task, you can delete it. This is the command to do so.
Format: T delete INDEX
Examples: T delete 1
| Parameter | Example |
|---|---|
INDEX |
1 |
 Figure 15 - Example outcome of deleting a task
![]() Here,
Here, INDEX refers to the index of the task you want to delete, as shown in the current tab. The
INDEX provided must one of the task indexes shown in the current window.
5.4 Contact
(Contributed by Tiffany)
Don’t you hate it when you need help for one of your modules but you just can’t remember who else is taking the module with you?
Luckily for you, TrackIt@NUS allows you to tag your contacts with the modules you have in common, and lets you see those contacts all at once! Simply click on a module tab and you will find the list of contacts associated with that module.
To view all contacts from all modules, as well as any contacts that are not associated with any module, click on the Contacts tab in the side panel.
5.4.1 Contact Command Parameters
Here are the parameters used in the Contact feature:
| Parameter | Description | Example |
|---|---|---|
INDEX |
Indicates the position of an item in a list. The specified INDEX must be within the range of the number of items in the list. |
1 - refers to the first item in a list |
NAME |
Refers to the Contact name. | John Doe |
[PHONE_NUMBER] |
(Optional) Refers to the phone number of a contact. Phone numbers must consist of only numbers, and can be of any length. | 999 |
[EMAIL] |
(Optional) Refers to the email address of a contact. Emails should be in the format local-part@domain.The local-part can only contain:<ul><li>Alphanumeric characters, and</li><li>The following special characters:!#$%&'*+-/=?^_{}~</li></ul>The domain can only contain:<ul><li>At least 2 characters</li><li>Alphanumeric characters</li><li>The following special characters in between: dash -, and period .</li><li>Start and end must be alphanumeric characters</li></ul> |
johnDoe925@example.com |
[TAG] |
(Optional) Tags are a way to group any number of contacts under a similar label. You can add as many tags as you want. Tagging a contact with a CODE will allow you to view the contact under the corresponding module tab. Note: if the provided module code doesn’t exist, the tag will just be treated as another ordinary tag without any problems. |
n/John Doe t/MA1101R t/groupmate |
5.4.2 Add a Contact C add
A new semester has started and you want to keep track of your new classmates. This is the command to add a new contact.
Format: C add n/NAME [p/PHONE_NUMBER] [e/EMAIL] [t/TAG]...
![]() Note:
Note:
- Duplicate email addresses (2 or more contacts with the same email address) can exist within TrackIt@NUS, so please always ensure that you are entering the correct email address.
Examples: To add a new contact John Doe, your MA1101R TA, follow these instructions.
| Parameter | Example |
|---|---|
NAME |
John Doe |
PHONE_NUMBER |
98765432 |
EMAIL |
johndoe@gmail.com |
TAG |
MA1101R, TA
|
- To add, type
C add n/John Doe p/98765432 e/johndoe@gmail.com t/MA1101R t/TAinto the command box. - Press
Enterto execute. - The result display will show the success message and you will see your new contact in the Contacts tab, and the MA1101R tab (if CODE field was filled).
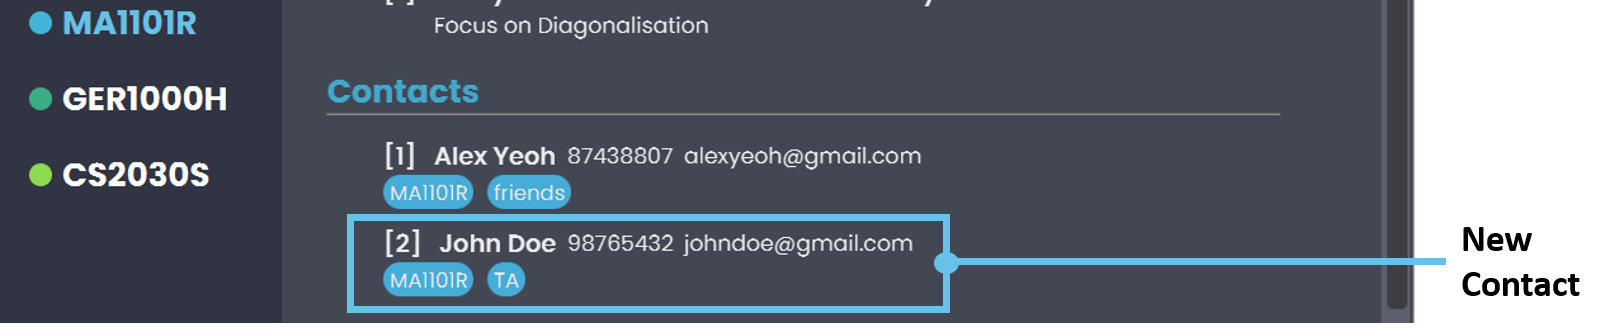 Figure 16 - Example outcome of adding a contact
5.4.3 Edit a Contact C edit
After adding your new contact John Doe to TrackIt@NUS, maybe you realised you spelled his name wrong, or you want to update his phone number. The edit command is what you should use to do so.
Format: C edit INDEX [n/NAME] [p/PHONE_NUMBER] [e/EMAIL] [t/TAG]...
![]() Note:
Note:
- The parameters
n/NAME,p/PHONE_NUMBER,e/EMAILandt/TAGare optional; however, at least one parameter must be provided (i.e.C edit 1is not a valid command). - When editing tags, existing tags of contact will be removed (i.e. adding tags is not cumulative).
- All tags can be removed by typing
t/
Example: To change John Doe’s name to Johnny Depp, follow these instructions.
| Parameter | Example |
|---|---|
INDEX |
2 |
NAME |
Johnny Depp |
- Look for the lesson’s index which is on the left of the lesson.
- To add, type
C edit 2 n/Johnny Deppinto the command box. - Press
Enterto execute. - The Result Display will show the success message and you should see your lesson updated in the Upcoming tab as well as the MA1101R module tab.
 Figure 17 - Example outcome of editing a contact
5.4.4 Delete a Contact C delete
Congratulations! You have finished reading the module MA1101R and now wish to delete your TA Johnny Depp’s contact from TrackIt@NUS. This is the command to do so.
Format: C delete INDEX
Examples: To delete Johnny Depp’s contact, follow these instructions.
| Parameter | Example |
|---|---|
INDEX |
2 |
- To add, type
C edit 2 n/Johnny Deppinto the command box. - Press
Enterto execute. - The Result Display will show the success message and you should see Johnny Depp’s contact disappear from both the Contacts tab and MA1101R tab.
 Figure 18 - Example outcome of deleting a contact
5.5 Getting help
For: Navigating to the help tab for a command summary list.
Format: help
Examples: help
5.6 Exiting the app
For: Exit the program.
Format: exit
Examples: exit
6. FAQ
(Contributed by Wei Hong)
Q: Will my data be saved in the computer?
A: TrackIt@NUS data is saved in the hard disk automatically after any command that changes the data. There is no need to save manually.
Q: How do I transfer my data to another computer?
A: Install the app in the other computer and overwrite the empty data file it creates with the file that contains the data of your previous TrackIt@NUS home folder.
Q: How many modules can I add in total?
A: The current limit is 10 modules.
Q: The pandemic is not over and my lessons are still online. Can I include Zoom links in my lessons address field ?
A: Unfortunately, as of v1.4, the ADDRESS field supports up to 20 char. Clickable Zoom links may be added in subsequent versions.
Q: Can I add a biweekly lesson in the module?
A: Unfortunately, as of v1.4, only weekly lessons are supported. Biweekly and monthly lessons may be added in subsequent versions.
Q: Why can I add a lesson that clashes with my existing lessons? Is this a bug?
A: This is because there are instances where students are granted a case-by-case approval to overload modules with concurrent lessons. These students should have the option to include concurrent lessons.
Q: Why is there a need for the Contacts Tab when I can already add contacts in the Module Tab?
A: It is meant for you to add contacts that may not be taking the same modules as you but they are still relevant in your social life and/or studies. Please refer to the Contacts Tab for more details.
7. Glossary
(Contributed by Wei Hong)
| Term | Explanation |
|---|---|
| Command Line Interface (CLI) | This refers to a text-based user interface to view and manage computer files. Click here for more information! |
| Graphical User Interface (GUI) | This refers to a system of interactive visual components for computer software. Click here for more information! |
| Index | This refers to the specific position of item in the list. This list can be a Lesson, Task or Contact list. |
| Tag | Tags are a way to group any number of contacts under a similar label. You can add as many tags as you want |
8. Command Summary
(Contributed by Wei Hong)
Module
| Command | Format | Example |
|---|---|---|
| add | M add m/CODE n/NAME |
M add m/CS1231S n/Discrete Structures |
| edit | M edit CODE [m/NEW_CODE] [n/NAME] |
M edit CS1231S m/CS1231 |
| delete | M delete CODE |
M delete CS1231 |
Lesson
| Command | Format | Example |
|---|---|---|
| add | L add m/CODE t/TYPE d/DATE a/ADDRESS |
L add m/CS2103T t/tutorial d/Wed 14:00-15:00 a/COM1 |
| edit | L edit INDEX [m/CODE] [t/TYPE] [d/DATE] [a/ADDRESS] |
L edit 1 a/LT17 |
| delete | L delete INDEX |
L delete 1 |
Task
| Command | Format | Example |
|---|---|---|
| add | T add n/NAME d/DATE [m/CODE] [r/REMARK] |
T add n/Assignment 1 d/20/11/2020 r/Focus on Chapters 1-3 |
| edit | T edit INDEX [n/NAME] [d/DATE] [m/CODE] [r/REMARK] |
T edit 1 n/Finish Assignment |
| delete | T delete INDEX |
T delete 1 |
Contact
| Command | Format | Example |
|---|---|---|
| add | C add n/NAME p/PHONE_NUMBER e/EMAIL [t/TAG]... |
C add n/John Doe p/98765432 e/johndoe@gmail.com t/MA1101R t/TA |
| edit | C edit INDEX [n/NAME] [p/PHONE_NUMBER] [e/EMAIL] [t/TAG]... |
C edit 2 n/Johnny Depp |
| delete | C delete INDEX |
C delete 2 |
General
| Command | Format |
|---|---|
| help | help |
| exit | exit |
Congratulations! You have come to the end of TrackIT@NUS user guide. Now you are one step closer to productivity. Remember, track less, and live more 😊!
